


Your heating system is running nonstop, but the air coming out of the indoor vent suddenly feels like a cool breeze on a freezing night. That unexpected draft, often accompanied by a loud hissing or swooshing noise from the outdoor unit, is enough to make any homeowner panic. When the temperature drops rapidly, you rely on your equipment to keep your family safe and warm. If you are searching for local service expertise and area tips to troubleshoot this exact problem, you are not alone. Many homeowners assume their equipment has suffered a catastrophic failure the moment they feel that cold draft.
To fully understand how modern heat pump systems operate, it helps to look at the built-in safeguards designed to protect them.
The sudden shift from warm air to a cool breeze during a cold snap is highly alarming. You might walk past your indoor air handler and notice it is barely pushing out air, and the air it does push feels distinctly unheated. Outside, the unit might sound like it is releasing a massive burst of pressurized air. In Mount Uniacke and surrounding maritime areas, these symptoms frequently point to a normal, essential protective function rather than a broken unit. Before you assume the worst and turn off your breaker, it is important to understand the mechanics of the defrost cycle—a standard feature of modern climate control that keeps your equipment running safely through the winter.
To extract heat from freezing outdoor air, the refrigerant inside your outdoor coil must be even colder than the air outside. Because of this massive temperature difference, moisture in the air condenses and freezes directly onto the metal fins of the outdoor unit. If left unchecked, this frost would eventually encase the entire unit in a solid block of ice, choking off airflow and destroying the compressor. To prevent this, your system enters a defrost cycle.
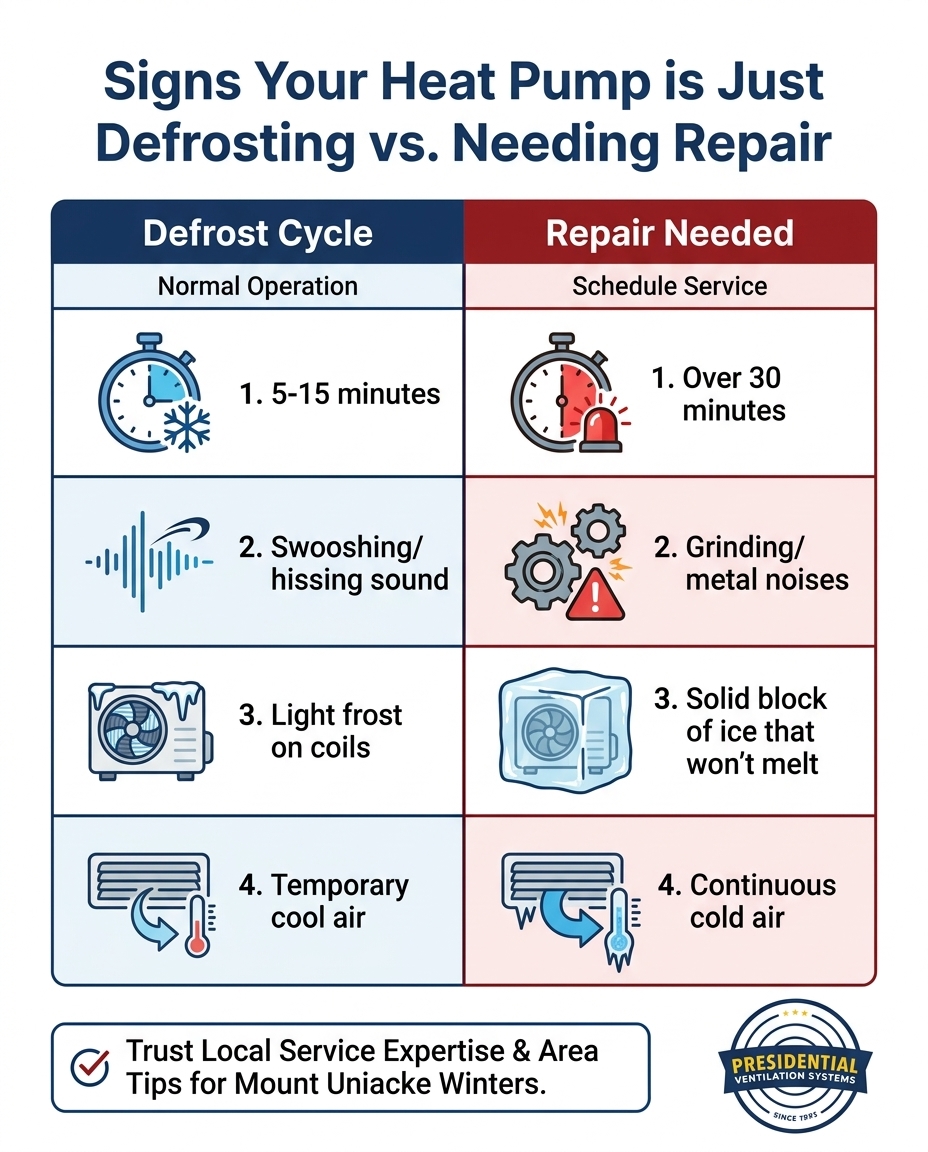
The defrost cycle is a temporary, automated process designed to melt accumulated ice off the outdoor coil. When sensors detect that ice is restricting airflow or that the coil temperature has dropped too low, the system briefly reverses its operation. During a Nova Scotia winter deep freeze, this built-in mechanism is the only thing preventing severe, costly damage to the internal components.
The secret to this process is a component called the reversing valve. When the system needs to defrost, this valve shifts the flow of refrigerant. Instead of pulling heat from the outside and bringing it inside, the system temporarily pulls heat from your home and sends it to the outdoor unit. This flood of hot refrigerant quickly melts the frost off the outdoor fins.
Most defrost cycles last between 5 to 15 minutes. Once the outdoor sensors confirm the ice has melted and the coil is back to a safe operating temperature, the reversing valve shifts again, and the system automatically returns to normal heating mode. If you are considering a new ductless heat pump installation, knowing how this cycle works will save you a lot of unnecessary stress during your first winter with the system.
If you have ever spoken to someone living in a dry, inland climate, they might tell you their system rarely goes into defrost mode. However, weather patterns here are entirely different. Frost accumulates fastest when outdoor temperatures hover between -5°C and 5°C and are combined with high relative humidity.
In Mount Uniacke and surrounding maritime areas, the air holds a massive amount of moisture, even in the dead of winter. When this damp coastal air meets the freezing metal of your outdoor coil, the moisture freezes on contact almost instantly. This rapid accumulation means your system must defrost far more frequently than a unit operating in a dry, inland prairie climate.
Nova Scotia's high coastal humidity and freezing temperatures create the perfect storm for frost buildup. Frequent defrosting is a sign that your system is working incredibly hard to adapt to the local environment, not a sign of failure. It is successfully managing the heavy moisture load of the maritime climate. Because of these unique regional weather patterns, robust, cold-climate specific operation is absolutely essential. If you are researching equipment that can handle these specific local conditions, a comprehensive guide to the best ductless heat pumps can help you identify models built specifically for high-moisture, low-temperature environments.
When a system shifts into defrost mode, it does not do so quietly. The sudden noises can be startling, especially if they wake you up in the middle of the night during a Nova Scotia winter deep freeze. Learning to differentiate between normal operational noises and actual mechanical warning signs is a critical skill for any homeowner.
When the reversing valve shifts direction to start the defrost cycle, the sudden equalization of refrigerant pressure causes a loud "swoosh" or hissing sound. Shortly after, you might hear popping or cracking noises. This is simply the plastic casing and metal components of the indoor unit expanding and contracting as the temperature rapidly changes from hot to cool.
Normal Defrost Sounds vs. Mechanical Warning Signs
• Loud swoosh or hissing — Likely Cause: Reversing valve shifting pressure — Required Action: None. Normal operation.
• Popping or cracking — Likely Cause: Thermal expansion of plastic/metal — Required Action: None. Normal operation.
• Harsh metal-on-metal grinding — Likely Cause: Failing fan motor or compressor bearing — Required Action: Turn off system. Call for service.
• Continuous loud vibrating — Likely Cause: Unbalanced fan blade or heavy ice block — Required Action: Turn off system. Call for service.
Always listen to the duration of the noise. Normal defrost sounds are temporary and only last for the few minutes the cycle is active. If a grinding or vibrating noise persists long after the cycle should have ended, that points to a true mechanical issue requiring professional attention.
The most alarming symptom of the defrost cycle is the sudden wave of cold air blowing inside your home. To melt outdoor ice, the system must temporarily act like an air conditioner. It pulls ambient heat from inside the home and pumps it outside to the frozen coil.
During this process, the indoor fan usually stops entirely to prevent chilling the room. However, some models allow the indoor fan to continue running at a very low speed. This circulates unheated room air, which creates a wind-chill effect that feels like a cold draft. This is a deliberate design choice by manufacturers to keep air moving across the indoor sensors so the system knows exactly when to switch back to heating.
Rest assured, the system will automatically reverse back to heating mode once the outdoor coil reaches the correct temperature. While this temporary discomfort can be annoying, it is infinitely better than the alternative: a completely frozen, inoperable system that provides no heat at all. Whether you have ductless units or larger ducted heat pump options, this physical reality of heat transfer applies across the board in Mount Uniacke and surrounding maritime areas.
While frequent defrosting is normal in our climate, there is a distinct line between a healthy cycle and a system crying out for help. Knowing when to request professional service prevents you from paying for an unnecessary emergency visit while protecting your equipment from total failure.
1. Time the cycle: If the system blows cold air for longer than 30 to 40 minutes without returning to heat, it may be stuck in defrost mode.
2. Inspect the outdoor unit: Look for heavy, solid ice buildup that encases the entire unit and does not melt away after an hour. This indicates a potential refrigerant leak, a bad defrost control board, or a failing sensor.
3. Check for airflow restrictions: Ensure snow drifts or debris are not blocking the outdoor fan, which prevents the system from breathing properly.
Accurate diagnostics are critical because symptoms can easily be misinterpreted. A typical pattern we see in the industry involves systems being incorrectly condemned. For example, one local homeowner reached out last fall when their mini splits were not working properly and constantly blowing cool air. A previous company had misdiagnosed the issue as a total compressor failure and charged for ineffective service. A proper diagnostic check quickly identified a simple sensor fault, confirmed warranty coverage, and arranged for the correct repair. Accurate troubleshooting during a Nova Scotia winter deep freeze saves time, money, and massive frustration.
Important safety note: Never use sharp tools, ice picks, or hot water to manually remove ice from the outdoor unit. You can easily puncture the pressurized refrigerant lines, turning a minor sensor issue into a catastrophic, expensive repair.
• Continuous cold air: The system blows cold air indoors endlessly, never returning to heat.
• Missing sounds: You notice a complete lack of the characteristic swooshing sound when the defrost cycle should normally start.
• Mode failure: The system fails to switch between heating and cooling modes entirely, remaining stuck in one setting regardless of thermostat adjustments.
While you cannot control the weather, you can absolutely control how well your equipment handles it. Proactive measures and correct setup dramatically reduce the severity of winter frost issues, helping your system complete its defrost cycles faster and more efficiently.
Proper installation is the first line of defense. The outdoor unit must be elevated securely above the average regional snowfall line. If a unit is installed too low, the water that melts off the coils during defrost has nowhere to drain. It pools at the base of the unit, refreezes, and eventually builds up into the fan blades. Strategic placement is also vital. The unit must be protected from prevailing winter winds that drive moisture directly into the coils.
At Presidential Ventilation Systems Ltd., our deep understanding of Maritime weather dictates exactly how we size, place, and mitigate wind exposure for every installation. We know firsthand that a unit placed directly in the path of coastal gales will spend half its life in defrost mode. Proper wind baffles and strategic location planning are non-negotiable in this region.
Routine maintenance plays an equally critical role. A dirty indoor filter restricts airflow, causing the indoor coil to run colder than it should, which throws off the entire system's temperature balance. Professional coil inspections ensure the outdoor fins are clean and capable of transferring heat efficiently. Enrolling in a preventative maintenance plan ensures a professional regularly clears debris, checks sensor calibrations, and confirms the reversing valve is operating smoothly before the freezing weather hits Mount Uniacke and surrounding maritime areas.
Waking up to a chilly house and strange noises is never pleasant, but understanding your equipment brings immediate peace of mind. Temporary cold air and loud swooshing noises are usually signs of a healthy system actively protecting itself from ice damage.
Because of our heavy regional coastal moisture, these cycles are simply a normal part of daily winter operation. Your system is working exactly as designed to keep your home comfortable despite the harsh outdoor conditions. However, if your system exhibits the true warning signs discussed—such as continuous cold air for over an hour, harsh grinding noises, or solid ice blocks that refuse to melt—it is time to seek help.
If you are ever in doubt during a Nova Scotia winter deep freeze, reaching out for a professional diagnostic is always the safest choice. Consult with local experts to get the answers and peace of mind you deserve, ensuring your home stays warm safely all season long.
Why is my heat pump making a swooshing noise?
The swooshing noise occurs when the reversing valve shifts direction to begin a defrost cycle. This sudden change in refrigerant flow causes a rapid equalization of pressure, resulting in a loud hissing or swooshing sound. It is a completely normal part of the system's operation and usually only lasts for a few seconds at the start and end of the cycle.
Is it normal for a heat pump to blow cold air in winter?
Yes, it is normal for short periods. During a defrost cycle, the system temporarily operates in cooling mode to pull heat from inside your home and use it to melt ice off the outdoor unit. This process typically lasts between 5 to 15 minutes before the system automatically switches back to pushing warm air.
When should I call a professional for my heat pump in winter?
You should call a professional if the system blows cold air continuously for more than 40 minutes without returning to heating mode. Additionally, reach out for service if you hear metal-on-metal grinding noises, or if the outdoor unit becomes encased in a solid block of ice that does not melt away on its own.
How long does a heat pump defrost cycle last?
A typical defrost cycle lasts anywhere from 5 to 15 minutes, depending on the severity of the ice buildup and the outdoor temperature. Once the sensors detect that the outdoor coil is free of frost and back to a safe temperature, the cycle ends automatically.
How often should a heat pump go into defrost mode?
The frequency depends heavily on the weather. In dry, extremely cold weather, it may rarely happen. However, when outdoor temperatures are between -5°C and 5°C with high coastal humidity, the system may need to defrost every 60 to 90 minutes to keep the coils clear of rapid frost accumulation.
At what temperature do heat pumps freeze up?
Frost can begin to accumulate on the outdoor coils any time the ambient air temperature drops below about 5°C, provided there is enough moisture in the air. Because the refrigerant inside the coil is much colder than the outside air, condensation freezes on contact even if the outdoor temperature is slightly above freezing.
Can I manually stop my heat pump from defrosting?
No, you should never attempt to bypass or stop a defrost cycle. This is a critical, automated safety feature. Interrupting the cycle will cause ice to quickly build up and crush the delicate aluminum fins, ultimately leading to a catastrophic and expensive compressor failure.


Your heating system is running nonstop, but the air coming out of the indoor vent suddenly feels like a cool breeze on a freezing night. That unexpected draft, often accompanied by a loud hissing or swooshing noise from the outdoor unit, is enough to make any homeowner panic. When the temperature drops rapidly, you rely on your equipment to keep your family safe and warm. If you are searching for local service expertise and area tips to troubleshoot this exact problem, you are not alone. Many homeowners assume their equipment has suffered a catastrophic failure the moment they feel that cold draft.
To fully understand how modern heat pump systems operate, it helps to look at the built-in safeguards designed to protect them.
The sudden shift from warm air to a cool breeze during a cold snap is highly alarming. You might walk past your indoor air handler and notice it is barely pushing out air, and the air it does push feels distinctly unheated. Outside, the unit might sound like it is releasing a massive burst of pressurized air. In Mount Uniacke and surrounding maritime areas, these symptoms frequently point to a normal, essential protective function rather than a broken unit. Before you assume the worst and turn off your breaker, it is important to understand the mechanics of the defrost cycle—a standard feature of modern climate control that keeps your equipment running safely through the winter.
To extract heat from freezing outdoor air, the refrigerant inside your outdoor coil must be even colder than the air outside. Because of this massive temperature difference, moisture in the air condenses and freezes directly onto the metal fins of the outdoor unit. If left unchecked, this frost would eventually encase the entire unit in a solid block of ice, choking off airflow and destroying the compressor. To prevent this, your system enters a defrost cycle.
The defrost cycle is a temporary, automated process designed to melt accumulated ice off the outdoor coil. When sensors detect that ice is restricting airflow or that the coil temperature has dropped too low, the system briefly reverses its operation. During a Nova Scotia winter deep freeze, this built-in mechanism is the only thing preventing severe, costly damage to the internal components.
The secret to this process is a component called the reversing valve. When the system needs to defrost, this valve shifts the flow of refrigerant. Instead of pulling heat from the outside and bringing it inside, the system temporarily pulls heat from your home and sends it to the outdoor unit. This flood of hot refrigerant quickly melts the frost off the outdoor fins.
Most defrost cycles last between 5 to 15 minutes. Once the outdoor sensors confirm the ice has melted and the coil is back to a safe operating temperature, the reversing valve shifts again, and the system automatically returns to normal heating mode. If you are considering a new ductless heat pump installation, knowing how this cycle works will save you a lot of unnecessary stress during your first winter with the system.
If you have ever spoken to someone living in a dry, inland climate, they might tell you their system rarely goes into defrost mode. However, weather patterns here are entirely different. Frost accumulates fastest when outdoor temperatures hover between -5°C and 5°C and are combined with high relative humidity.
In Mount Uniacke and surrounding maritime areas, the air holds a massive amount of moisture, even in the dead of winter. When this damp coastal air meets the freezing metal of your outdoor coil, the moisture freezes on contact almost instantly. This rapid accumulation means your system must defrost far more frequently than a unit operating in a dry, inland prairie climate.
Nova Scotia's high coastal humidity and freezing temperatures create the perfect storm for frost buildup. Frequent defrosting is a sign that your system is working incredibly hard to adapt to the local environment, not a sign of failure. It is successfully managing the heavy moisture load of the maritime climate. Because of these unique regional weather patterns, robust, cold-climate specific operation is absolutely essential. If you are researching equipment that can handle these specific local conditions, a comprehensive guide to the best ductless heat pumps can help you identify models built specifically for high-moisture, low-temperature environments.
When a system shifts into defrost mode, it does not do so quietly. The sudden noises can be startling, especially if they wake you up in the middle of the night during a Nova Scotia winter deep freeze. Learning to differentiate between normal operational noises and actual mechanical warning signs is a critical skill for any homeowner.
When the reversing valve shifts direction to start the defrost cycle, the sudden equalization of refrigerant pressure causes a loud "swoosh" or hissing sound. Shortly after, you might hear popping or cracking noises. This is simply the plastic casing and metal components of the indoor unit expanding and contracting as the temperature rapidly changes from hot to cool.
Normal Defrost Sounds vs. Mechanical Warning Signs
• Loud swoosh or hissing — Likely Cause: Reversing valve shifting pressure — Required Action: None. Normal operation.
• Popping or cracking — Likely Cause: Thermal expansion of plastic/metal — Required Action: None. Normal operation.
• Harsh metal-on-metal grinding — Likely Cause: Failing fan motor or compressor bearing — Required Action: Turn off system. Call for service.
• Continuous loud vibrating — Likely Cause: Unbalanced fan blade or heavy ice block — Required Action: Turn off system. Call for service.
Always listen to the duration of the noise. Normal defrost sounds are temporary and only last for the few minutes the cycle is active. If a grinding or vibrating noise persists long after the cycle should have ended, that points to a true mechanical issue requiring professional attention.
The most alarming symptom of the defrost cycle is the sudden wave of cold air blowing inside your home. To melt outdoor ice, the system must temporarily act like an air conditioner. It pulls ambient heat from inside the home and pumps it outside to the frozen coil.
During this process, the indoor fan usually stops entirely to prevent chilling the room. However, some models allow the indoor fan to continue running at a very low speed. This circulates unheated room air, which creates a wind-chill effect that feels like a cold draft. This is a deliberate design choice by manufacturers to keep air moving across the indoor sensors so the system knows exactly when to switch back to heating.
Rest assured, the system will automatically reverse back to heating mode once the outdoor coil reaches the correct temperature. While this temporary discomfort can be annoying, it is infinitely better than the alternative: a completely frozen, inoperable system that provides no heat at all. Whether you have ductless units or larger ducted heat pump options, this physical reality of heat transfer applies across the board in Mount Uniacke and surrounding maritime areas.
While frequent defrosting is normal in our climate, there is a distinct line between a healthy cycle and a system crying out for help. Knowing when to request professional service prevents you from paying for an unnecessary emergency visit while protecting your equipment from total failure.
1. Time the cycle: If the system blows cold air for longer than 30 to 40 minutes without returning to heat, it may be stuck in defrost mode.
2. Inspect the outdoor unit: Look for heavy, solid ice buildup that encases the entire unit and does not melt away after an hour. This indicates a potential refrigerant leak, a bad defrost control board, or a failing sensor.
3. Check for airflow restrictions: Ensure snow drifts or debris are not blocking the outdoor fan, which prevents the system from breathing properly.
Accurate diagnostics are critical because symptoms can easily be misinterpreted. A typical pattern we see in the industry involves systems being incorrectly condemned. For example, one local homeowner reached out last fall when their mini splits were not working properly and constantly blowing cool air. A previous company had misdiagnosed the issue as a total compressor failure and charged for ineffective service. A proper diagnostic check quickly identified a simple sensor fault, confirmed warranty coverage, and arranged for the correct repair. Accurate troubleshooting during a Nova Scotia winter deep freeze saves time, money, and massive frustration.
Important safety note: Never use sharp tools, ice picks, or hot water to manually remove ice from the outdoor unit. You can easily puncture the pressurized refrigerant lines, turning a minor sensor issue into a catastrophic, expensive repair.
• Continuous cold air: The system blows cold air indoors endlessly, never returning to heat.
• Missing sounds: You notice a complete lack of the characteristic swooshing sound when the defrost cycle should normally start.
• Mode failure: The system fails to switch between heating and cooling modes entirely, remaining stuck in one setting regardless of thermostat adjustments.
While you cannot control the weather, you can absolutely control how well your equipment handles it. Proactive measures and correct setup dramatically reduce the severity of winter frost issues, helping your system complete its defrost cycles faster and more efficiently.
Proper installation is the first line of defense. The outdoor unit must be elevated securely above the average regional snowfall line. If a unit is installed too low, the water that melts off the coils during defrost has nowhere to drain. It pools at the base of the unit, refreezes, and eventually builds up into the fan blades. Strategic placement is also vital. The unit must be protected from prevailing winter winds that drive moisture directly into the coils.
At Presidential Ventilation Systems Ltd., our deep understanding of Maritime weather dictates exactly how we size, place, and mitigate wind exposure for every installation. We know firsthand that a unit placed directly in the path of coastal gales will spend half its life in defrost mode. Proper wind baffles and strategic location planning are non-negotiable in this region.
Routine maintenance plays an equally critical role. A dirty indoor filter restricts airflow, causing the indoor coil to run colder than it should, which throws off the entire system's temperature balance. Professional coil inspections ensure the outdoor fins are clean and capable of transferring heat efficiently. Enrolling in a preventative maintenance plan ensures a professional regularly clears debris, checks sensor calibrations, and confirms the reversing valve is operating smoothly before the freezing weather hits Mount Uniacke and surrounding maritime areas.
Waking up to a chilly house and strange noises is never pleasant, but understanding your equipment brings immediate peace of mind. Temporary cold air and loud swooshing noises are usually signs of a healthy system actively protecting itself from ice damage.
Because of our heavy regional coastal moisture, these cycles are simply a normal part of daily winter operation. Your system is working exactly as designed to keep your home comfortable despite the harsh outdoor conditions. However, if your system exhibits the true warning signs discussed—such as continuous cold air for over an hour, harsh grinding noises, or solid ice blocks that refuse to melt—it is time to seek help.
If you are ever in doubt during a Nova Scotia winter deep freeze, reaching out for a professional diagnostic is always the safest choice. Consult with local experts to get the answers and peace of mind you deserve, ensuring your home stays warm safely all season long.
Why is my heat pump making a swooshing noise?
The swooshing noise occurs when the reversing valve shifts direction to begin a defrost cycle. This sudden change in refrigerant flow causes a rapid equalization of pressure, resulting in a loud hissing or swooshing sound. It is a completely normal part of the system's operation and usually only lasts for a few seconds at the start and end of the cycle.
Is it normal for a heat pump to blow cold air in winter?
Yes, it is normal for short periods. During a defrost cycle, the system temporarily operates in cooling mode to pull heat from inside your home and use it to melt ice off the outdoor unit. This process typically lasts between 5 to 15 minutes before the system automatically switches back to pushing warm air.
When should I call a professional for my heat pump in winter?
You should call a professional if the system blows cold air continuously for more than 40 minutes without returning to heating mode. Additionally, reach out for service if you hear metal-on-metal grinding noises, or if the outdoor unit becomes encased in a solid block of ice that does not melt away on its own.
How long does a heat pump defrost cycle last?
A typical defrost cycle lasts anywhere from 5 to 15 minutes, depending on the severity of the ice buildup and the outdoor temperature. Once the sensors detect that the outdoor coil is free of frost and back to a safe temperature, the cycle ends automatically.
How often should a heat pump go into defrost mode?
The frequency depends heavily on the weather. In dry, extremely cold weather, it may rarely happen. However, when outdoor temperatures are between -5°C and 5°C with high coastal humidity, the system may need to defrost every 60 to 90 minutes to keep the coils clear of rapid frost accumulation.
At what temperature do heat pumps freeze up?
Frost can begin to accumulate on the outdoor coils any time the ambient air temperature drops below about 5°C, provided there is enough moisture in the air. Because the refrigerant inside the coil is much colder than the outside air, condensation freezes on contact even if the outdoor temperature is slightly above freezing.
Can I manually stop my heat pump from defrosting?
No, you should never attempt to bypass or stop a defrost cycle. This is a critical, automated safety feature. Interrupting the cycle will cause ice to quickly build up and crush the delicate aluminum fins, ultimately leading to a catastrophic and expensive compressor failure.
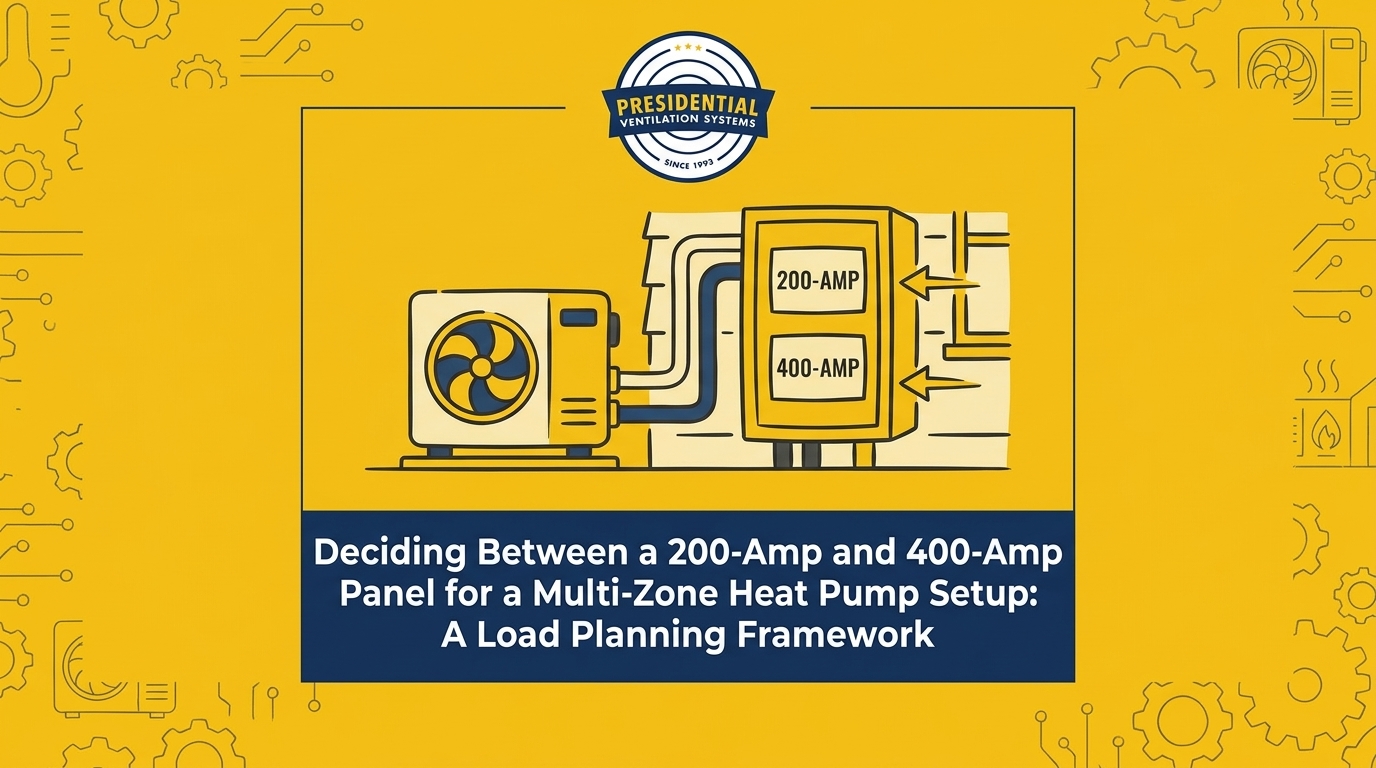
When it comes to new construction, a common myth is that a standard electrical service is automatically robust enough to handle anything a modern homeowner throws at it, making the process of Deciding Between a 200-Amp and 400-Amp Panel for a Multi-Zone Heat Pump Setup feel like an afterthought. The reality is far more complex. A standard 200-amp service has been the baseline for decades, but total home electrification has drastically shifted the goalposts. Today's custom homes are no longer relying on fossil fuels for heating, cooking, or transportation. Instead, they are powered entirely by electricity, which requires a fundamental shift in how we plan residential infrastructure.
The specific challenge lies in balancing total home electrification without overloading the system. You might assume that because your appliances are high-efficiency, they draw less power overall. While they use energy more effectively, the sheer number of high-draw systems operating simultaneously—like induction ranges, electric water heaters, and comprehensive Heat Pump Systems—creates a massive cumulative demand. If this demand exceeds the capacity of the main breaker, you face nuisance tripping, system lockouts, or the need for a highly disruptive electrical overhaul shortly after moving in.
At Presidential Ventilation Systems Ltd., we've found this creates a critical decision point for anyone planning Mount Uniacke custom home builds. Evaluating your current and future power needs during the blueprint phase is the only way to avoid expensive retrofits once the drywall is up and the landscaping is finished. Electrical load planning is a strict professional requirement dictated by national safety codes, not a casual DIY estimate. Getting it right from day one ensures that your home functions smoothly, safely, and efficiently, regardless of how many systems are running at once.
To understand why upgrading your electrical service might be necessary, you have to break down the actual electrical demands of modern, high-efficiency home systems. This process is governed by strict regulations, specifically the Canadian Electrical Code (CEC) Rule 8-200, which dictates how residential load calculations must be performed. Our electrical and HVAC teams know that a licensed electrician doesn't just guess your power needs; they use a precise mathematical formula to ensure safety and compliance.
1. Assess the square footage baseline: The CEC assigns a base wattage requirement based on the livable square footage of the home to cover general lighting and standard receptacles.
2. Factor in major appliances: Dedicated circuits for induction stoves, electric dryers, and electric water heaters are added to the calculation, often carrying a demand factor that accounts for the reality that not everything runs at 100% capacity simultaneously.
3. Calculate HVAC loads: This is where the math gets serious. The amperage requirements for large-scale heating and cooling systems are significant. Multi-zone configurations draw substantial power, especially when multiple compressor units are required to service a large footprint.
4. Add electric vehicle infrastructure: Integrating a Level 2 electric vehicle charger adds a massive continuous load. These chargers typically require dedicated 40-50 amp circuits, and unlike an oven that cycles on and off, an EV charger pulls maximum current for hours at a time.
The cumulative effect of running these systems simultaneously alongside standard household appliances is what pushes a standard panel to its absolute limit. When you combine Multi-zone heat pump + Level 2 EV charger loads, you are consuming a vast portion of a 200-amp panel's available capacity before you even turn on a light switch. This is a pattern we see often, which is why thorough planning is essential for anyone installing Multi-Zone Ductless Heat Pumps in a fully electrified home.
Summing up the baseline requirements for a modern home reveals just how quickly amperage is consumed. An induction stove might require a 40-amp breaker, an electric dryer needs 30 amps, and an electric water heater requires another 30 amps. While the CEC applies a demand factor to these non-continuous loads (assuming you won't bake a turkey, dry three loads of laundry, and take a long shower all at the exact same moment), the baseline draw remains exceptionally high.
The critical distinction in residential planning is understanding continuous versus non-continuous loads. A continuous load operates for three hours or more at a time. EV chargers and heating systems fall into this category. The electrical code requires that continuous loads only utilize 80% of a breaker's rated capacity to prevent overheating. This means a 50-amp circuit for an EV charger can only safely provide 40 amps of continuous power, further complicating the load calculation and eating into the panel's overall budget.
The Problem: In mild climates, a heat pump operates with incredible efficiency, drawing a relatively moderate and steady amount of power to move heat from the outside air into your home. However, local climate conditions drastically impact peak electrical loads. When temperatures plummet, the electrical math changes completely.
The Cause: In our years of installing systems across Nova Scotia, we always focus heavily on the impact of our cold winters here. Robust multi-zone heat pump systems draw significant continuous power to maintain indoor temperatures during deep winter freezes. As the outside air gets colder, the compressor has to work harder and longer to extract heat. More importantly, when the temperature drops below the heat pump's optimal operating range, the system relies on auxiliary electrical resistance heat strips. These heat strips function like a giant toaster inside your ductwork or air handler. They are incredibly effective at warming the air, but they require a massive amperage spike to operate. This auxiliary heat draw is often overlooked in mild-climate load calculations, but it is a harsh reality for Mount Uniacke custom home builds.
The Solution: You must factor worst-case winter scenarios into the initial electrical plan. Sufficient electrical capacity is critical for uninterrupted heating. If your load calculation only accounts for the heat pump's base compressor draw and ignores the 60-to-100-amp spike that occurs when the auxiliary heat strips activate on a -20°C night, your main breaker will trip. Planning for extreme cold ensures that your family stays warm without plunging the house into darkness.
A 200-amp service is the current standard for most new construction, and for many homes, it is perfectly adequate. However, providing a realistic assessment of when a 200-amp service is sufficient and when it falls short requires looking at the specific appliance profile of the home.
• Gas Heat, Gas Appliances, No EV — 200-Amp Panel Suitability: Highly Suitable — Potential Bottlenecks: None. Plenty of capacity for future minor additions.
• Electric Heat (Standard), Electric Appliances, No EV — 200-Amp Panel Suitability: Suitable — Potential Bottlenecks: Approaching limits during peak winter usage.
• Multi-Zone Heat Pump, Electric Appliances, One EV — 200-Amp Panel Suitability: Borderline / Requires Load Shedding — Potential Bottlenecks: Combining Multi-zone heat pump + Level 2 EV charger loads often exceeds safe continuous limits.
• Multi-Zone Heat Pump, Electric Appliances, Multiple EVs, Hot Tub — 200-Amp Panel Suitability: Inadequate — Potential Bottlenecks: Guaranteed to fail CEC load calculations without a service upgrade.
From what our technicians typically see in the field, a 200-amp panel can safely support a moderately sized home (under 2,500 square feet) with standard electric appliances and a basic HVAC system. However, adding a single heavy continuous load—like a Level 2 EV charger—to a home that already relies on electric heat can push a 200-amp panel to its absolute limit.
The load-shedding workaround: If you are locked into a 200-amp service, load-shedding devices or smart electrical panels offer a potential workaround. These devices monitor the total power draw and automatically pause specific heavy loads (like the EV charger) when the HVAC system requires maximum power. While effective, they have limitations for large properties and can be frustrating if you need your car fully charged on a cold winter morning. Ultimately, any panel evaluation and load calculation must be conducted by a licensed professional to ensure safety and code compliance.
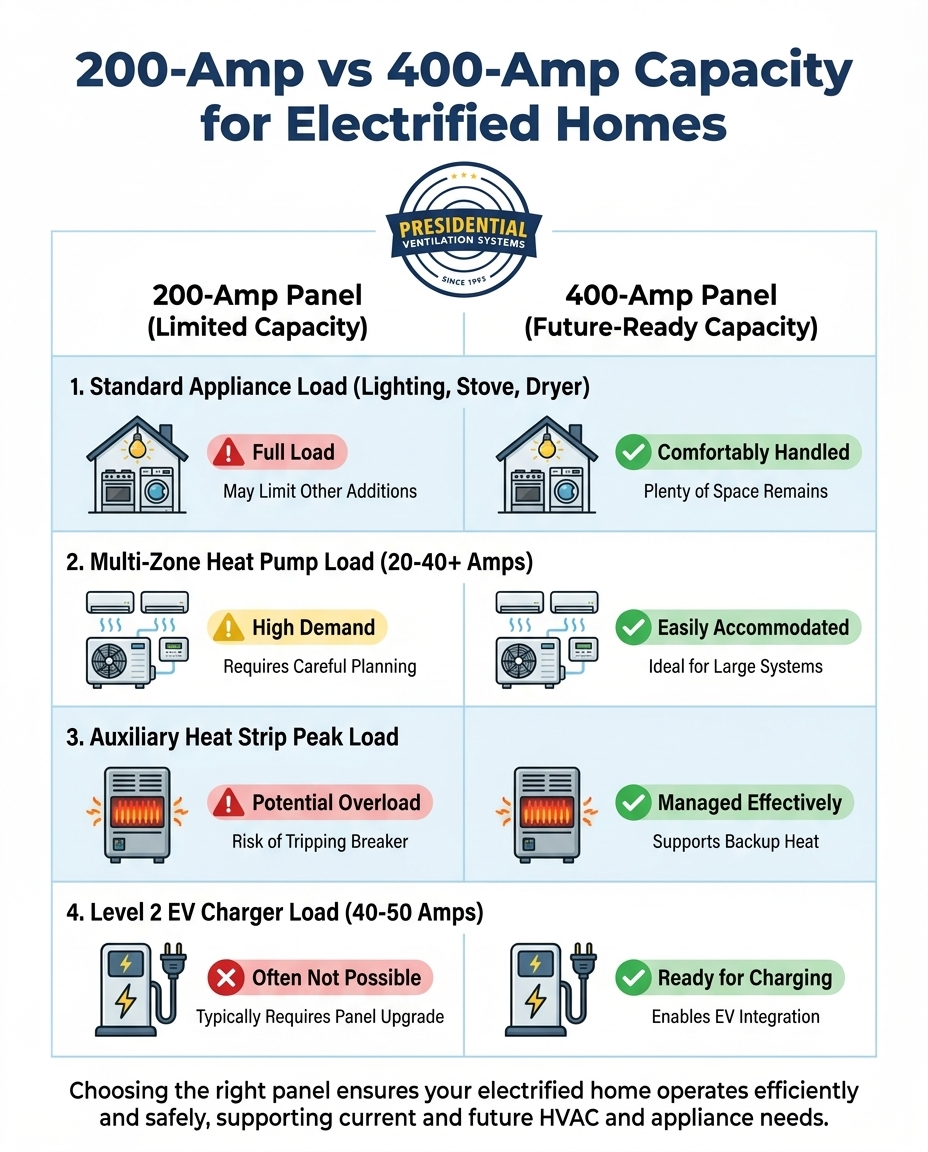
When our team's math clearly shows that 200 amps won't cut it, we recommend upgrading to a 400-amp service during the construction phase as the most logical step for Mount Uniacke custom home builds. But what exactly does this upgrade entail? In residential applications, a "400-amp service" usually consists of a 320-amp continuous meter base installed on the exterior of the home, which then feeds into two separate 200-amp breaker panels inside.
Unlocking total flexibility: This expanded capacity easily accommodates multiple heat pumps, multiple electric vehicles, and luxury amenities that draw heavy power, such as hot tubs, electrically heated outbuildings, or large commercial-style workshop equipment. With two 200-amp panels, you have an abundance of breaker spaces, ensuring that every high-draw appliance can have its own dedicated circuit without compromising the safety of the main feed.
The long-term value: The true benefit of this upgrade is future-proofing. The automotive industry is moving rapidly toward total electrification, and home heating is following suit. Installing this infrastructure during the initial build is vastly more efficient than attempting a retrofit later. While the initial investment for a larger meter base, heavier gauge wiring, and dual panels is higher upfront, it prevents costly teardowns, drywall patching, and service interruptions down the road. If you are curious about the mechanics of upgrading, understanding the factors involved in breaker panel upgrade cost and scope can help you budget accurately during the blueprint stage.
One of the most common pitfalls in custom construction is treating the HVAC system and the electrical system as entirely separate entities. Illustrating the necessity of having mechanical and electrical teams aligned is crucial to prevent installation bottlenecks. Common scenarios arise where a perfectly planned HVAC installation is suddenly halted because the existing or planned electrical panel simply lacks the capacity to power the equipment.
Holistic planning prevents these last-minute scrambles and ensures seamless system integration. When the mechanical load requirements are calculated in tandem with the electrical infrastructure, there are no surprises on installation day. For example, our team had a Mount Uniacke homeowner reach out during a summer heat wave when an issue arose with their electrical panel upgrade during a central heat pump installation. Because our teams communicated effectively, our specialist Jack helped resolve the panel concerns on-site, ensuring the electrical infrastructure could safely support the new equipment, and the system now works flawlessly.
This highlights the immense value of working with professionals who understand the complete picture. As a comprehensive HVAC installer, Presidential Ventilation Systems Ltd. understands both the mechanical load requirements and the electrical infrastructure needed to support high-efficiency systems in large custom homes. When you are balancing Multi-zone heat pump + Level 2 EV charger loads, having a unified strategy ensures your project stays on schedule and your home operates safely.
Building a custom home with robust electrical and HVAC systems is a significant investment, but there are financial incentives available that can help offset the initial outlay. Provincial and federal rebates are increasingly tied directly to home electrification and energy efficiency, rewarding homeowners who choose to move away from fossil fuels.
Unlocking incentive tiers: Upgrading electrical panels in conjunction with qualifying heat pumps often unlocks specific incentive tiers. Many government and utility programs recognize that older electrical infrastructure is a barrier to heat pump adoption. As a result, they offer valuable rebates specifically designed to help cover the cost of electrical service upgrades when they are required to support high-efficiency heating and cooling systems.
Budgeting for efficiency: Our team strongly encourages homeowners planning Mount Uniacke custom home builds to factor these rebates into their initial construction budgets. Exploring HVAC and Electrical Financing alongside available rebates can make the decision to upgrade to a 400-amp service much easier. However, it is important to note that professional installation is almost always a strict requirement to ensure all equipment meets rebate eligibility standards. DIY installations or unpermitted electrical work will immediately disqualify you from receiving these valuable financial incentives.
Is 200 amps enough for a heat pump and EV charger?
In our experience, it depends entirely on the size of the home and the other appliances in use. While a 200-amp panel can sometimes support a heat pump and a single EV charger in a smaller home with gas appliances, combining Multi-zone heat pump + Level 2 EV charger loads in a fully electrified home usually exceeds safe continuous load limits, requiring load-shedding devices or a panel upgrade.
When should I upgrade to 400 amp service for a custom build?
We advise planning for a 400-amp service during the blueprint phase if your home will feature total electrification. This includes multi-zone heating, multiple electric vehicles, an induction range, electric water heating, and luxury additions like a hot tub or heated outbuilding. Doing this during the initial build avoids highly disruptive retrofits later.
How much power does a multi-zone heat pump use?
The power draw varies significantly based on the tonnage of the system and the outdoor temperature. A standard multi-zone compressor might draw 20 to 40 amps during normal operation, but this number can spike drastically if extreme cold forces the system to activate auxiliary electrical resistance heat strips.
Do auxiliary heat strips require their own dedicated breaker?
Yes, auxiliary heat strips require their own heavy-duty dedicated circuits. Because they use electrical resistance to generate heat, they draw a massive amount of amperage—often requiring 60 to 100 amps depending on the size of the air handler—which must be carefully factored into the home's total load calculation.
Can a load calculation be done after the house is framed?
While a load calculation can technically be performed at any time, doing it after framing is incredibly risky. If the calculation reveals that a 400-amp service is required, you may have to tear out framing or alter the utility connection point, causing major delays and budget overruns. Load calculations should always be finalized during the architectural design phase.
The choice between a 200-amp and 400-amp service ultimately dictates the future flexibility, safety, and comfort of your home. Assuming that standard infrastructure will support total electrification is a risk that modern custom builds simply cannot afford. A professional load calculation that factors in your specific HVAC goals, EV charging needs, and extreme weather variables is the only way to ensure your electrical panel is up to the task.
Before you finalize your blueprints for your Mount Uniacke custom home builds, ensure your mechanical and electrical plans are perfectly aligned. We encourage you to Schedule a Consultation with our team to review your load requirements, discuss high-efficiency heat pump options, and secure a power strategy that supports your home for decades to come.
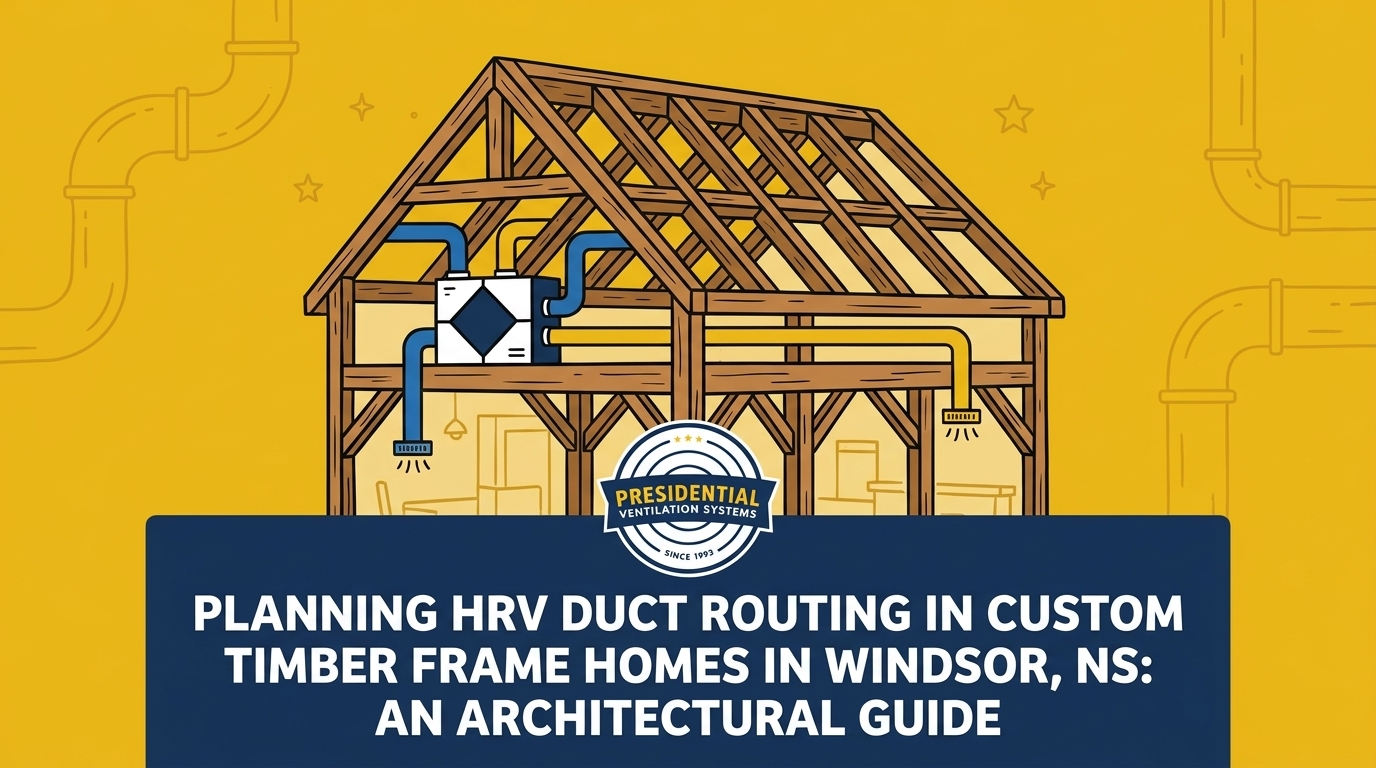
When you are planning HRV duct routing in custom timber frame homes in Windsor, you quickly run into a massive architectural roadblock: how do you hide the bulky ventilation infrastructure without ruining the gorgeous exposed beams? At Presidential Ventilation Systems Ltd., our team frequently consults on custom builds where homeowners have spent months perfecting the blueprints, carefully selecting the timber and mapping out the open-concept living spaces. The last thing you want is a network of 6-inch to 8-inch galvanized steel pipes cutting across your vaulted ceilings or dropping down in the middle of a carefully designed room.
This is the concrete problem facing many homeowners building in Windsor and rural Nova Scotia today. The rising popularity of timber frame construction brings unique structural challenges. You are forced to make critical decisions during the early construction phase, long before the drywall goes up. If you wait until the framing is finished to think about your HRV systems, you will likely face costly teardowns or be forced to accept unsightly bulkheads that ruin your interior design.
Standard routing methods simply fail in these environments. In a conventional home with truss roofs and standard attic spaces, hiding rigid HRV ductwork is straightforward. In a custom timber frame, the ceiling is the roof, and the floor joists are often exposed. This necessitates highly specialized approaches to air distribution.
• Lack of hidden cavities: Exposed beams mean no traditional ceiling voids for main trunk lines.
• Strict clearance requirements: Rigid HRV ductwork cannot be crushed or compressed to fit into impossibly tight spaces without severely restricting airflow.
• Structural integrity rules: You cannot simply drill massive 6-inch holes through load-bearing timber beams to run your ducts.
• Visual continuity: Every bulkhead or dropped ceiling introduced to hide a pipe detracts from the open, airy aesthetic you paid a premium to achieve.
Custom timber frames, particularly those enclosed with Structural Insulated Panels (SIPs), create highly airtight building envelopes. While this is fantastic for energy efficiency, it completely eliminates the natural drafts that older homes relied on to breathe. Without mechanical intervention, the air inside your home becomes stagnant, trapping moisture, odors, and indoor pollutants.
This is where local climate realities dictate your building strategy. Nova Scotia's humid maritime climate, combined with our famously cold and damp winters, drastically increases the risk of severe winter condensation in airtight custom homes, particularly during the deep freezes of January and February. When warm, moist indoor air hits the cold interior surfaces of poorly ventilated windows or exterior walls, condensation forms rapidly. Over time, this trapped moisture threatens the structural integrity of the timber itself, leading to rot, mold, and costly structural decay.
We consistently remind builders and homeowners that because of these risks, the National Building Code of Canada (NBC) Section 9.32 mandates continuous mechanical ventilation for these airtight structures. You do not have the option to simply skip the ventilation system to save your ceiling aesthetic. A Heat Recovery Ventilator (HRV) is mandatory. The HRV continuously exhausts stale, humid air from your bathrooms and kitchen while simultaneously drawing in fresh outdoor air, transferring the heat between the two streams so you do not lose your heating energy. Upgrading to high-efficiency HRV models during the construction phase can also often qualify you for valuable provincial energy rebates.
Understanding the balance between energy efficiency and healthy indoor air quality is paramount. You must plan for the system's longevity, which includes understanding the importance of maintaining your HRV system once the home is occupied. If the ductwork is routed poorly, the system will strain to move air, increasing noise levels and reducing the lifespan of the equipment.
• Natural Air Leakage — Standard Construction: High (drafty windows, wall gaps) — Airtight Timber Frame (SIPs): Extremely Low (sealed envelope)
• Moisture Accumulation — Standard Construction: Escapes through natural drafts — Airtight Timber Frame (SIPs): Trapped inside without mechanical help
• Condensation Risk in Winter — Standard Construction: Moderate to Low — Airtight Timber Frame (SIPs): Severe (requires continuous HRV)
• Ventilation Strategy — Standard Construction: Often relies on basic exhaust fans — Airtight Timber Frame (SIPs): Mandatory whole-home HRV ducting
Ventilation planning cannot be an afterthought in exposed-beam architecture. The most expensive mistake a custom home builder can make is treating the HVAC system as a secondary phase that happens after the framing is complete. By the time the timber is locked in place, your options for routing rigid HRV ductwork have shrunk to almost zero.
Early collaboration between builders, HVAC professionals, and electrical trades is absolutely essential. In our commercial and residential construction projects across Mount Uniacke and Windsor, we've seen firsthand that wires can easily bend around pipes, but rigid steel ducts cannot bend around 200-amp electrical panels or plumbing stacks. The ventilation contractor must claim their space first.
Here is the necessary sequence of collaboration to ensure your Windsor timber frame build goes smoothly:
1. Architectural Blueprint Review: Before breaking ground, the HVAC design team reviews the architectural drawings to calculate the exact volume of air required for every room, sizing the rigid HRV ductwork accordingly.
2. Identifying Routing Paths: The team maps out the primary trunk lines, actively looking for ways to utilize non-vaulted areas (like utility rooms or pantries) to house the largest pipes.
3. Conflict Resolution Meetings: The builder, HVAC contractor, and electrician meet to resolve spatial conflicts. If a duct needs to cross a major beam, the builder can plan a strategic chase or secondary framing solution before the wood is even cut.
4. Pre-Framing Adjustments: Minor adjustments are made to the floor plan—such as thickening an interior partition wall from 2x4 to 2x6—to easily accommodate vertical duct drops without compromising the living space.
5. Coordinated Installation: The HVAC team installs the hidden ductwork precisely as planned, allowing the electrical and plumbing teams to route their flexible lines around the established air pathways.
Preventing costly structural conflicts and redesigns during the build phase requires this level of discipline. When everyone works from a unified plan, the integrity of the timber frame is preserved, and the ventilation system operates at peak efficiency.
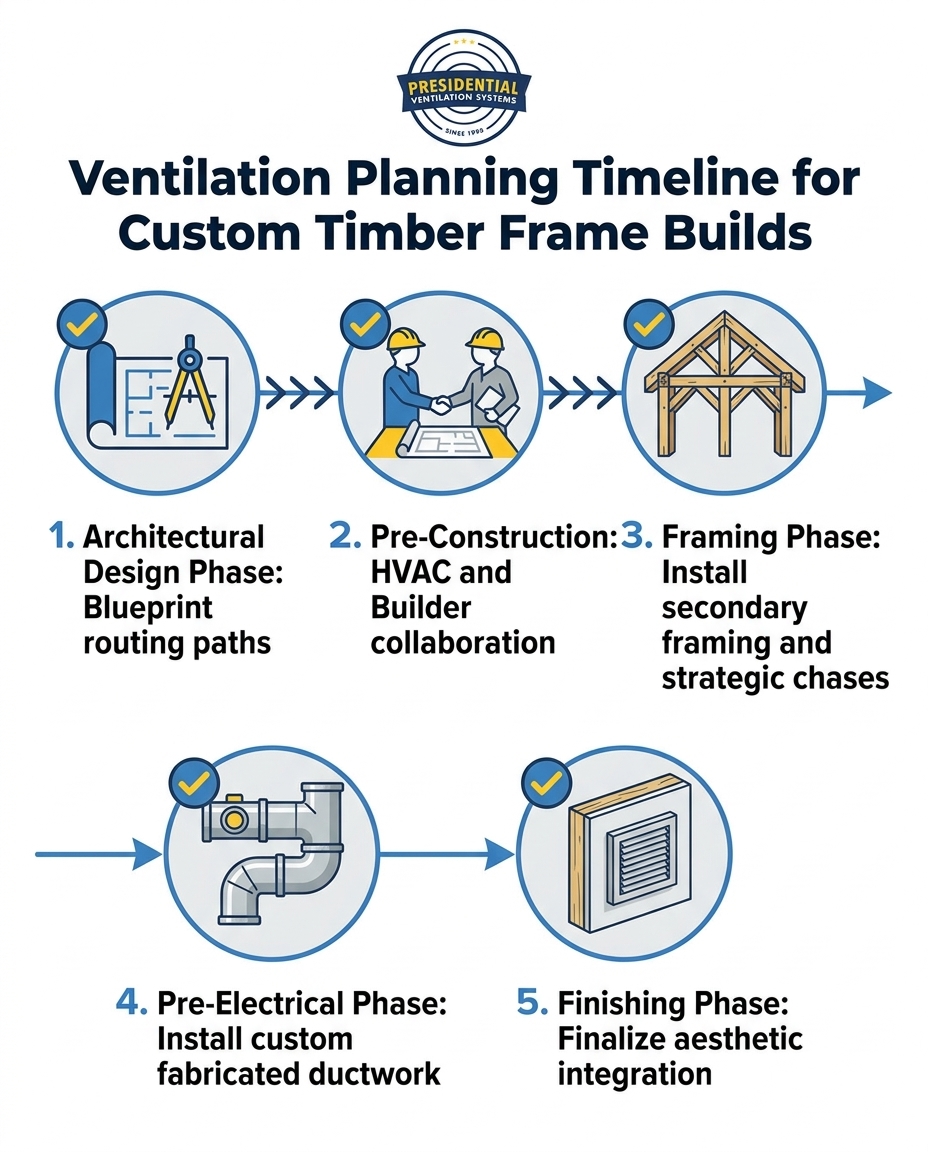
Hiding rigid HRV ductwork in a home that celebrates exposed structural elements requires creativity and a deep understanding of airflow dynamics. You cannot simply shrink the ducts to fit into smaller spaces, as this increases air velocity, resulting in a system that sounds like a jet engine running inside your living room. Instead, ventilation experts utilize specific architectural strategies to conceal the lines seamlessly.
A strategic chase is a deliberately designed hollow space within the home's architecture meant specifically to house utilities. In a timber frame home, a chase might be designed to look like a structural column or a decorative faux beam. When planned early, these chases blend seamlessly with the home's interior design. For example, in a recent 2,500-square-foot custom build, our team utilized a vertical chase built alongside a massive central fireplace stone veneer, allowing the main HRV trunk line to travel from the basement mechanical room to the upper loft without ever being seen.
While the primary timber frame handles the structural load of the house, secondary framing (often standard dimensional lumber) is used to create interior partition walls and ceilings in non-vaulted areas. By slightly dropping the ceiling in a hallway or a mudroom using secondary framing, you create a hidden pathway for airflow. The rigid HRV ductwork can travel horizontally through this dropped ceiling, often transitioning a standard 6-inch round pipe into a 3.25 x 10-inch rectangular duct to branch off and deliver fresh air to the adjacent vaulted bedrooms through discreet high-wall grilles.
Not every room in a custom timber frame home has an exposed cathedral ceiling. Utility rooms, walk-in closets, pantries, and bathrooms often have standard, flat ceilings. These non-vaulted zones act as the primary transit routes for your ventilation system. The HVAC design will route the largest, most intrusive ducts through these hidden spaces, keeping the spectacular timber framework in the great room completely free of visual clutter.
Every concealed pathway must meet all local building code requirements for clearance and safety. Rigid HRV ductwork in Windsor and rural Nova Scotia must be properly insulated when passing through unconditioned spaces to prevent condensation inside the pipe. Furthermore, the routing must allow for proper air balancing, ensuring that the master bedroom receives the exact same quality of fresh air exchange as the basement living area.
Even with brilliant architectural planning, you will inevitably encounter spaces where standard, off-the-shelf rigid ducts simply refuse to fit. Standard round pipes require significant vertical clearance, which often clashes with the tight clearances of custom timber frames. When the structural math doesn't leave room for a standard pipe, you need a different approach.
This is where the necessity of low-profile, custom-dimensioned ducting becomes apparent. Achieving the necessary ventilation rates and airflow dynamics without bulky infrastructure requires specialized manufacturing. A flat, rectangular duct can move the exact same volume of air as a round duct, provided the internal surface area is calculated correctly. However, you cannot buy these highly specific transitional pieces at a local hardware store.
Having access to custom sheet metal fabrication changes the entire landscape of your build. In-house sheet metal fabrication capabilities allow for custom duct routing solutions that preserve the aesthetic of exposed beams without compromising airflow. If a duct needs to squeeze into a precise 3.5-inch void between a SIPs roof panel and a 12x12 hemlock purlin, our fabricators can create a custom rectangular transition to fit that exact millimeter-specific gap.
Adapting ductwork layouts during major structural work ensures seamless integration. We see this exact scenario play out frequently in local builds and extensive remodels. Our installation team recently tackled a major house renovation in Windsor that required replacing their old ductwork and heat pump system entirely. By utilizing custom-fabricated solutions, we were able to fit the new, highly efficient ducting seamlessly into the updated framework, delivering a system that works flawlessly while respecting the home's new architectural lines. The ability to fabricate solutions on the fly prevents construction delays and ensures the rigid HRV ductwork never becomes an eyesore.
Your HRV system does not operate in a vacuum. In complex architectural spaces, ventilation routing must work in tandem with your primary heating and cooling systems. Balancing fresh air distribution with primary heating and cooling loads is a delicate science, particularly in Windsor and rural Nova Scotia, where temperature swings demand robust climate control.
Coordinating duct pathways to serve both ventilation and temperature control needs efficiently is the hallmark of a well-designed custom home. Often, we recommend interlocking a properly sized 150 to 200 CFM (Cubic Feet per Minute) HRV unit with ducted heat pump systems. This allows the fresh, filtered air from the HRV to be distributed throughout the home using the heat pump's larger duct network. This integration reduces the total amount of ductwork required in the home, which is a massive advantage when trying to preserve exposed timber beams.
Managing air stratification in vaulted ceilings is another critical factor. In tall timber frame rooms, hot air naturally rises to the peak, leaving the living space near the floor cold.
• Strategic Grille Placement: High-wall returns can pull the trapped warm air from the vaulted peaks and redistribute it.
• Velocity Control: Custom duct sizing ensures the air is pushed down into the living space without creating uncomfortable drafts.
• Acoustic Management: Ensuring quiet operation by minimizing sharp turns and restrictions in the duct layout keeps the system silent, even when running continuously.
• Moisture Control: Integrated systems ensure that fresh, dry air reaches the most condensation-prone areas of the timber frame, protecting the wood.
Hiding HRV ductwork in exposed beam ceilings requires routing the pipes through strategic chases, dropped ceilings in adjacent hallways, or inside secondary framing. Instead of running ducts directly across the vaulted ceiling, our HVAC designers utilize non-vaulted zones like closets and mudrooms as transit hubs. When tight clearances arise, custom low-profile sheet metal fabrication is used to squeeze the ductwork into narrow wall cavities without restricting the necessary airflow.
Early HVAC planning is critical because rigid ventilation ducts require significant physical space that cannot easily be carved out after the heavy timber is locked into place. Bringing your ventilation contractor in during the blueprint phase prevents structural conflicts and avoids massive retrofitting costs. It ensures optimal placement of the ductwork before the electrical and plumbing trades run their lines, guaranteeing the architectural aesthetic is preserved.
Yes, airtight timber frame homes absolutely require an HRV, and it is mandated by the National Building Code of Canada. Because custom builds utilizing SIPs (Structural Insulated Panels) create a highly sealed building envelope, natural drafts cannot remove indoor moisture. Without a continuously running HRV, the humid maritime climate of Nova Scotia will cause severe winter condensation, leading to mold and structural rot within the timber.
Standard rigid ductwork can be used in some areas, but it is often too bulky for the tight clearances required in custom timber frame builds. Off-the-shelf round pipes typically require too much vertical space, forcing builders to create ugly bulkheads. To maintain the visual appeal of the exposed beams, custom-dimensioned rectangular ductwork is frequently required to achieve the same airflow in a much lower profile.
Custom sheet metal fabrication allows HVAC installers to create unique, low-profile duct shapes that maintain the correct airflow volume while fitting into highly restrictive spaces. Instead of forcing a standard 6-inch round pipe into a 5-inch gap, a custom rectangular duct can be fabricated to slide perfectly into the secondary framing. This ensures the ductwork remains completely hidden without protruding into the living space or violating building codes.
Planning HRV duct routing in custom timber frame homes in Windsor requires foresight, precision, and a deep respect for the architectural beauty of the build. At Presidential Ventilation Systems Ltd., we know the importance of planning your ventilation strategy early in the pre-construction phase cannot be overstated. Waiting until the framing is complete will severely limit your options and compromise the stunning exposed-beam aesthetic you have worked so hard to achieve.
By utilizing clear, architectural-friendly routing strategies and custom duct fabrication, you can protect both your home's visual appeal and its long-term structural health against the harsh realities of the Nova Scotia climate. Do not leave your indoor air quality to chance. Encourage your builder to collaborate with experienced local ventilation professionals before finalizing those blueprints, ensuring your custom home breathes perfectly for decades to come.