

Daikin mini split maintenance is key to keeping your ductless system running smoothly. Here's what you need to know:
Essential Maintenance Tasks:
• Clean air filters every 2 weeks to maintain airflow and efficiency
• Clear outdoor unit of debris monthly (maintain 2-foot clearance)
• Schedule professional service twice yearly (spring and fall)
• Check and clean condensate drain to prevent water leaks
• Inspect for unusual sounds or odors during operation
Quick Troubleshooting:
• Unit won't start → Check remote batteries and circuit breaker
• Poor heating/cooling → Clean or replace dirty filters
• Water leaking → Clear clogged drain line with wet/dry vacuum
• Strange noises → Check for loose parts or debris in outdoor unit
Properly maintained, your Daikin mini split system offers incredible energy efficiency and year-round comfort. Regular maintenance can save up to 15% on energy bills and prevent costly breakdowns.
Ductless systems are economical, quiet, and efficient, but like any HVAC investment, they need regular care for peak performance. The good news is that most maintenance is simple DIY work. We'll show you what to do and when to call the pros.

Before diving into Daikin mini split maintenance, let's review the basics. Daikin systems offer personalized comfort without extensive ductwork, making them ideal for homes in areas like Kentville NS or Halifax NS.
A mini-split system has two main parts:
• Indoor unit (evaporator): The wall-mounted unit that distributes conditioned air into your living space. Multiple units can create different temperature "zones" in your home.
• Outdoor unit (condenser): The workhorse located outside your home, containing the compressor and condenser coil.
• Refrigerant lines: Insulated copper tubes connecting the indoor and outdoor units, circulating the refrigerant that transfers heat.
• Remote controller: Used for setting temperature, mode, and fan speed.
In cooling mode, the indoor unit absorbs heat from your home and releases it outside. In heating mode, the process reverses, with the outdoor unit extracting heat from the outside air and moving it indoors. This heat transfer method is highly efficient, making these systems versatile for various applications across Nova Scotia.
Think of your Daikin mini-split like a car; it needs regular service to prevent problems. Here’s why maintenance is crucial:
• Prevent breakdowns: Addressing minor issues like clogged filters prevents them from becoming major, costly repairs.
• Lower electricity bills: A clean, efficient system doesn't have to work as hard, consuming less electricity. Cleaning filters every two weeks keeps costs down.
• Improve indoor air quality: Clean filters trap dust and particulates, preventing them from circulating back into your home. This is especially important for those with allergies.
• Extend system lifespan: A well-maintained unit lasts longer. Proactive care helps your system reach or exceed its expected lifespan of 15+ years.
• System longevity: By preventing strain and optimizing efficiency, regular maintenance ensures your investment provides comfort for years to come.
Most Daikin mini split maintenance is surprisingly straightforward. We've helped thousands of Nova Scotia homeowners keep their systems running smoothly and are happy to share our tips.

Safety first: Before starting, power down your system. Turn it off with the remote, then flip the corresponding circuit breaker at your electrical panel. This protects you and your equipment.
These DIY tasks are the foundation of your seasonal checklist for keeping your Daikin system efficient year-round.
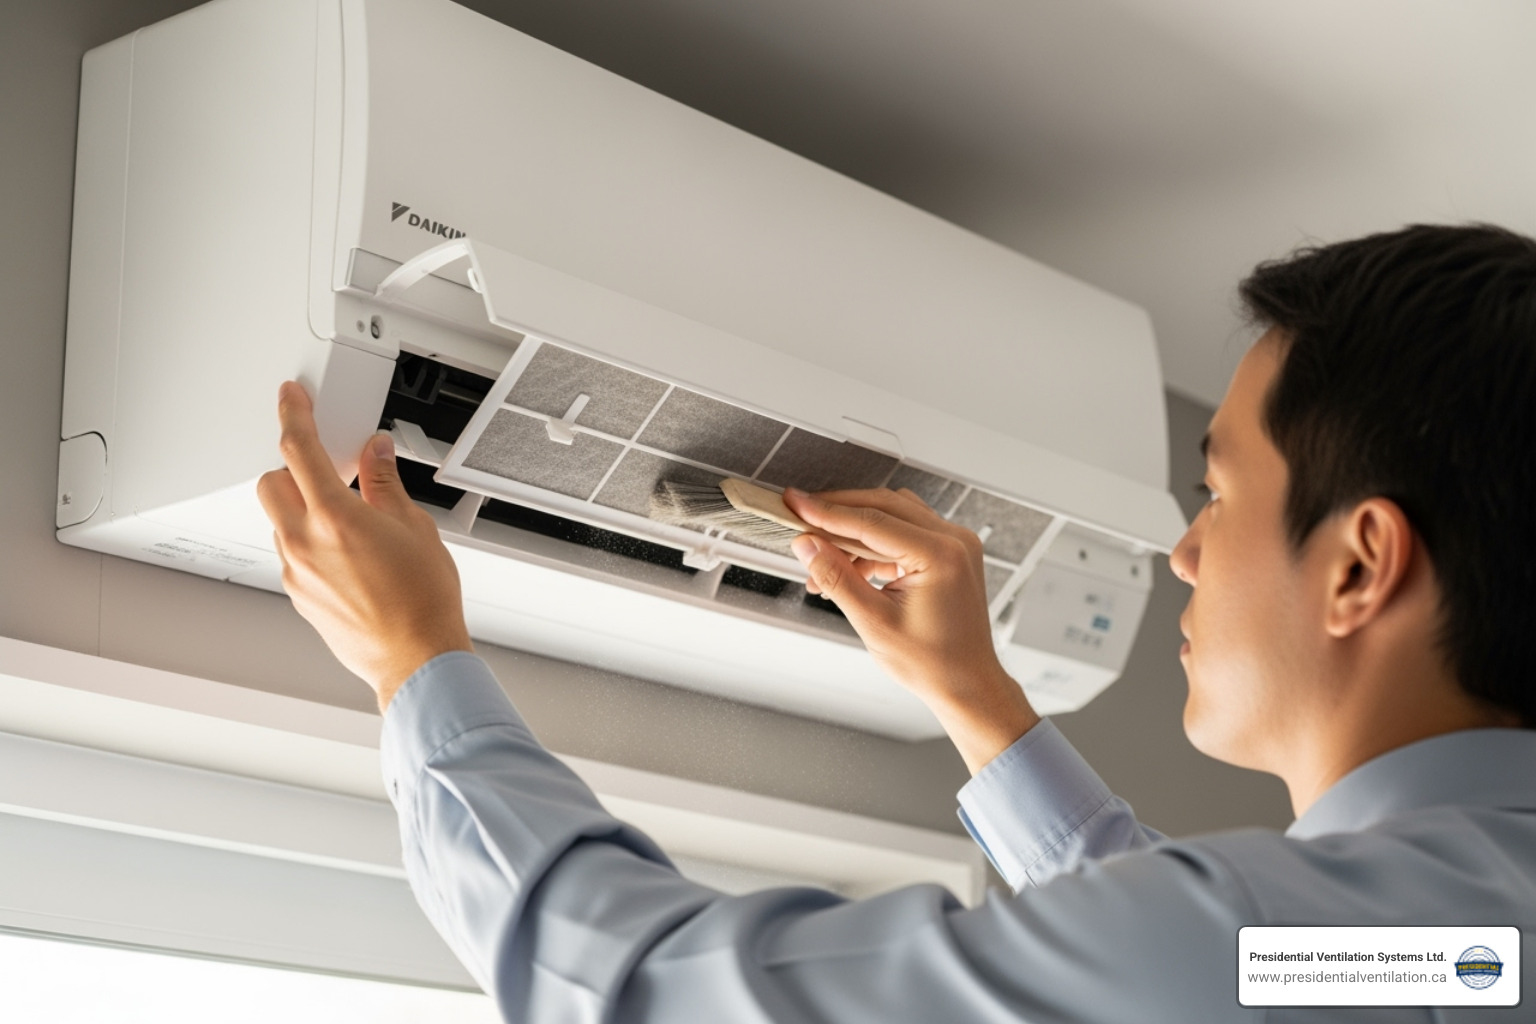
Your indoor unit deserves regular attention. Before you start, gather your cleaning supplies: a soft cloth, mild detergent, and a vacuum with a brush attachment.
For cleaning frequency, aim to clean your air filters every two weeks, especially if you have pets. For most homes, once every one to three months is sufficient.
First, gently open the front panel. Wipe the exterior and panel with a damp cloth and mild detergent, rinse with a clean damp cloth, and dry thoroughly. Avoid harsh chemicals or water above 104°F to protect the plastic components.
Next, slide out the air filters. For light dust, use your vacuum's brush attachment. For heavier grime, wash them in lukewarm water with mild detergent, rinse well, and let them air dry completely in the shade. Never wring them out.
If your model has a special titanium apatite photocatalytic air-purifying filter, clean it every 5-6 months and replace it every 3 years. For more model-specific details, the Daikin Mini-Split Cleaning | Parts Town guide is a great resource.
While the filters dry, inspect the blower wheel and evaporator coils. You can gently wipe accessible areas, but if you see significant dirt or mold, it's time to call a professional.
Check the condensate drain line, which carries away moisture. Ensure the indoor unit is level with a slight tilt toward the drain and that the outdoor drain hose is not blocked.
Once everything is clean and dry, slide the filters back in, close the panel, and restore power at the breaker.
Your outdoor unit faces the elements but still needs care. The most important task is to clear debris regularly. Leaves, grass clippings, and twigs can collect around the unit, restricting airflow. Maintain a two-foot clearance on all sides for optimal performance.

Wipe down the housing with a damp cloth and mild detergent. For the condenser fins, use a soft brush for gentle cleaning. Be careful not to bend the delicate metal fins, as this can reduce efficiency.
In Nova Scotia, winter prep is essential for your Daikin heat pump.
After a heavy snowfall, perform snow removal around your outdoor unit to ensure it can operate efficiently. Ice buildup prevention is also crucial. If ice forms on the unit, never chip it away. Instead, use a safe clearing method: pour warm water (not hot) over the ice to melt it without causing damage.
Your Daikin system has an automatic defrost operation. When frost builds on the outdoor coil, the unit will pause for 3 to 10 minutes to melt it. You might see steam or hear bubbling sounds, which is completely normal.
For more winter tips, Daikin's Maintenance Tips | Daikin Global page offers excellent guidance.
Even with regular Daikin mini split maintenance, issues can arise. Many common problems have simple solutions you can handle yourself. Here's a quick troubleshooting guide.

If your Daikin mini-split won't turn on, check these things first:
1. Remote control batteries: A simple fix! Remote batteries last about a year. Replace them if the display is dim.
2. Circuit breaker check: Check your electrical panel to see if the unit's breaker has tripped. If it trips again after resetting, call a professional.
3. Correct mode setting: Ensure the remote is set to the correct mode (e.g., cooling for cool air).
4. Power outage/Surge: After a power fluctuation, Daikin units are designed to restart automatically after about 3 minutes.
This is a frequent complaint with an often simple fix. Here's what to check:
1. Dirty air filters: This is the #1 cause. Clogged filters restrict airflow, preventing the unit from effectively heating or cooling. Clean them regularly.
2. Blocked outdoor unit: If the outdoor unit is obstructed by bushes, snow, or debris, it can't exchange heat properly. Clear the area, maintaining a 2-foot clearance.
3. Refrigerant leaks: Signs include ice on the coils or a hissing sound. Refrigerant is a hazardous substance, and fixing leaks requires a certified HVAC technician.
4. System age: A mini-split heat pump over 15 years old may naturally lose efficiency, even with good maintenance.
Strange sounds or smells can indicate a problem. Here's what they might mean:
• Rattling/vibrating: Often indicates loose components or debris in the fans. Check for loose panels.
• Grinding/squealing: These sounds could suggest problems with the blower motor or fan bearings and require professional service.
• Clicking/Buzzing: Normal operational sounds from refrigerant control valves, electrical components, or the flap moving.
• Bubbling sound: Can be caused by outdoor air entering the drain hose. Try opening a vent or window to equalize pressure.
• Musty smells: Usually indicates mold and mildew on the indoor coil or drain pan. Regular cleaning helps, but visible mold requires a professional deep cleaning.
• Burning odors: A serious concern that could indicate an electrical issue. Turn off the unit at the circuit breaker immediately and call a professional.
Water leakage is typically caused by one of these issues:
1. Clogged condensate drain line: This is the most common cause. Algae, mold, or debris can block the line, causing water to back up and overflow.
— Resolution: You can often clear a minor clog by using a wet/dry vacuum on the end of the drain line outside to suck out the blockage. If you're unsure or the clog is stubborn, call a professional.
2. Improper drainage/leveling issues: If the indoor unit isn't level, water may not drain correctly. This requires professional adjustment.
3. Dirty air filter/coils: A very dirty filter can cause the evaporator coil to freeze. When the ice melts, the excess water can overwhelm the drain system.
While DIY Daikin mini split maintenance is crucial, some issues require professional service. Think of it like this: you can change your car's oil, but you call a mechanic for engine noises. The same principle applies to your mini-split.
At Presidential Ventilation Systems Ltd., we have over 30 years of experience serving Nova Scotia homeowners in Dartmouth NS, Bedford NS, and Windsor NS. As a leading Daikin Comfort Pro Dealer, we're here when you need expert help.
Call a professional if you notice these telltale signs:
• Persistent issues: If you've performed all the DIY troubleshooting steps and the problem continues, it's time for an expert to diagnose the deeper issue.
• Poor performance after cleaning: If the system still underperforms after a thorough cleaning, there could be an issue with internal components like the compressor or sensors.
• Loud, unusual noises: Grinding, screeching, or banging sounds are your system's cry for help and often indicate mechanical problems that can worsen if ignored.
• Refrigerant leak signs: Ice on the coils, hissing sounds, or a sudden drop in performance may signal a refrigerant leak, which requires certified handling.
• Electrical problems: If your circuit breaker repeatedly trips or you smell something burning, turn off the unit immediately and call for service.
• System is over 15 years old: Older units are more prone to breakdowns. A professional can assess whether a repair or replacement is the more sensible option.
We recommend scheduling professional maintenance twice a year—once in the spring and once in the fall. This prepares your system for the demands of the upcoming season, whether you're in Mount Uniacke NS or Kentville NS.
During a professional tune-up, our certified technicians perform a comprehensive service:
• Component inspection: We thoroughly examine both indoor and outdoor units for wear, damage, or loose parts.
• Coil cleaning: We use specialized tools and cleaners to deep clean the evaporator and condenser coils, removing stubborn buildup.
• Refrigerant level checking: We use professional gauges to verify refrigerant levels and pressures are correct, repairing any leaks we find.
• Electrical connection tightening: We inspect and tighten all electrical connections to ensure safe and efficient operation.
• Drain line flushing: We thoroughly flush the drain line to prevent clogs and water leaks.
• System testing: We test all system functions, including heating, cooling, fan operation, and thermostat accuracy.
• Performance measurements: We take readings like temperature differential and airflow to assess your system's performance and catch potential issues early.
Regular professional maintenance is an investment in energy savings, reliability, and a longer system lifespan.
After 30+ years serving homeowners in Halifax, Dartmouth, and across Nova Scotia, we've answered many questions about Daikin mini split maintenance. Here are some of the most common ones.
For optimal performance and energy savings, clean your filters every two weeks. If your system runs constantly, or if you have pets or smokers in the home, you should check them weekly.
Even if filters look clean, a quick bi-weekly cleaning prevents buildup and keeps air flowing smoothly. Think of it as preventative care—it's much easier than fixing a problem later.
If you lose your remote, don't panic. Most Daikin units have a manual ON/OFF button, usually located behind the front panel or on the side of the unit. Pressing it will start the system in automatic mode, keeping you comfortable while you look for the remote.
To get a replacement, contact any Daikin dealer with your unit's model number. For newer models, you can also explore Daikin's smartphone apps, which allow you to control the system from your phone.
No, you should not use commercial cleaning sprays on your mini-split. Harsh chemicals found in all-purpose cleaners can damage the delicate internal components of your unit.
These chemicals can cause plastic resin parts to crack, corrode metal coils, and damage sensors, often leading to water leaks. Furthermore, using unauthorized cleaning products will void your warranty, turning a simple cleaning task into a potentially expensive repair.
Stick with mild soap and water for cleaning exterior surfaces and filters. For a deeper clean, let our certified technicians use the proper equipment and manufacturer-approved cleaners to do the job safely.
Your Daikin mini-split is an investment in your home's comfort and energy efficiency. Proper care ensures it runs perfectly for years. The secret is proactive care—addressing small issues before they become big problems.
Your role involves simple DIY tasks like cleaning filters every two weeks and keeping the outdoor unit clear of debris. These small efforts make a huge difference in your system's performance.
When you combine your regular care with professional support from certified technicians, you create the perfect recipe for success. Bi-annual professional tune-ups are essential for catching issues before they become expensive headaches.
The long-term benefits are clear: lower energy bills, cleaner air, and the peace of mind that your system will be reliable when you need it most.
At Presidential Ventilation Systems Ltd., we've helped Nova Scotia homeowners get the most from their HVAC systems for over 30 years. As a leading Daikin Comfort Pro Dealer, we understand our Maritime climate, from humid summers in Halifax to cold winters in Truro.
Whether you're in Dartmouth, Mount Uniacke, Kentville, or Windsor, we know what your Daikin system needs to perform at its best. Our local experience allows us to spot potential issues and keep your system running smoothly.
Don't wait for a breakdown to think about maintenance. Take action now to protect your investment.
Contact us for expert heat pump maintenance in Halifax and find what three decades of HVAC expertise can do for your home.

Daikin mini split maintenance is key to keeping your ductless system running smoothly. Here's what you need to know:
Essential Maintenance Tasks:
• Clean air filters every 2 weeks to maintain airflow and efficiency
• Clear outdoor unit of debris monthly (maintain 2-foot clearance)
• Schedule professional service twice yearly (spring and fall)
• Check and clean condensate drain to prevent water leaks
• Inspect for unusual sounds or odors during operation
Quick Troubleshooting:
• Unit won't start → Check remote batteries and circuit breaker
• Poor heating/cooling → Clean or replace dirty filters
• Water leaking → Clear clogged drain line with wet/dry vacuum
• Strange noises → Check for loose parts or debris in outdoor unit
Properly maintained, your Daikin mini split system offers incredible energy efficiency and year-round comfort. Regular maintenance can save up to 15% on energy bills and prevent costly breakdowns.
Ductless systems are economical, quiet, and efficient, but like any HVAC investment, they need regular care for peak performance. The good news is that most maintenance is simple DIY work. We'll show you what to do and when to call the pros.
Before diving into Daikin mini split maintenance, let's review the basics. Daikin systems offer personalized comfort without extensive ductwork, making them ideal for homes in areas like Kentville NS or Halifax NS.
A mini-split system has two main parts:
• Indoor unit (evaporator): The wall-mounted unit that distributes conditioned air into your living space. Multiple units can create different temperature "zones" in your home.
• Outdoor unit (condenser): The workhorse located outside your home, containing the compressor and condenser coil.
• Refrigerant lines: Insulated copper tubes connecting the indoor and outdoor units, circulating the refrigerant that transfers heat.
• Remote controller: Used for setting temperature, mode, and fan speed.
In cooling mode, the indoor unit absorbs heat from your home and releases it outside. In heating mode, the process reverses, with the outdoor unit extracting heat from the outside air and moving it indoors. This heat transfer method is highly efficient, making these systems versatile for various applications across Nova Scotia.
Think of your Daikin mini-split like a car; it needs regular service to prevent problems. Here’s why maintenance is crucial:
• Prevent breakdowns: Addressing minor issues like clogged filters prevents them from becoming major, costly repairs.
• Lower electricity bills: A clean, efficient system doesn't have to work as hard, consuming less electricity. Cleaning filters every two weeks keeps costs down.
• Improve indoor air quality: Clean filters trap dust and particulates, preventing them from circulating back into your home. This is especially important for those with allergies.
• Extend system lifespan: A well-maintained unit lasts longer. Proactive care helps your system reach or exceed its expected lifespan of 15+ years.
• System longevity: By preventing strain and optimizing efficiency, regular maintenance ensures your investment provides comfort for years to come.
Most Daikin mini split maintenance is surprisingly straightforward. We've helped thousands of Nova Scotia homeowners keep their systems running smoothly and are happy to share our tips.
Safety first: Before starting, power down your system. Turn it off with the remote, then flip the corresponding circuit breaker at your electrical panel. This protects you and your equipment.
These DIY tasks are the foundation of your seasonal checklist for keeping your Daikin system efficient year-round.
Your indoor unit deserves regular attention. Before you start, gather your cleaning supplies: a soft cloth, mild detergent, and a vacuum with a brush attachment.
For cleaning frequency, aim to clean your air filters every two weeks, especially if you have pets. For most homes, once every one to three months is sufficient.
First, gently open the front panel. Wipe the exterior and panel with a damp cloth and mild detergent, rinse with a clean damp cloth, and dry thoroughly. Avoid harsh chemicals or water above 104°F to protect the plastic components.
Next, slide out the air filters. For light dust, use your vacuum's brush attachment. For heavier grime, wash them in lukewarm water with mild detergent, rinse well, and let them air dry completely in the shade. Never wring them out.
If your model has a special titanium apatite photocatalytic air-purifying filter, clean it every 5-6 months and replace it every 3 years. For more model-specific details, the Daikin Mini-Split Cleaning | Parts Town guide is a great resource.
While the filters dry, inspect the blower wheel and evaporator coils. You can gently wipe accessible areas, but if you see significant dirt or mold, it's time to call a professional.
Check the condensate drain line, which carries away moisture. Ensure the indoor unit is level with a slight tilt toward the drain and that the outdoor drain hose is not blocked.
Once everything is clean and dry, slide the filters back in, close the panel, and restore power at the breaker.
Your outdoor unit faces the elements but still needs care. The most important task is to clear debris regularly. Leaves, grass clippings, and twigs can collect around the unit, restricting airflow. Maintain a two-foot clearance on all sides for optimal performance.
Wipe down the housing with a damp cloth and mild detergent. For the condenser fins, use a soft brush for gentle cleaning. Be careful not to bend the delicate metal fins, as this can reduce efficiency.
In Nova Scotia, winter prep is essential for your Daikin heat pump.
After a heavy snowfall, perform snow removal around your outdoor unit to ensure it can operate efficiently. Ice buildup prevention is also crucial. If ice forms on the unit, never chip it away. Instead, use a safe clearing method: pour warm water (not hot) over the ice to melt it without causing damage.
Your Daikin system has an automatic defrost operation. When frost builds on the outdoor coil, the unit will pause for 3 to 10 minutes to melt it. You might see steam or hear bubbling sounds, which is completely normal.
For more winter tips, Daikin's Maintenance Tips | Daikin Global page offers excellent guidance.
Even with regular Daikin mini split maintenance, issues can arise. Many common problems have simple solutions you can handle yourself. Here's a quick troubleshooting guide.
If your Daikin mini-split won't turn on, check these things first:
1. Remote control batteries: A simple fix! Remote batteries last about a year. Replace them if the display is dim.
2. Circuit breaker check: Check your electrical panel to see if the unit's breaker has tripped. If it trips again after resetting, call a professional.
3. Correct mode setting: Ensure the remote is set to the correct mode (e.g., cooling for cool air).
4. Power outage/Surge: After a power fluctuation, Daikin units are designed to restart automatically after about 3 minutes.
This is a frequent complaint with an often simple fix. Here's what to check:
1. Dirty air filters: This is the #1 cause. Clogged filters restrict airflow, preventing the unit from effectively heating or cooling. Clean them regularly.
2. Blocked outdoor unit: If the outdoor unit is obstructed by bushes, snow, or debris, it can't exchange heat properly. Clear the area, maintaining a 2-foot clearance.
3. Refrigerant leaks: Signs include ice on the coils or a hissing sound. Refrigerant is a hazardous substance, and fixing leaks requires a certified HVAC technician.
4. System age: A mini-split heat pump over 15 years old may naturally lose efficiency, even with good maintenance.
Strange sounds or smells can indicate a problem. Here's what they might mean:
• Rattling/vibrating: Often indicates loose components or debris in the fans. Check for loose panels.
• Grinding/squealing: These sounds could suggest problems with the blower motor or fan bearings and require professional service.
• Clicking/Buzzing: Normal operational sounds from refrigerant control valves, electrical components, or the flap moving.
• Bubbling sound: Can be caused by outdoor air entering the drain hose. Try opening a vent or window to equalize pressure.
• Musty smells: Usually indicates mold and mildew on the indoor coil or drain pan. Regular cleaning helps, but visible mold requires a professional deep cleaning.
• Burning odors: A serious concern that could indicate an electrical issue. Turn off the unit at the circuit breaker immediately and call a professional.
Water leakage is typically caused by one of these issues:
1. Clogged condensate drain line: This is the most common cause. Algae, mold, or debris can block the line, causing water to back up and overflow.
— Resolution: You can often clear a minor clog by using a wet/dry vacuum on the end of the drain line outside to suck out the blockage. If you're unsure or the clog is stubborn, call a professional.
2. Improper drainage/leveling issues: If the indoor unit isn't level, water may not drain correctly. This requires professional adjustment.
3. Dirty air filter/coils: A very dirty filter can cause the evaporator coil to freeze. When the ice melts, the excess water can overwhelm the drain system.
While DIY Daikin mini split maintenance is crucial, some issues require professional service. Think of it like this: you can change your car's oil, but you call a mechanic for engine noises. The same principle applies to your mini-split.
At Presidential Ventilation Systems Ltd., we have over 30 years of experience serving Nova Scotia homeowners in Dartmouth NS, Bedford NS, and Windsor NS. As a leading Daikin Comfort Pro Dealer, we're here when you need expert help.
Call a professional if you notice these telltale signs:
• Persistent issues: If you've performed all the DIY troubleshooting steps and the problem continues, it's time for an expert to diagnose the deeper issue.
• Poor performance after cleaning: If the system still underperforms after a thorough cleaning, there could be an issue with internal components like the compressor or sensors.
• Loud, unusual noises: Grinding, screeching, or banging sounds are your system's cry for help and often indicate mechanical problems that can worsen if ignored.
• Refrigerant leak signs: Ice on the coils, hissing sounds, or a sudden drop in performance may signal a refrigerant leak, which requires certified handling.
• Electrical problems: If your circuit breaker repeatedly trips or you smell something burning, turn off the unit immediately and call for service.
• System is over 15 years old: Older units are more prone to breakdowns. A professional can assess whether a repair or replacement is the more sensible option.
We recommend scheduling professional maintenance twice a year—once in the spring and once in the fall. This prepares your system for the demands of the upcoming season, whether you're in Mount Uniacke NS or Kentville NS.
During a professional tune-up, our certified technicians perform a comprehensive service:
• Component inspection: We thoroughly examine both indoor and outdoor units for wear, damage, or loose parts.
• Coil cleaning: We use specialized tools and cleaners to deep clean the evaporator and condenser coils, removing stubborn buildup.
• Refrigerant level checking: We use professional gauges to verify refrigerant levels and pressures are correct, repairing any leaks we find.
• Electrical connection tightening: We inspect and tighten all electrical connections to ensure safe and efficient operation.
• Drain line flushing: We thoroughly flush the drain line to prevent clogs and water leaks.
• System testing: We test all system functions, including heating, cooling, fan operation, and thermostat accuracy.
• Performance measurements: We take readings like temperature differential and airflow to assess your system's performance and catch potential issues early.
Regular professional maintenance is an investment in energy savings, reliability, and a longer system lifespan.
After 30+ years serving homeowners in Halifax, Dartmouth, and across Nova Scotia, we've answered many questions about Daikin mini split maintenance. Here are some of the most common ones.
For optimal performance and energy savings, clean your filters every two weeks. If your system runs constantly, or if you have pets or smokers in the home, you should check them weekly.
Even if filters look clean, a quick bi-weekly cleaning prevents buildup and keeps air flowing smoothly. Think of it as preventative care—it's much easier than fixing a problem later.
If you lose your remote, don't panic. Most Daikin units have a manual ON/OFF button, usually located behind the front panel or on the side of the unit. Pressing it will start the system in automatic mode, keeping you comfortable while you look for the remote.
To get a replacement, contact any Daikin dealer with your unit's model number. For newer models, you can also explore Daikin's smartphone apps, which allow you to control the system from your phone.
No, you should not use commercial cleaning sprays on your mini-split. Harsh chemicals found in all-purpose cleaners can damage the delicate internal components of your unit.
These chemicals can cause plastic resin parts to crack, corrode metal coils, and damage sensors, often leading to water leaks. Furthermore, using unauthorized cleaning products will void your warranty, turning a simple cleaning task into a potentially expensive repair.
Stick with mild soap and water for cleaning exterior surfaces and filters. For a deeper clean, let our certified technicians use the proper equipment and manufacturer-approved cleaners to do the job safely.
Your Daikin mini-split is an investment in your home's comfort and energy efficiency. Proper care ensures it runs perfectly for years. The secret is proactive care—addressing small issues before they become big problems.
Your role involves simple DIY tasks like cleaning filters every two weeks and keeping the outdoor unit clear of debris. These small efforts make a huge difference in your system's performance.
When you combine your regular care with professional support from certified technicians, you create the perfect recipe for success. Bi-annual professional tune-ups are essential for catching issues before they become expensive headaches.
The long-term benefits are clear: lower energy bills, cleaner air, and the peace of mind that your system will be reliable when you need it most.
At Presidential Ventilation Systems Ltd., we've helped Nova Scotia homeowners get the most from their HVAC systems for over 30 years. As a leading Daikin Comfort Pro Dealer, we understand our Maritime climate, from humid summers in Halifax to cold winters in Truro.
Whether you're in Dartmouth, Mount Uniacke, Kentville, or Windsor, we know what your Daikin system needs to perform at its best. Our local experience allows us to spot potential issues and keep your system running smoothly.
Don't wait for a breakdown to think about maintenance. Take action now to protect your investment.
Contact us for expert heat pump maintenance in Halifax and find what three decades of HVAC expertise can do for your home.

You upgrade your home's insulation, seal the drafty doors, and turn on your highly efficient heating system, only to face a frustrating new problem: waking up to windows dripping with water. Finding reliable home maintenance tips and troubleshooting strategies for indoor air quality is a major priority during the colder months. Modern energy-efficient homes are tightly sealed to prevent valuable heat from escaping. However, this airtight construction inadvertently traps stale air and moisture indoors. The result is excessive indoor humidity levels causing window condensation, which can eventually lead to mold growth and poor air quality.
Many homeowners assume their new heating equipment will automatically handle air circulation and moisture control. The reality is that true home comfort requires a careful balance between advanced heating technology and dedicated mechanical ventilation.
If you are exploring solutions for trapped moisture and stale air, learning how Heat Pumps and modern Ductless Heat Pumps fit into your home's ecosystem is a great place to start.
The building science behind indoor humidity is relatively straightforward, but cold weather drastically amplifies the effects. A standard family of four generates roughly 1.5 to 2 gallons of moisture every single day. This moisture comes from routine, unavoidable activities like breathing, cooking, showering, and doing laundry. Without proper exhaust mechanisms built into the home, this water vapor has nowhere to go. It remains suspended in your indoor air.
During a typical Nova Scotia winter, our team at Presidential Ventilation Systems regularly sees deep freezes and coastal dampness create the perfect storm for condensation. When the warm, humid air inside your home makes contact with cold window glass, the air rapidly cools. Cold air cannot hold as much moisture as warm air, so it releases the excess water directly onto the cold surface as liquid condensation. Over time, this constant dampness degrades your window frames, damages drywall, and creates an ideal breeding ground for airborne mold spores.
To understand why this happens, you have to look at your home's thermal envelope. The thermal envelope is the physical barrier between the conditioned air inside your home and the unconditioned air outside. This includes your roof, foundation, windows, doors, and wall insulation. In older, drafty homes, the thermal envelope is weak. Heat escapes easily, but so does indoor moisture, as fresh outdoor air constantly leaks in through the cracks.
When you upgrade your insulation and seal air leaks to improve energy efficiency, you tighten that envelope. This is fantastic for lowering your heating bills, but it completely disrupts the home's natural air exchange. You have successfully trapped the heat, but you have also trapped the humidity.
• Breathing and Perspiration — Moisture Generated (Daily Estimate): 0.5 to 1 Gallon — Impact on Tightly Sealed Homes: Constant baseline humidity that builds up overnight, especially in bedrooms.
• Cooking and Boiling Water — Moisture Generated (Daily Estimate): 2 to 4 Pints — Impact on Tightly Sealed Homes: Rapid spikes in airborne moisture that quickly settle on kitchen windows.
• Showering and Bathing — Moisture Generated (Daily Estimate): 0.5 Gallons — Impact on Tightly Sealed Homes: Heavy, localized humidity that spreads to adjoining rooms without exhaust fans.
• Washing and Drying Laundry — Moisture Generated (Daily Estimate): 1 to 2 Pints — Impact on Tightly Sealed Homes: Steady moisture release, particularly if dryers are not perfectly vented outdoors.
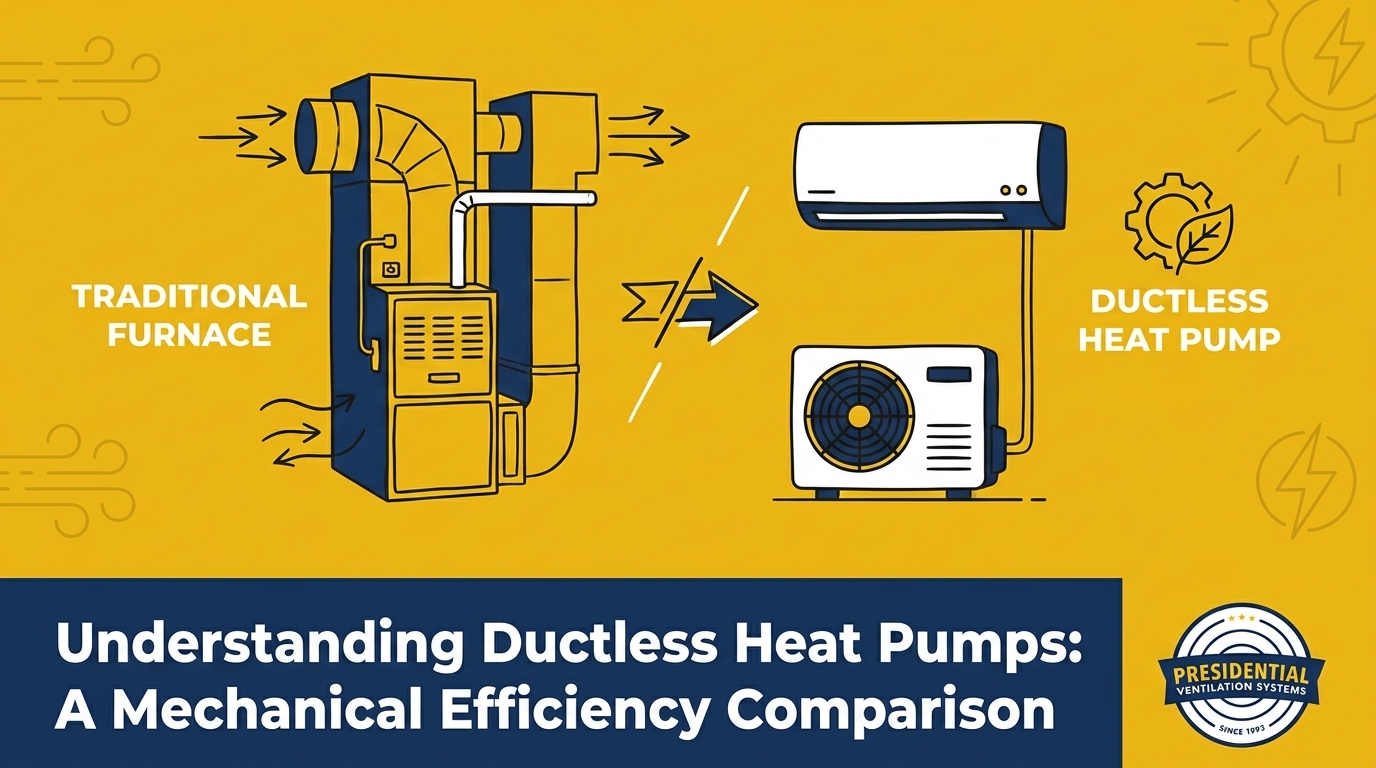
Targeted, efficient heating: Ductless systems provide highly efficient, targeted heating without the need for traditional ductwork. They use a closed refrigerant loop to absorb ambient heat from the outdoor air and transfer it directly into your living spaces. Because they do not rely on a centralized network of leaky metal ducts, they deliver heat exactly where you need it with minimal energy loss.
Continuous air circulation: While these systems continuously circulate and filter the indoor air, it is critical to understand what they do not do. Ductless heat pumps do not pull fresh outside air into the home. They simply pull the existing room air across a heated coil, filter out dust and particulates, and push that same air back into the room.
The common misconception: A widespread misconception we often encounter is that upgrading to a premium heating system will automatically solve stale air issues. If your home already suffers from excessive indoor humidity levels causing window condensation, a ductless unit will not remove that moisture on its own during the heating season. For comprehensive comfort, you need to pair reliable equipment, like Lennox Ductless Systems, with a dedicated strategy for fresh air exchange.
Optimizing your HVAC system and managing indoor humidity requires a proactive approach. Based on our experience servicing homes throughout Mount Uniacke and the surrounding areas, following these actionable home maintenance tips and troubleshooting steps will help you maintain a healthier indoor environment and protect your equipment.
1. Check and clean indoor air filters regularly: Your ductless unit relies on unrestricted airflow to function efficiently. Dust and debris clog the indoor filters, forcing the fan motor to work harder and reducing the volume of air circulating through the room. Clean your reusable filters every few weeks to ensure optimal performance.
2. Monitor and stabilize thermostat settings: Maintain a consistent temperature rather than drastically turning the heat down when you leave the house. Large temperature fluctuations encourage condensation. When the indoor air cools too quickly, it loses its ability to hold moisture, dumping water onto your windows and walls.
3. Keep outdoor units clear of snow and debris: During a harsh Nova Scotia winter, snowdrifts and ice buildup can choke your outdoor compressor. The system needs clear airflow on all sides to extract heat efficiently. Gently brush away snow and ensure gutters aren't dripping freezing water directly onto the unit.
4. Utilize point-source exhaust fans: Always run bathroom exhaust fans for at least 30 minutes after showering, and use your kitchen range hood when boiling water. This removes heavy moisture at the source before it can migrate through the rest of the house.
One of the best practices for ductless systems is to "set it and forget it." Running the system continuously at a comfortable temperature is far more efficient than turning it on and off. Proper, continuous operation ensures even heating and limits the creation of cold spots in the corners of rooms where moisture tends to accumulate and form mold.
Routine professional care is just as important as your daily habits. For instance, we recently visited a homeowner in Mount Uniacke who scheduled an inspection and deep clean last fall. Our technician performed a thorough inspection, cleaned the internal components, and tested the system, providing valuable information on keeping the unit running efficiently through the colder months. Staying on top of this through a preventive maintenance plan ensures your system is always ready for the next temperature drop.
Defining mechanical ventilation: If your home is tightly sealed, the most effective way to eliminate stale air is through mechanical ventilation. A Heat Recovery Ventilator (HRV) is a system designed specifically to exchange stale indoor air with fresh outdoor air in a controlled manner.
The heat recovery process: What makes an HRV system brilliant is its ability to save energy. Inside the unit is a specialized heat exchange core. As the warm, stale, humid air is exhausted out of your home, it passes through this core. At the same time, cold, fresh outdoor air is pulled into the home through a separate channel in the same core. The heat from the outgoing air is transferred to the incoming air. The two airstreams never actually mix, but the heat is recovered, pre-warming the fresh air before it enters your living space.
Lowering indoor humidity: This continuous air exchange dramatically lowers indoor humidity. By constantly flushing out the moisture-laden air and replacing it with drier outdoor air, an HRV effectively eliminates excessive indoor humidity levels causing window condensation, all without sacrificing the heating efficiency you worked so hard to achieve.
You might wonder why you shouldn't just crack a window to let fresh air in. Opening a window during freezing temperatures completely defeats the purpose of your insulation and forces your heating system to work overtime to compensate for the massive heat loss. An HRV recovers up to 80% of the heat that would otherwise be lost, providing incredible energy savings. Furthermore, the health benefits of continuously flushing out indoor pollutants, cooking odors, volatile organic compounds (VOCs), and excess moisture are immeasurable.

Upgrading your home's heating system without addressing the ventilation is a common oversight. When older homes are retrofitted with modern, airtight insulation and new windows, the natural drafts disappear. If you install a high-efficiency heating system into this newly sealed environment without adding mechanical ventilation, you will almost certainly face air quality issues.
HRVs complement ductless configurations perfectly. Because ductless units do not use central ductwork, an HRV can be installed with its own small, dedicated ducting system to pull stale air from bathrooms and kitchens, while delivering fresh air to bedrooms and living areas. The key to success is proper system sizing. The ventilation rate must match your home's exact square footage and occupancy levels to ensure the air is exchanged frequently enough to prevent condensation.
Professional design is critical to ensure airflow pathways effectively reach all living areas without creating uncomfortable drafts. As a Daikin Comfort Pro dealer, our team at Presidential Ventilation Systems understands the importance of certified, expertly designed installations that guarantee robust performance and protect your warranty coverage. A well-designed ecosystem ensures you get the most out of the best ductless heat pumps on the market while maintaining pristine indoor air quality, no matter how harsh the Nova Scotia winter gets.
Identifying warning signs: While routine filter cleaning is a great DIY task, certain symptoms require expert attention. If you notice persistent mold growth around your windows, unresponsive heating units, strange grinding noises, or heavy ice buildup on the outdoor compressor that cannot be safely brushed away, it is time to call a professional.
Safety limits and licensing: Never attempt DIY electrical repairs or try to modify refrigerant lines. These systems operate under high pressure and high voltage, requiring specialized licensing and training to service safely. Tinkering with internal components can easily void your warranty or cause critical system failures.
We had a customer reach out to us last fall when their mini splits were not working properly. A previous company had failed to identify or fix the problem. Our professional technicians diagnosed the issue, confirmed the necessary repairs were covered under warranty, and fixed the system swiftly, restoring full functionality.
Professional assessments: A licensed expert can do more than just fix broken parts. They can perform a comprehensive assessment of your home's airflow and humidity levels to determine exactly why you are experiencing excessive indoor humidity levels causing window condensation. Furthermore, professional assessments can determine if your home qualifies for generic energy rebates or incentive programs when upgrading to high-efficiency ventilation or heating systems, helping offset the cost of improving your home's comfort.
Your windows sweat because warm, humid indoor air is coming into contact with the freezing cold glass. As the air cools against the window, it loses its capacity to hold moisture, leaving liquid condensation behind. In tightly sealed homes during a Nova Scotia winter, this trapped humidity has no way to escape without mechanical ventilation.
Yes, in most tightly sealed homes, an HRV is highly recommended alongside a ductless system. Ductless heat pumps are excellent at heating and circulating existing indoor air, but they do not bring in fresh outdoor air. An HRV provides the necessary fresh air exchange to remove stale air and excess moisture.
Start by checking your daily habits: ensure you are using bathroom and kitchen exhaust fans consistently. Next, check your home's thermal envelope to see if you recently sealed drafts without adding ventilation. If the humidity persists, you likely need a mechanical solution like an HRV to actively exhaust the moisture-heavy air.
An HRV system requires regular filter cleaning or replacement every few months to maintain proper airflow. The heat exchange core should also be removed and gently washed annually according to the manufacturer's instructions. Finally, ensure the exterior intake and exhaust hoods remain clear of snow, leaves, and debris.
The most effective fix for poor ventilation in an airtight home is installing a Heat Recovery Ventilator. This system mechanically forces stale air out and pulls fresh air in, while recovering the heat to maintain energy efficiency. It acts as the lungs of your home, ensuring healthy air quality without relying on drafts.
True winter comfort relies on much more than just a powerful heating system; it demands a delicate balance between efficient temperature control and effective moisture management. When you seal your home against the cold, you must also provide a pathway for stale, humid air to escape. By understanding the mechanics of your thermal envelope and the benefits of mechanical ventilation, you can permanently resolve excessive indoor humidity levels causing window condensation.
Implementing reliable home maintenance tips and troubleshooting strategies will protect your investment and your family's health. Do not settle for damp, stale air this season. Explore how integrated heating and HRV systems can transform your living space into a consistently warm, dry, and healthy environment.
At Presidential Ventilation Systems Ltd., we often see that navigating the various heating system options comparisons for homeowners begins when an aging furnace starts to struggle against the Mount Uniacke cold. You are likely facing a critical mechanical decision: replace your failing equipment with another traditional combustion furnace, or transition to a modern heat transfer system. This choice goes far beyond simply picking a recognizable brand; it hinges on understanding the true mechanical efficiency and the objective operational limits of different heating technologies.
Deciding between a central heat pump and a traditional fossil-fuel setup requires evaluating how consistent winter heating is achieved in a maritime climate. Homeowners must look past generic marketing benefits to see exactly how these systems perform under continuous winter stress. Transitioning away from burning oil or gas changes the fundamental infrastructure of how a house stays warm. The decision point rests on whether the superior mechanical efficiency of heat transfer justifies the initial transition away from a familiar combustion system.
To make sense of these technologies, start by reviewing objective data on ductless heat pumps and how they operate differently from legacy systems. By comparing the underlying mechanics, you can accurately assess which technology aligns with your property's thermal envelope and your long-term comfort requirements.
The problem: Traditional heating systems are fundamentally limited by the laws of thermodynamics related to combustion. A furnace generates heat by burning a consumable fuel—such as oil, natural gas, or propane. Even in the most advanced combustion systems, the mechanical efficiency ceiling is capped because a portion of the thermal energy is always lost through the exhaust flue along with the combustion byproducts.
The cause: Because a furnace must create heat from scratch by consuming a resource, it can never produce more energy than the fuel contains. If a furnace operates at 95% efficiency, it means 95 percent of the fuel consumed becomes usable heat, while the remaining 5 percent escapes outdoors. There is no physical way for a combustion system to exceed 100% efficiency.
The solution: Heat pumps bypass this limitation entirely by utilizing a refrigeration cycle to transfer ambient thermal energy rather than burning fuel to create it. Even during a sub-zero maritime winter, there is still measurable heat energy in the outdoor air. A heat pump uses specialized refrigerant that absorbs this dispersed ambient heat, compresses it to raise its temperature, and transfers it inside the house. Because moving existing heat requires significantly less electrical input than generating new heat, the mechanical efficiency of Lennox ductless systems and similar equipment can easily exceed 100%, often operating at 200% to 300% efficiency under normal conditions.
To accurately compare heating systems, homeowners must understand the specific metrics used to grade different mechanical technologies. You cannot directly compare a heat pump to a furnace using the same number, as they operate on completely different principles. Understanding these ratings ensures that properties in Mount Uniacke and surrounding areas are equipped with systems capable of handling local weather demands.
AFUE (Annual Fuel Utilization Efficiency): This metric applies exclusively to combustion systems like furnaces and boilers. It measures the percentage of fuel that is successfully converted into usable heat over an entire year. A high-efficiency gas furnace might achieve an AFUE rating of 98%, meaning only 2% of the energy is lost as exhaust.
HSPF (Heating Seasonal Performance Factor): This rating applies to heat pumps operating in heating mode. It calculates the total space heating required during the season divided by the total electrical energy consumed by the system. A higher HSPF rating indicates a more efficient unit that requires less electricity to move the same amount of thermal energy.
For a deeper dive into specific equipment ratings and performance metrics, reviewing a comprehensive guide to the best ductless heat pumps provides valuable context on how these numbers translate to real-world operation.
• Standard Gas Furnace — Efficiency Metric: AFUE — Maximum Efficiency Ceiling: Up to 98% — Operational Mechanism: Combustion (Burns fuel to create heat)
• Oil Furnace — Efficiency Metric: AFUE — Maximum Efficiency Ceiling: 80% - 87% — Operational Mechanism: Combustion (Burns fuel to create heat)
• Standard Heat Pump — Efficiency Metric: HSPF — Maximum Efficiency Ceiling: Up to 250% — Operational Mechanism: Heat Transfer (Moves ambient heat)
• Cold-Climate Heat Pump — Efficiency Metric: HSPF — Maximum Efficiency Ceiling: Up to 300%+ — Operational Mechanism: Enhanced Heat Transfer (Inverter-driven)
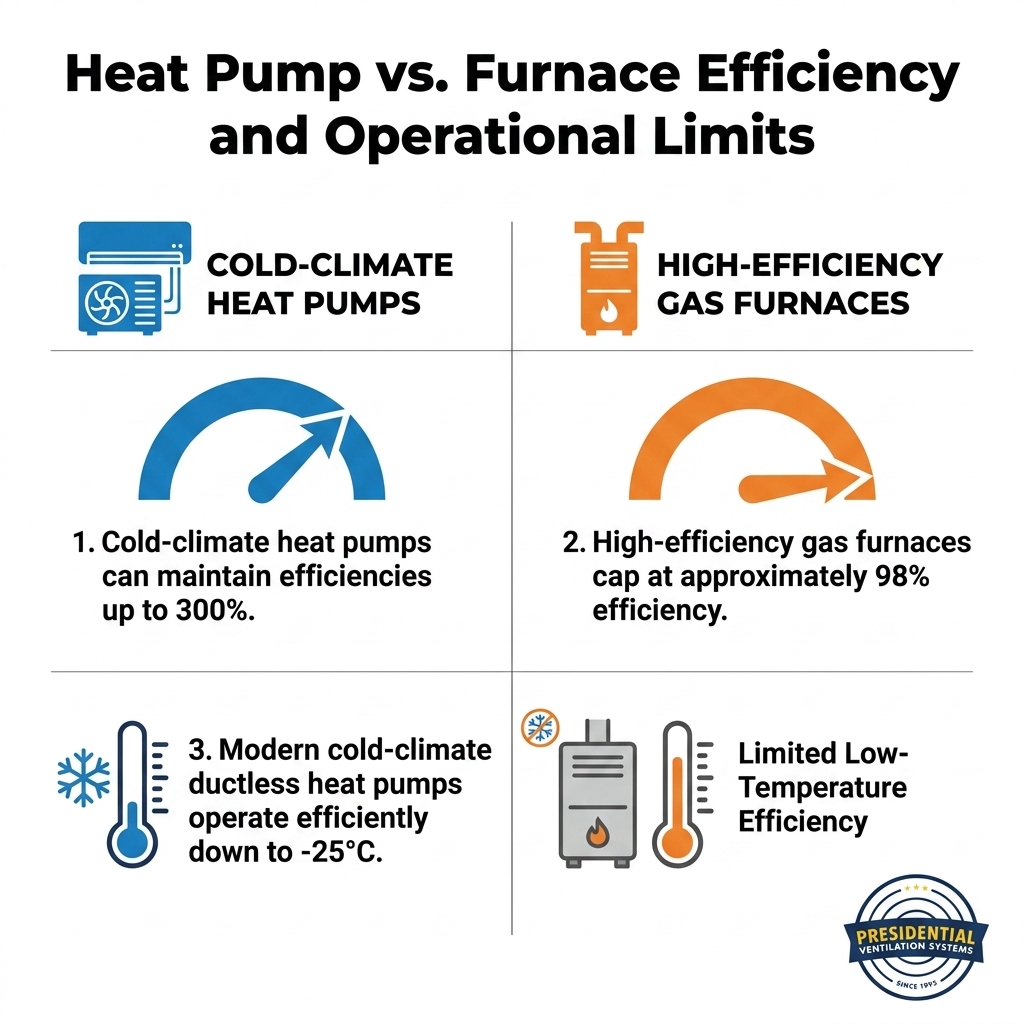
Temperature thresholds: The most critical factor in evaluating a heat pump is its objective operational limit during extreme weather. Standard heat pumps—often designed for milder southern climates—begin losing significant efficiency just below the freezing mark. As the temperature drops, there is less ambient thermal energy available, forcing the compressor to work harder to extract heat. Eventually, a standard unit reaches a balance point where it can no longer extract enough heat to keep the indoor space warm without relying on auxiliary electric resistance heating.
Cold-climate engineering: Modern cold-climate ductless heat pumps are engineered specifically to bypass these traditional limits. Utilizing advanced variable-speed inverter compressors and enhanced refrigerant management, these systems can operate efficiently in temperatures as low as -25 degrees Celsius. They physically accelerate the compressor speed to draw more thermal energy from the frigid air, maintaining indoor comfort through a sub-zero maritime winter.
Understanding these mechanical limits helps determine if a hybrid dual-fuel system or a complete transition to heat transfer is the right choice. For example, our technicians at Presidential Ventilation Systems Ltd. recently assessed a Mount Uniacke homeowner's existing, non-company installed heat pump system to evaluate its cold-weather performance. Our team explained the objective pros and cons of the current equipment's mechanical limits and offered helpful alternatives and advice for running the system efficiently despite its specific temperature thresholds.
Transitioning away from a traditional oil burner to a central or ductless heat pump system fundamentally alters a property's electrical load. A furnace primarily uses electricity just to run the blower motor, while a heat pump relies on electricity to power the heavy-duty outdoor compressor. We frequently find that older homes may require electrical panel upgrades—often moving from a 100-amp service to a 200-amp service—to safely support the continuous electrical draw of modern heating systems. Evaluating the existing electrical infrastructure is a mandatory step before committing to a heat transfer upgrade.
Cold temperatures are only one variable in the mechanical performance equation; ambient moisture plays a massive and often overlooked role. In our years of installing systems across Nova Scotia, we've found that the dampness of maritime winters requires specialized defrost capabilities, focusing on the specific challenges of high humidity combined with freezing temperatures. When a heat pump operates in heating mode, the outdoor coil becomes extremely cold—often colder than the ambient air—which causes moisture in the humid air to condense and freeze on the metal fins.
To maintain efficiency, the system must periodically clear this frost accumulation through an automatic defrost cycle. Here is the step-by-step mechanical process of how a system manages high humidity during a sub-zero maritime winter:
1. Frost Accumulation: High ambient humidity in the cold maritime air contacts the freezing outdoor condenser coils, rapidly forming a layer of frost that insulates the fins and restricts airflow.
2. Sensor Activation: Internal thermistors and solid-state control boards detect the drop in airflow and the changing temperature differential across the coil, signaling that the unit is losing efficiency.
3. Reversing the Valve: The system temporarily reverses the flow of refrigerant, shifting from heating mode to cooling mode. This redirects the hot, compressed refrigerant gas back outdoors instead of inside the house.
4. Ice Melt and Drainage: The hot refrigerant rapidly melts the accumulated ice on the outdoor coil. The resulting water must freely drain away from the base pan to prevent solid ice blocks from forming inside the chassis.
5. Resuming Heating: Once the sensors detect the coil is clear of ice, the reversing valve shifts back, and the system resumes extracting heat from the outdoor air to warm the home.
During this brief defrost period, the indoor unit temporarily stops blowing warm air. Systems engineered for damp, cold climates complete this cycle rapidly to minimize any disruption to indoor comfort.
Even the most advanced mechanical equipment will fail to reach its advertised efficiency ratings if the installation parameters are incorrect. Equipment ratings are only accurate if the system is precisely sized and installed correctly for the specific thermal envelope of the home. Certified installation practices, such as maintaining Daikin Comfort Pro status, directly impact a system's ability to maintain efficiency during extreme weather by ensuring strict adherence to manufacturer specifications.
• Precise Load Calculations: Technicians must perform detailed calculations to match the equipment capacity to the home's exact square footage, insulation levels, and window quality. Oversized units will short-cycle, while undersized units will run constantly without satisfying the thermostat.
• Strategic Outdoor Placement: Proper placement of outdoor units is critical in Mount Uniacke and surrounding areas to prevent snow burial. Units must be elevated on stands or wall brackets to allow for adequate defrost drainage and unobstructed airflow during heavy snowfall.
• Refrigerant Line Sizing: The copper lines connecting the indoor and outdoor units must be sized correctly and purged with nitrogen to prevent moisture and non-condensables from degrading the compressor oil.
• Documentation and Compliance: Navigating warranties and available rebates requires meticulous documentation during the installation phase. A recent project of ours demonstrated this full lifecycle: after providing a comprehensive quote, our installation team followed up, completed the installation, submitted the manufacturer warranty, and clearly explained the rebate process to the homeowner.
Executing these technical prerequisites accurately is why professional heat pump installations are vital for long-term mechanical reliability.
The ongoing mechanical care required for heat transfer systems differs significantly from combustion systems. Traditional furnaces require annual checks primarily focused on combustion safety. Our service technicians must inspect heat exchangers for microscopic cracks that could leak carbon monoxide, ensure the exhaust flues are drafting correctly, and clean the burner assemblies to maintain a safe flame.
Ductless systems and central heat pumps do not have combustion hazards, but they move massive volumes of air and are highly sensitive to airflow restrictions. They require frequent filter cleaning by the homeowner and professional deep cleaning of the indoor blower wheels and evaporator coils. If the micro-channel coils become clogged with household dust or pet dander, the system loses its ability to transfer heat efficiently, forcing the outdoor compressor to operate at higher pressures.
During a sub-zero maritime winter, a neglected heat pump will struggle to extract heat, leading to increased electrical consumption and premature component wear. We consistently see that preventative care directly correlates to the longevity of the compressor and the system's overall lifespan. Enrolling in a structured preventative maintenance plan ensures that both the indoor air handlers and the outdoor condenser are professionally calibrated and cleaned before the harsh weather arrives.
Choosing between a traditional combustion furnace and a modern heat transfer system comes down to understanding your home's existing infrastructure and the specific demands of the local climate. Reviewing objective options comparisons for homeowners allows you to look past the marketing language and focus on factual mechanical limits, electrical requirements, and efficiency ratings.
By evaluating how different systems handle defrost cycles, deep freezes, and ongoing maintenance, you can confidently plan your next HVAC upgrade. A clear, technically sound understanding of these operational differences ensures that the equipment you choose will provide consistent, efficient warmth. Consulting with our certified professionals at Presidential Ventilation Systems Ltd. guarantees that your chosen system is sized, placed, and installed to meet your year-round comfort expectations.
At what temperature do heat pumps lose efficiency?
Standard heat pumps typically begin to lose efficiency as temperatures drop below freezing (0°C). However, modern cold-climate heat pumps are engineered with advanced compressors that maintain high efficiency and heat output in temperatures as low as -25°C. The exact drop-off point depends heavily on the specific make and model of the equipment.
How does a maritime climate affect heat pump performance?
A damp maritime climate accelerates frost buildup on the outdoor condenser coils due to high ambient humidity. This requires the heat pump to initiate automatic defrost cycles more frequently to melt the accumulated ice. Systems installed in these regions must be specifically designed to handle rapid defrosting without severely interrupting indoor heating.
Can a heat pump replace a furnace completely?
Yes, a properly sized cold-climate heat pump can completely replace a traditional furnace in most homes. The property must have an adequate electrical panel to support the system, and the unit must be rated for the lowest expected winter temperatures in your specific region. In some cases, homeowners opt for a hybrid system that uses both technologies.
Is it better to have a heat pump or a furnace in Canada?
The better option depends on the specific region, the home's insulation, and the local cost of electricity versus fossil fuels. Cold-climate heat pumps offer superior mechanical efficiency and operate without producing carbon monoxide, making them highly effective for many Canadian homes. Furnaces may still be preferred in extreme northern climates where temperatures consistently remain below -30°C for extended periods.
Why does my heat pump's outdoor unit ice up in the winter?
It is completely normal for a thin layer of white frost to accumulate on the outdoor unit during winter operation, as the freezing coils condense moisture from the air. The system is designed to automatically melt this frost using a built-in defrost cycle. If the unit becomes encased in a solid block of thick ice that does not melt, it indicates a mechanical issue that requires professional service.
What are the electrical requirements for switching to a heat pump?
Switching from a fossil-fuel furnace to a heat pump often requires a dedicated 220-volt circuit for the outdoor compressor. Many older homes with 100-amp electrical panels need to be upgraded to 200-amp service to safely handle the increased electrical load. A certified electrician or HVAC technician must evaluate your current panel before installation.