


How do you effectively heat and cool a sprawling main floor without compromising the clean aesthetics of your architectural design? At Presidential Ventilation, we know that when weighing Ducted vs. Ductless Heat Pumps for Open-Concept New Builds in Bedford, the answer comes down to finalizing your HVAC blueprints before the first sheet of drywall goes up. Choosing between the seamless, hidden look of a fully ducted system and the targeted, hyper-efficient control of ductless heads is one of the most critical decisions in the new construction process. If you wait too long to decide, you risk structural roadblocks, electrical panel limitations, and compromised airflow that can leave your beautiful new living space feeling drafty during the winter months.
For a complete breakdown of your choices, explore our comprehensive guide to heat pump installation options.
Across Bedford new construction developments, our team consistently sees homeowners grappling with this exact dilemma. Modern architectural trends favor wide-open sightlines, vaulted ceilings, and massive windows. While these features create stunning living environments, they also introduce complex heating and cooling challenges. To make the right choice for your new build, you need to look beyond the equipment itself and understand how different heat pump configurations interact with the specific layout, volume, and building materials of your future home.
In our years of designing HVAC systems for Mount Uniacke and Bedford homes, we've learned that heating a large, unpartitioned space requires a solid understanding of fluid dynamics and thermal physics. In a traditional home with smaller, enclosed rooms, the HVAC system simply needs to fill a confined box with conditioned air until the thermostat registers the desired temperature. Open-concept layouts completely change this equation. Without interior walls to trap and guide the air, heat naturally rises to the highest points of the room, while heavier cold air settles near the floor. If your system is not engineered for these conditions, your equipment will run constantly, yet your living spaces will still suffer from uncomfortable temperature swings.
When you remove interior walls and raise the ceiling height, you drastically increase the total cubic volume of air that needs to be conditioned. Furthermore, modern designs heavily feature expansive glass surfaces. Even the most energy-efficient double- or triple-pane windows offer significantly less insulation than a standard insulated wall, contributing to rapid heat loss during cold snaps and excessive heat gain during sunny summer afternoons. To combat these architectural hurdles, we always ensure HVAC planning for open-concept homes follows a strict, calculated approach.
1. Calculate accurate heating loads: A standard square-footage calculation is not enough. Your HVAC designer must calculate the total cubic volume of the space, factoring in the exact insulation values of your specific windows, doors, and roofing materials.
2. Determine required throw distance: "Throw distance" refers to how far the equipment can physically push conditioned air into a room before the air loses its momentum. Pushing warm air to the dead center of a massive, 800-square-foot great room requires specific fan speeds and strategic vent or unit placement.
3. Map out return air pathways: Supplying warm air is only half the battle. Your system must efficiently pull cold, stale air back to the air handler to be reconditioned. In open spaces, poorly placed return vents can lead to stagnant air pockets and isolated cold spots.
4. Account for solar heat gain: South-facing windows will naturally heat up certain zones of your open floor plan faster than others. Your system must be capable of balancing these natural temperature variations without overcooling the shaded areas of the home.
For many homeowners building their dream house, preserving the interior design is paramount. This is where ducted heat pump systems truly shine in new construction. By utilizing a central indoor air handler connected to a network of concealed sheet metal or fiberglass ductwork, a ducted system delivers conditioned air through unobtrusive floor, wall, or ceiling registers. The bulky equipment remains completely hidden in a mechanical room, basement, or attic space.
In Bedford new construction developments, integrating a ducted system during the framing phase is far easier and more cost-effective than attempting a retrofit later. The open walls allow technicians to route the ductwork perfectly, ensuring optimal airflow geometry without having to compromise on ceiling heights or build unsightly bulkheads. During a recent residential construction installation, our lead technician, Nick, performed a highly thorough installation for a family building a new home. By getting involved early, Nick was able to address all the customers' thoughts and questions regarding vent placement, ensuring the final product delivered perfectly balanced temperatures while remaining virtually invisible.
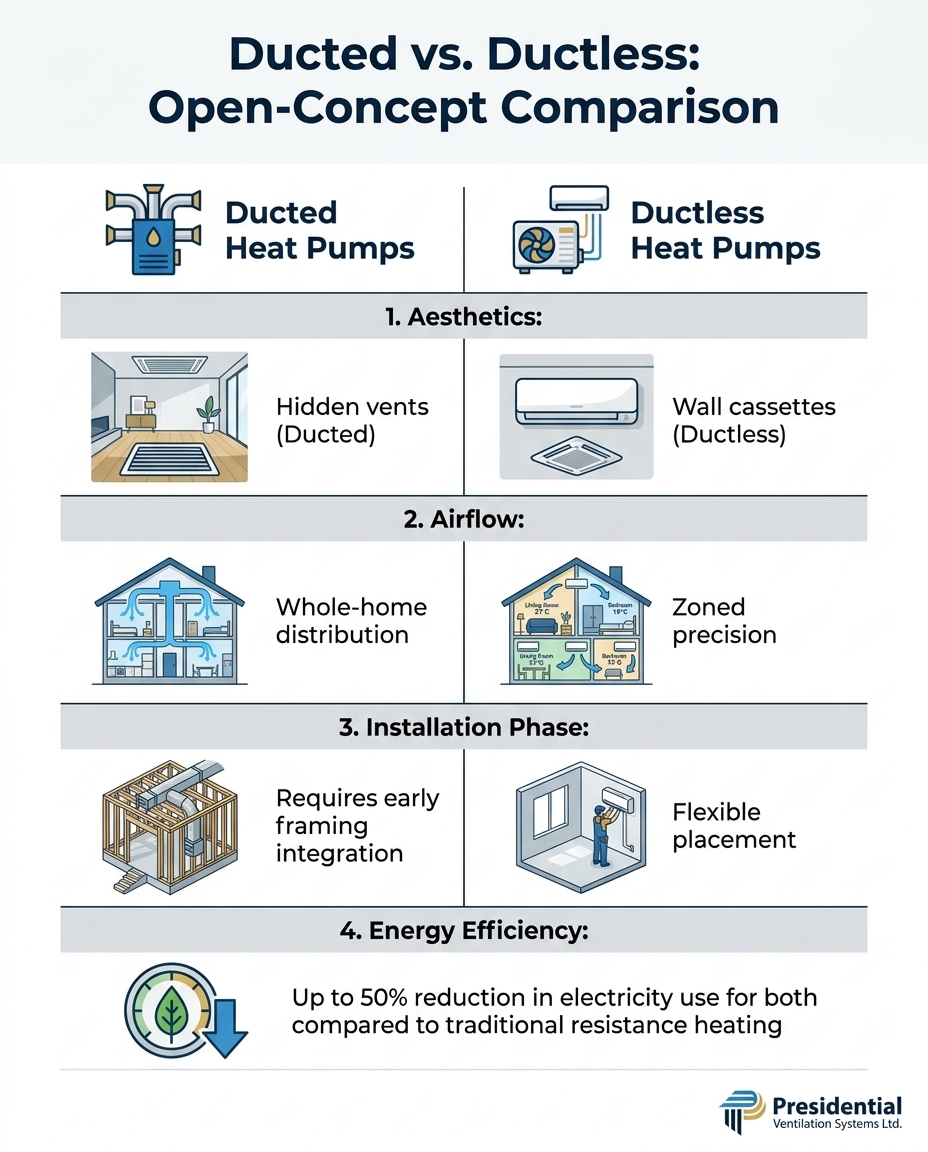
• Aesthetics — Ducted Heat Pump Pros: Completely hidden equipment; only flush registers and grilles are visible in the living space. — Ducted Heat Pump Cons: Requires dedicated mechanical space for the central air handler and ductwork chases.
• Airflow Distribution — Ducted Heat Pump Pros: Provides even, whole-home temperature control; eliminates isolated cold zones effectively. — Ducted Heat Pump Cons: Cannot easily provide different temperatures for different rooms without advanced, costly zoning dampers.
• Installation Timing — Ducted Heat Pump Pros: Can be seamlessly integrated into the architectural blueprints during the framing phase. — Ducted Heat Pump Cons: Must be finalized before drywall; retrofitting or changing the design later is highly disruptive.
• Air Filtration — Ducted Heat Pump Pros: Allows for the installation of whole-home media filters, UV purifiers, and central humidifiers. — Ducted Heat Pump Cons: Ducts require periodic cleaning to maintain optimal indoor air quality over the years.
If your open-concept build features complex rooflines, limited attic space, or a sprawling layout that naturally divides into distinct functional areas, ductless heat pumps offer an incredibly efficient alternative. Instead of relying on a central air handler and ductwork, a ductless system utilizes an outdoor compressor connected directly to one or more indoor air-handling units (often called mini-split heads or cassettes) mounted on the walls, floors, or recessed into the ceiling.
The primary advantage our team sees with a ductless approach in Bedford new construction developments is hyper-targeted zoning. You can independently control the temperature in the kitchen, the living room, and the master suite. However, this precision comes with an aesthetic trade-off. Wall-mounted units are visible in the living space. To maximize throw distance and ensure the conditioned air reaches the center of your open floor plan, these units must be strategically placed high on exterior walls, free from obstructions like tall furniture or heavy drapery. While modern cassettes are sleek and unobtrusive, their placement must be factored into your interior design plans early on to ensure they blend naturally with your decor.
A pattern we see often in new construction is treating the HVAC system as an afterthought. Whether you lean toward a ducted or ductless configuration, the decision must be finalized well before the drywall installation begins. Modern heat pumps are highly efficient, but they still require dedicated electrical circuits, specific load calculations, and physical space within the wall cavities for refrigerant lines, condensate drains, and control wiring.
If you delay this decision, you may find that your electrical panel was not sized to handle the specific amperage of your chosen outdoor compressor, or that the framing does not accommodate the necessary ductwork drops. To keep your Bedford new construction development on schedule and on budget, we recommend following this critical planning checklist in coordination with your builder and electrical contractor:
• Finalize the heat loss/heat gain calculation: Have your HVAC contractor review the finalized architectural plans, including window specifications and insulation values, to determine the exact capacity required.
• Coordinate with the electrician: Ensure the main electrical panel is sized appropriately for the heat pump's maximum amp draw, and that dedicated circuits are roughed in to the exact locations of the indoor and outdoor units.
• Map the refrigerant and drain lines: Ductless systems require copper line sets and PVC drain pipes to run through the walls from the indoor heads to the outdoor unit. These must be installed and pressure-tested before the walls are closed up.
• Design the ductwork layout: For ducted systems, work with the builder to ensure joist spaces and wall cavities are kept clear of plumbing and electrical runs where trunk lines and branch ducts need to go.
• Plan the outdoor unit placement: Select a location for the outdoor compressor that minimizes noise near bedrooms, complies with local property setbacks, and remains accessible for winter snow clearing.
Having installed countless systems across Mount Uniacke and the greater Halifax area, we know firsthand that the Nova Scotia winter heating season is notoriously demanding. We don't just experience cold temperatures; we face a damp, penetrating coastal chill, high humidity, and rapid temperature fluctuations that can swing from freezing rain to deep sub-zero conditions in a matter of hours.
These maritime weather patterns heavily impact heat pump performance. If a system is undersized for a sprawling open floor plan, it will run continuously during coastal cold snaps, struggling to push warm air across large rooms while simultaneously fighting to execute its automatic defrost cycles. Conversely, an oversized system will short-cycle, turning on and off too rapidly to properly dehumidify the air, leaving your home feeling clammy during our humid summers. Selecting a cold-climate rated unit that maintains its heating capacity down to deep freezing temperatures is critical. For a deeper dive into units rated specifically for our coastal environment, review our guide on the best ducted heat pumps for Halifax area homes. Proper sizing ensures your system can gracefully handle the heavy lifting required during the harshest months without overworking the compressor.
Building a new home is a significant financial investment, but integrating a high-efficiency heat pump can unlock substantial provincial incentives. Efficiency Nova Scotia offers robust rebate programs designed to encourage the adoption of energy-saving technologies in new constructions. However, navigating the qualification requirements requires strict attention to detail and professional oversight.
To ensure your new build qualifies for these valuable incentives, you must adhere to several key requirements. First and foremost, the equipment must meet specific performance tiers, and the installation must be completed by an approved, certified dealer. As a trusted Daikin Comfort Pro dealer with deep roots in Nova Scotia's residential and commercial construction sectors, our Presidential Ventilation team guarantees that your system is optimally sized for your complex open layout and perfectly aligned with all provincial rebate criteria.
• Certified Installation: Rebates are strictly contingent on the system being installed by a recognized professional. DIY installations or work done by uncertified contractors will immediately void your eligibility.
• Electrical Compliance: Upgrading from traditional heating plans to a central heat pump often requires careful electrical panel coordination. For example, during a recent project involving a transition to a central heat pump, our team member Jack worked closely with the homeowners to resolve their electrical panel concerns, ensuring the new load was safely accommodated and fully compliant with code.
• Proper Documentation: You will need to submit detailed invoices, AHRI certificates (proving the efficiency rating of the matched indoor and outdoor units), and warranty documentation. A professional contractor will handle the bulk of this paperwork on your behalf.
• Pre-Approval Requirements: Some new construction programs require energy modeling or pre-approval before the equipment is purchased. Always consult with your HVAC expert during the blueprint phase to ensure no steps are missed.
The better option depends entirely on your architectural design and aesthetic preferences. Ducted systems are often preferred in new builds because the ductwork can be easily hidden during the framing stage, providing invisible, whole-home comfort. Ductless systems are excellent if your design lacks the ceiling space for ductwork or if you prioritize highly specific, room-by-room temperature zoning.
In an open concept layout, mini-split heads should be placed high on exterior walls, pointing toward the center of the largest living areas to maximize airflow "throw distance." They should be positioned away from direct heat sources, tall furniture, or corners that might obstruct the fan's ability to distribute conditioned air evenly across the room.
The exact number depends on the total cubic volume of the space, the ceiling height, and the insulation values of your windows and walls. Generally, a sprawling open-concept main floor requires at least one large-capacity head in the primary living area, often supplemented by a smaller head in the kitchen or dining zone to ensure even temperatures and eliminate cold spots.
Yes, absolutely. Mini-splits are highly effective in open-concept houses, provided they are properly sized for the cubic volume of the space. Because open layouts lack walls to trap air, the mini-split must have a powerful enough fan to push the conditioned air across the large expanse, requiring careful calculation by an HVAC professional.
The best heating system for a new house in Nova Scotia is a cold-climate rated heat pump (either ducted or ductless) paired with a reliable backup heat source. Because of the damp, freezing coastal winters, the system must be specifically engineered to maintain high heating capacities at sub-zero temperatures while efficiently managing summer humidity.
To qualify for heat pump rebates through Efficiency Nova Scotia, you must purchase an eligible, high-efficiency system on their approved product list. Furthermore, the system must be installed by a certified contractor, and you must submit all required AHRI certificates, invoices, and warranty documentation within the program's specified timeframe.
Choosing between a ducted and ductless heat pump for your open-concept new build is a decision that impacts your daily comfort, your interior design, and your long-term energy costs. Whether you prefer the invisible, whole-home distribution of concealed ductwork or the hyper-efficient, zoned control of a ductless setup, the most important step is finalizing your strategy before the drywall is hung. Proper planning ensures your electrical panels are sized correctly, your airflow is mapped to eliminate cold spots, and your system meets all requirements for provincial rebates.
When it comes to executing these plans, experience matters. During a recent winter commercial and residential project, our Presidential Ventilation installation team was able to complete a complex heat pump installation efficiently within a single day, ensuring the home was protected from the freezing temperatures without delaying the overall construction schedule. If you are in the planning phases of a Bedford new construction development, you need a clear decision framework that guarantees optimal airflow and seamless aesthetics. Contact our team at Presidential Ventilation today to schedule a consultation and finalize your HVAC blueprints with confidence.


How do you effectively heat and cool a sprawling main floor without compromising the clean aesthetics of your architectural design? At Presidential Ventilation, we know that when weighing Ducted vs. Ductless Heat Pumps for Open-Concept New Builds in Bedford, the answer comes down to finalizing your HVAC blueprints before the first sheet of drywall goes up. Choosing between the seamless, hidden look of a fully ducted system and the targeted, hyper-efficient control of ductless heads is one of the most critical decisions in the new construction process. If you wait too long to decide, you risk structural roadblocks, electrical panel limitations, and compromised airflow that can leave your beautiful new living space feeling drafty during the winter months.
For a complete breakdown of your choices, explore our comprehensive guide to heat pump installation options.
Across Bedford new construction developments, our team consistently sees homeowners grappling with this exact dilemma. Modern architectural trends favor wide-open sightlines, vaulted ceilings, and massive windows. While these features create stunning living environments, they also introduce complex heating and cooling challenges. To make the right choice for your new build, you need to look beyond the equipment itself and understand how different heat pump configurations interact with the specific layout, volume, and building materials of your future home.
In our years of designing HVAC systems for Mount Uniacke and Bedford homes, we've learned that heating a large, unpartitioned space requires a solid understanding of fluid dynamics and thermal physics. In a traditional home with smaller, enclosed rooms, the HVAC system simply needs to fill a confined box with conditioned air until the thermostat registers the desired temperature. Open-concept layouts completely change this equation. Without interior walls to trap and guide the air, heat naturally rises to the highest points of the room, while heavier cold air settles near the floor. If your system is not engineered for these conditions, your equipment will run constantly, yet your living spaces will still suffer from uncomfortable temperature swings.
When you remove interior walls and raise the ceiling height, you drastically increase the total cubic volume of air that needs to be conditioned. Furthermore, modern designs heavily feature expansive glass surfaces. Even the most energy-efficient double- or triple-pane windows offer significantly less insulation than a standard insulated wall, contributing to rapid heat loss during cold snaps and excessive heat gain during sunny summer afternoons. To combat these architectural hurdles, we always ensure HVAC planning for open-concept homes follows a strict, calculated approach.
1. Calculate accurate heating loads: A standard square-footage calculation is not enough. Your HVAC designer must calculate the total cubic volume of the space, factoring in the exact insulation values of your specific windows, doors, and roofing materials.
2. Determine required throw distance: "Throw distance" refers to how far the equipment can physically push conditioned air into a room before the air loses its momentum. Pushing warm air to the dead center of a massive, 800-square-foot great room requires specific fan speeds and strategic vent or unit placement.
3. Map out return air pathways: Supplying warm air is only half the battle. Your system must efficiently pull cold, stale air back to the air handler to be reconditioned. In open spaces, poorly placed return vents can lead to stagnant air pockets and isolated cold spots.
4. Account for solar heat gain: South-facing windows will naturally heat up certain zones of your open floor plan faster than others. Your system must be capable of balancing these natural temperature variations without overcooling the shaded areas of the home.
For many homeowners building their dream house, preserving the interior design is paramount. This is where ducted heat pump systems truly shine in new construction. By utilizing a central indoor air handler connected to a network of concealed sheet metal or fiberglass ductwork, a ducted system delivers conditioned air through unobtrusive floor, wall, or ceiling registers. The bulky equipment remains completely hidden in a mechanical room, basement, or attic space.
In Bedford new construction developments, integrating a ducted system during the framing phase is far easier and more cost-effective than attempting a retrofit later. The open walls allow technicians to route the ductwork perfectly, ensuring optimal airflow geometry without having to compromise on ceiling heights or build unsightly bulkheads. During a recent residential construction installation, our lead technician, Nick, performed a highly thorough installation for a family building a new home. By getting involved early, Nick was able to address all the customers' thoughts and questions regarding vent placement, ensuring the final product delivered perfectly balanced temperatures while remaining virtually invisible.
• Aesthetics — Ducted Heat Pump Pros: Completely hidden equipment; only flush registers and grilles are visible in the living space. — Ducted Heat Pump Cons: Requires dedicated mechanical space for the central air handler and ductwork chases.
• Airflow Distribution — Ducted Heat Pump Pros: Provides even, whole-home temperature control; eliminates isolated cold zones effectively. — Ducted Heat Pump Cons: Cannot easily provide different temperatures for different rooms without advanced, costly zoning dampers.
• Installation Timing — Ducted Heat Pump Pros: Can be seamlessly integrated into the architectural blueprints during the framing phase. — Ducted Heat Pump Cons: Must be finalized before drywall; retrofitting or changing the design later is highly disruptive.
• Air Filtration — Ducted Heat Pump Pros: Allows for the installation of whole-home media filters, UV purifiers, and central humidifiers. — Ducted Heat Pump Cons: Ducts require periodic cleaning to maintain optimal indoor air quality over the years.
If your open-concept build features complex rooflines, limited attic space, or a sprawling layout that naturally divides into distinct functional areas, ductless heat pumps offer an incredibly efficient alternative. Instead of relying on a central air handler and ductwork, a ductless system utilizes an outdoor compressor connected directly to one or more indoor air-handling units (often called mini-split heads or cassettes) mounted on the walls, floors, or recessed into the ceiling.
The primary advantage our team sees with a ductless approach in Bedford new construction developments is hyper-targeted zoning. You can independently control the temperature in the kitchen, the living room, and the master suite. However, this precision comes with an aesthetic trade-off. Wall-mounted units are visible in the living space. To maximize throw distance and ensure the conditioned air reaches the center of your open floor plan, these units must be strategically placed high on exterior walls, free from obstructions like tall furniture or heavy drapery. While modern cassettes are sleek and unobtrusive, their placement must be factored into your interior design plans early on to ensure they blend naturally with your decor.
A pattern we see often in new construction is treating the HVAC system as an afterthought. Whether you lean toward a ducted or ductless configuration, the decision must be finalized well before the drywall installation begins. Modern heat pumps are highly efficient, but they still require dedicated electrical circuits, specific load calculations, and physical space within the wall cavities for refrigerant lines, condensate drains, and control wiring.
If you delay this decision, you may find that your electrical panel was not sized to handle the specific amperage of your chosen outdoor compressor, or that the framing does not accommodate the necessary ductwork drops. To keep your Bedford new construction development on schedule and on budget, we recommend following this critical planning checklist in coordination with your builder and electrical contractor:
• Finalize the heat loss/heat gain calculation: Have your HVAC contractor review the finalized architectural plans, including window specifications and insulation values, to determine the exact capacity required.
• Coordinate with the electrician: Ensure the main electrical panel is sized appropriately for the heat pump's maximum amp draw, and that dedicated circuits are roughed in to the exact locations of the indoor and outdoor units.
• Map the refrigerant and drain lines: Ductless systems require copper line sets and PVC drain pipes to run through the walls from the indoor heads to the outdoor unit. These must be installed and pressure-tested before the walls are closed up.
• Design the ductwork layout: For ducted systems, work with the builder to ensure joist spaces and wall cavities are kept clear of plumbing and electrical runs where trunk lines and branch ducts need to go.
• Plan the outdoor unit placement: Select a location for the outdoor compressor that minimizes noise near bedrooms, complies with local property setbacks, and remains accessible for winter snow clearing.
Having installed countless systems across Mount Uniacke and the greater Halifax area, we know firsthand that the Nova Scotia winter heating season is notoriously demanding. We don't just experience cold temperatures; we face a damp, penetrating coastal chill, high humidity, and rapid temperature fluctuations that can swing from freezing rain to deep sub-zero conditions in a matter of hours.
These maritime weather patterns heavily impact heat pump performance. If a system is undersized for a sprawling open floor plan, it will run continuously during coastal cold snaps, struggling to push warm air across large rooms while simultaneously fighting to execute its automatic defrost cycles. Conversely, an oversized system will short-cycle, turning on and off too rapidly to properly dehumidify the air, leaving your home feeling clammy during our humid summers. Selecting a cold-climate rated unit that maintains its heating capacity down to deep freezing temperatures is critical. For a deeper dive into units rated specifically for our coastal environment, review our guide on the best ducted heat pumps for Halifax area homes. Proper sizing ensures your system can gracefully handle the heavy lifting required during the harshest months without overworking the compressor.
Building a new home is a significant financial investment, but integrating a high-efficiency heat pump can unlock substantial provincial incentives. Efficiency Nova Scotia offers robust rebate programs designed to encourage the adoption of energy-saving technologies in new constructions. However, navigating the qualification requirements requires strict attention to detail and professional oversight.
To ensure your new build qualifies for these valuable incentives, you must adhere to several key requirements. First and foremost, the equipment must meet specific performance tiers, and the installation must be completed by an approved, certified dealer. As a trusted Daikin Comfort Pro dealer with deep roots in Nova Scotia's residential and commercial construction sectors, our Presidential Ventilation team guarantees that your system is optimally sized for your complex open layout and perfectly aligned with all provincial rebate criteria.
• Certified Installation: Rebates are strictly contingent on the system being installed by a recognized professional. DIY installations or work done by uncertified contractors will immediately void your eligibility.
• Electrical Compliance: Upgrading from traditional heating plans to a central heat pump often requires careful electrical panel coordination. For example, during a recent project involving a transition to a central heat pump, our team member Jack worked closely with the homeowners to resolve their electrical panel concerns, ensuring the new load was safely accommodated and fully compliant with code.
• Proper Documentation: You will need to submit detailed invoices, AHRI certificates (proving the efficiency rating of the matched indoor and outdoor units), and warranty documentation. A professional contractor will handle the bulk of this paperwork on your behalf.
• Pre-Approval Requirements: Some new construction programs require energy modeling or pre-approval before the equipment is purchased. Always consult with your HVAC expert during the blueprint phase to ensure no steps are missed.
The better option depends entirely on your architectural design and aesthetic preferences. Ducted systems are often preferred in new builds because the ductwork can be easily hidden during the framing stage, providing invisible, whole-home comfort. Ductless systems are excellent if your design lacks the ceiling space for ductwork or if you prioritize highly specific, room-by-room temperature zoning.
In an open concept layout, mini-split heads should be placed high on exterior walls, pointing toward the center of the largest living areas to maximize airflow "throw distance." They should be positioned away from direct heat sources, tall furniture, or corners that might obstruct the fan's ability to distribute conditioned air evenly across the room.
The exact number depends on the total cubic volume of the space, the ceiling height, and the insulation values of your windows and walls. Generally, a sprawling open-concept main floor requires at least one large-capacity head in the primary living area, often supplemented by a smaller head in the kitchen or dining zone to ensure even temperatures and eliminate cold spots.
Yes, absolutely. Mini-splits are highly effective in open-concept houses, provided they are properly sized for the cubic volume of the space. Because open layouts lack walls to trap air, the mini-split must have a powerful enough fan to push the conditioned air across the large expanse, requiring careful calculation by an HVAC professional.
The best heating system for a new house in Nova Scotia is a cold-climate rated heat pump (either ducted or ductless) paired with a reliable backup heat source. Because of the damp, freezing coastal winters, the system must be specifically engineered to maintain high heating capacities at sub-zero temperatures while efficiently managing summer humidity.
To qualify for heat pump rebates through Efficiency Nova Scotia, you must purchase an eligible, high-efficiency system on their approved product list. Furthermore, the system must be installed by a certified contractor, and you must submit all required AHRI certificates, invoices, and warranty documentation within the program's specified timeframe.
Choosing between a ducted and ductless heat pump for your open-concept new build is a decision that impacts your daily comfort, your interior design, and your long-term energy costs. Whether you prefer the invisible, whole-home distribution of concealed ductwork or the hyper-efficient, zoned control of a ductless setup, the most important step is finalizing your strategy before the drywall is hung. Proper planning ensures your electrical panels are sized correctly, your airflow is mapped to eliminate cold spots, and your system meets all requirements for provincial rebates.
When it comes to executing these plans, experience matters. During a recent winter commercial and residential project, our Presidential Ventilation installation team was able to complete a complex heat pump installation efficiently within a single day, ensuring the home was protected from the freezing temperatures without delaying the overall construction schedule. If you are in the planning phases of a Bedford new construction development, you need a clear decision framework that guarantees optimal airflow and seamless aesthetics. Contact our team at Presidential Ventilation today to schedule a consultation and finalize your HVAC blueprints with confidence.

The fall shoulder season in maritime Nova Scotia is fast approaching, and your retail store's climate control is about to face its toughest test of the year. Preparing your Dartmouth retail store's HVAC for the fall shoulder season means navigating freezing mornings that demand heat, followed by busy, sunlit afternoons that require active cooling. This extreme daily temperature swing creates a unique concrete problem for commercial spaces: the building requires robust heating at dawn, but rapid cooling just a few hours later when the store fills with customers.
If your commercial thermostat controls are not configured correctly, this dramatic shift causes your heating and cooling systems to fight each other. The core decision point for facility managers is how to properly configure commercial thermostat deadband settings to handle these rapid daily temperature shifts without causing excessive mechanical strain. Ensure you have reliable commercial heating services on standby before the unpredictable coastal weather takes a toll on your equipment.
Managing a commercial retail space is vastly different from controlling a residential home. In a residential setting, you might simply switch the thermostat from "Cool" to "Heat" once October arrives. In a Dartmouth retail environment, doing so will almost certainly result in an uncomfortably hot store by 2:00 PM. The challenge lies in balancing the natural climate fluctuations of maritime fall weather with the heavy internal heat loads generated by retail operations. When commercial systems are left on standard factory settings during this transition, the resulting inefficiency leads to massive energy waste and significant wear on expensive commercial electrical components.
Retail stores struggle with temperature regulation during the fall significantly more than standard office buildings or warehouses. This difficulty stems from the concept of latent and sensible heat loads. Even when the outside air is crisp and cool, the inside of a retail store generates a massive amount of its own heat.
Consider the typical heat sources present in a busy retail environment:
• High-intensity lighting: Large arrays of display lights, track lighting, and illuminated signage generate continuous radiant heat throughout business hours.
• Electronic displays: Point-of-sale systems, digital advertising screens, and massive refrigeration units (which exhaust heat into the aisles) constantly raise the ambient temperature.
• Foot traffic: Every customer walking through the door introduces body heat and moisture into the space, rapidly changing the indoor climate during peak shopping hours.
Dartmouth's coastal proximity exacerbates rapid temperature and humidity shifts during the fall transition period, stressing improperly configured commercial HVAC systems. The frequent opening and closing of main entry doors allows cold, damp maritime air to rush in, confusing the thermostat sensors located deeper inside the store. The system detects a sudden drop in temperature and triggers the furnace or heating mode.
However, within minutes, the massive internal heat loads from lights and bodies warm that air back up, pushing the indoor temperature past the comfort zone. This dynamic triggers the need for active cooling even when outdoor temperatures begin to drop into the single digits. Standard residential thermostat practices simply do not apply to commercial retail environments because residential homes do not experience this rapid, intense fluctuation of internal heat generation. Commercial spaces require specialized control strategies to manage this chaotic thermal environment.
To resolve the issue of systems fighting each other, commercial HVAC relies on a specific control setting known as a thermostat deadband. A thermostat deadband is defined as the specific temperature range where neither heating nor cooling is activated. It is a neutral zone, or a buffer, programmed into the commercial control system to give the mechanical equipment a rest.
Without a proper deadband, a commercial HVAC system can experience "overlap." This happens when the heating setpoint and the cooling setpoint are too close together. For example, if the heat is set to turn on at 20°C and the AC is set to turn on at 21°C, the system will constantly bounce back and forth. The furnace runs, overshoots the target slightly to 21.5°C, which immediately triggers the air conditioning to turn on. The AC then cools the space down to 19.5°C, which immediately triggers the heat again. The systems are literally fighting each other, wasting massive amounts of energy.
According to ASHRAE (American Society of Heating, Refrigerating and Air-Conditioning Engineers) commercial building temperature guidelines, establishing a proper deadband is critical for energy efficiency and occupant comfort. A typical thermostat deadband variance of 3-5 degrees is recommended to prevent this overlap.
• Zero Deadband (Incorrect) — Heating Setpoint: 21°C — Cooling Setpoint: 21°C — System Behavior: Constant switching between heat and AC; rapid component failure.
• Narrow Deadband (Risky) — Heating Setpoint: 20°C — Cooling Setpoint: 21°C — System Behavior: Frequent cycling during fall shoulder season temperature swings.
• Optimized Deadband (Correct) — Heating Setpoint: 19°C — Cooling Setpoint: 23°C — System Behavior: System rests in the 4-degree neutral zone; saves energy and wear.
Configuring these advanced deadband controls requires a professional understanding of commercial electrical and mechanical systems. Facility managers should never attempt to rewire internal commercial thermostats, adjust electrical contactors, or bypass safety limits, as commercial voltage can be highly dangerous and improper settings can instantly damage heavy rooftop units (RTUs).
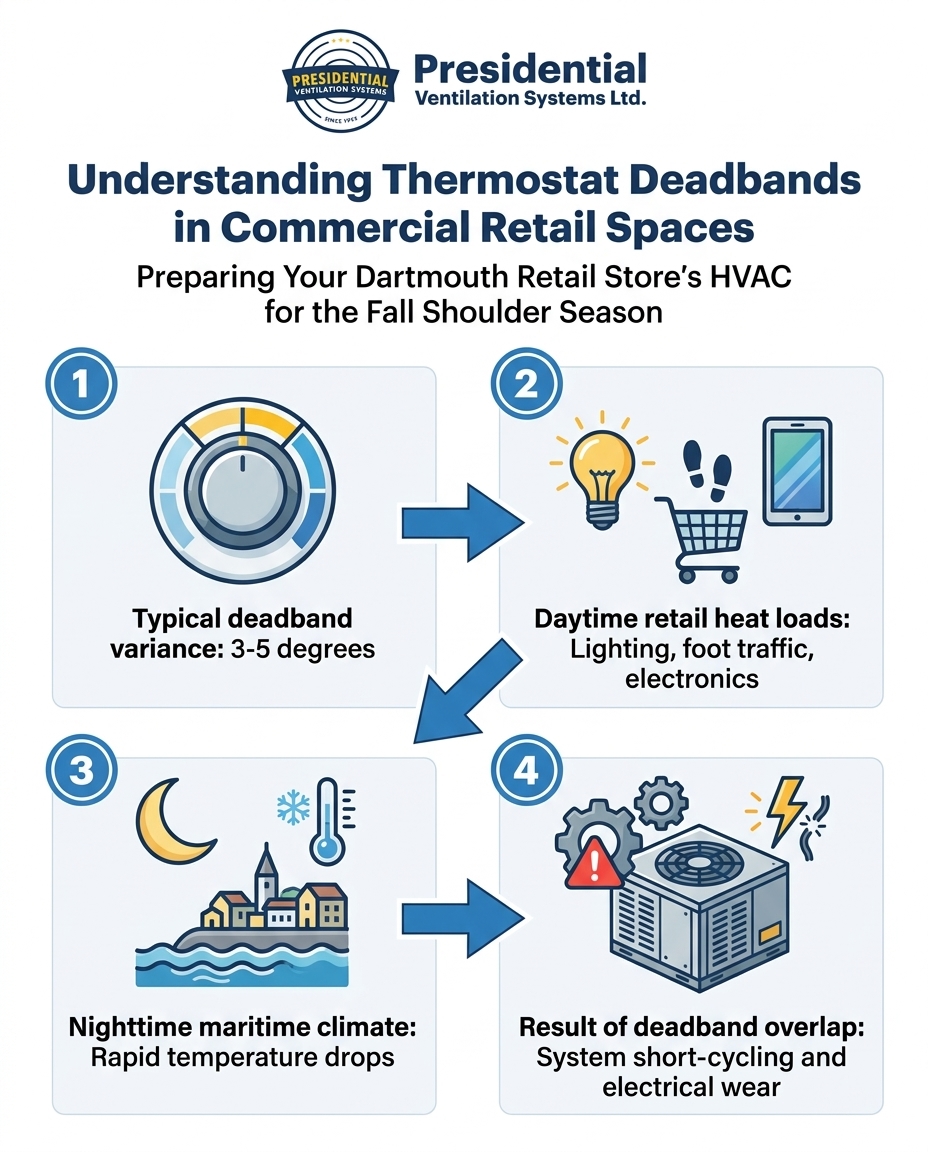
When a deadband is improperly configured during the fall shoulder season, the most immediate consequence is short-cycling. In a commercial context, short-cycling occurs when a massive piece of HVAC equipment turns on, runs for only a few minutes, and then abruptly shuts off, only to restart moments later. Fall weather frequently causes this because the ambient temperature hovers right on the edge of the thermostat's setpoints.
Rapid daily temperature shifts lead to excessive mechanical wear and tear on commercial compressors. A compressor is designed to run in long, steady cycles to efficiently move refrigerant and allow lubricating oils to circulate properly. When the system short-cycles, the oil never fully returns to the compressor, leading to increased friction, overheating, and eventual catastrophic mechanical failure. The constant starting and stopping grinds down bearings and stresses the blower motor belts.
Beyond the mechanical parts, short-cycling places immense strain on commercial electrical components. Every time a heavy commercial rooftop unit starts up, it draws a massive surge of power known as inrush current. This current is often several times higher than the running current. When heavy machinery cycles on and off too frequently, this repeated surge overheats electrical contactors, degrades capacitors, and can even cause phase imbalances in the building's electrical panel.
Establishing a proper thermostat deadband variance (typically 3-5 degrees) allows the system to rest. By widening the gap between the heating and cooling triggers, the indoor temperature is allowed to drift naturally within a comfortable range. This simple optimization drastically reduces the number of startup cycles, extending the equipment lifespan and protecting the building's electrical infrastructure.
Facility managers and store owners need to know how to identify if their current deadband settings are incorrect before the equipment suffers permanent damage. Because the fall shoulder season in maritime Nova Scotia forces systems to work in both modes daily, symptoms of deadband overlap become highly visible.
Watch for these common warning signs that your retail HVAC system is fighting itself:
• Noticeable temperature swings: Customers or staff complain that the store feels freezing near the entrance but boiling hot near the back displays, changing rapidly by the hour.
• Constant blower fan operation: The air never stops rushing through the vents, yet the temperature never seems to stabilize.
• Unusually high energy bills: A sudden, unexplained spike in commercial electrical costs during September or October often indicates the heat and AC are running simultaneously.
• Rapid clicking noises: Hearing the thermostat or the rooftop unit constantly clicking on and off every ten minutes.
One of the most frustrating scenarios for a retail manager is when the air conditioner not working during warm afternoons becomes a daily disruption, despite the system functioning perfectly to heat the store that very same morning. This usually means the safety sensors have locked the cooling system out due to short-cycling or frozen coils caused by improper fall settings.
Always observe the operational cycles by listening to the vents and monitoring the thermostat readouts, but never attempt internal electrical diagnostics. Instead, document these specific issues—noting the time of day the temperature swings occur and how often the system cycles—to share with a commercial HVAC technician upon arrival.
Optimizing your commercial controls is not just about preventing breakdowns; it is directly tied to your retail store's bottom line. The relationship between reduced short-cycling and overall energy consumption in retail spaces is profound. Every unnecessary startup surge avoided is electricity saved.
When you optimize commercial HVAC controls, you reduce unnecessary mechanical wear, which lowers your long-term maintenance costs. However, the immediate financial benefit comes from reduced monthly utility bills. By allowing the store's temperature to drift naturally within that 3-5 degree deadband, the system relies on the building's thermal mass rather than active mechanical heating or cooling.
Furthermore, upgrading to advanced commercial thermostats or building automation controls can help businesses qualify for provincial energy efficiency rebates. Programs designed to reduce grid strain often reward commercial properties that upgrade from outdated, manual thermostats to smart, deadband-capable control systems. Reviewing Efficiency Nova Scotia commercial rebate literature is a smart first step, as many of these incentives require professional installation and verification. Seeking a professional system assessment not only ensures your deadbands are set perfectly for the maritime fall, but it also provides the documentation needed to pursue construction, electrical, and energy efficiency rebates.
Transitioning from a technical understanding of deadbands to actual implementation requires professional support. A professional fall inspection for a commercial system entails much more than changing a filter. Technicians must test the advanced controls, verify the deadband variance, inspect the electrical contactors for pitting caused by summer short-cycling, and perform a deep cleaning of the coils to ensure proper airflow.
Preventative maintenance avoids costly downtime during peak retail shopping seasons. If a rooftop unit fails on Black Friday because the compressor finally gave out after weeks of fall short-cycling, the loss of foot traffic and inventory damage far outweighs the cost of a routine inspection. This highlights the absolute necessity of having a structured maintenance plan for complex commercial equipment.
One local commercial customer reached out during the spring when their heat pump system failed entirely, and previous technicians from other companies could not resolve the issue. A skilled technician properly diagnosed the complex control problem, explained the underlying cause to the facility manager, and successfully fixed the heat pump after previous failed attempts. This level of insight is crucial when dealing with commercial ducted heat pump systems that require precise calibration.
Presidential Ventilation's expertise in commercial HVAC systems ensures retail businesses avoid costly downtime and maintain perfect customer comfort through advanced thermostat deadband optimization. Working with technicians who deeply understand local maritime climate challenges across various local HVAC service areas means your system will be tailored to handle the exact humidity and temperature swings unique to the coast.
The fall shoulder season in maritime Nova Scotia is the optimal time to configure your controls, well before the deep winter freeze sets in. Stabilizing your indoor temperatures now protects sensitive retail inventory, keeps your staff productive, and ensures every customer experiences a comfortable shopping environment the moment they walk through the doors.
Don't wait until the system locks itself out from excessive short-cycling. Schedule a professional assessment of your store's HVAC controls today and secure an HVAC maintenance plan to keep your commercial electrical and mechanical systems running safely and efficiently all year long.
What is a thermostat deadband?
A thermostat deadband is a specific temperature range programmed into an HVAC control system where neither heating nor cooling is activated. This neutral zone, typically 3-5 degrees, gives the mechanical equipment time to rest and prevents the heating and cooling systems from fighting each other.
How do I stop my commercial HVAC from short-cycling during the fall?
The most effective way to stop short-cycling during the fall shoulder season is to have a professional widen the thermostat deadband variance. This prevents the system from rapidly turning on and off in response to minor temperature fluctuations, reducing strain on the electrical components and compressor.
What temperature should a retail store be kept at?
While exact temperatures depend on the inventory, ASHRAE guidelines generally suggest a heating setpoint around 19°C to 20°C and a cooling setpoint around 23°C to 24°C. Maintaining this gap ensures energy efficiency and keeps the environment comfortable for shoppers moving through the store.
Why is my commercial AC running in the fall?
Your commercial AC runs in the fall because retail spaces generate massive latent heat loads from high-intensity lighting, electronic displays, and heavy foot traffic. Even when it is cold outside, this internal heat can quickly push the indoor temperature past the cooling setpoint, requiring the AC to engage.
Can improper deadband settings damage commercial electrical components?
Yes, improper deadband settings cause the system to short-cycle, which forces heavy commercial equipment to restart constantly. Each startup draws a massive surge of inrush current that can overheat electrical contactors, degrade capacitors, and eventually lead to catastrophic mechanical failure.
How do commercial HVAC rebates work in Nova Scotia?
Commercial HVAC rebates, such as those offered by Efficiency Nova Scotia, provide financial incentives for businesses that upgrade to high-efficiency equipment and advanced control systems. Qualifying for these rebates typically requires a professional assessment and installation to verify that the new systems significantly reduce electrical grid strain.

You finally have the keys to your brand-new build, but despite the pristine floors and fresh paint, a fine layer of white dust keeps settling on your countertops. At Presidential Ventilation Systems Ltd., our team often encounters a frustrating reality for many property owners: What happens when you skip HRV duct cleaning in a newly constructed home means your state-of-the-art ventilation network is already compromised before you even move your furniture inside. For example, in homes completed during the recent 2022-2024 residential and commercial construction boom, we routinely find significant amounts of drywall dust, heavy sawdust, and fiberglass particles accumulated heavily during the final stages of home construction, settling deep inside the ductwork.
To ensure your new property operates as efficiently as it was designed to, exploring professional ventilation and HVAC services is the best first step you can take.
The most common decision point for new homeowners is whether to schedule a post-build cleaning or simply assume the system is spotless because the house has never been lived in. Modern construction practices generate massive amounts of ultrafine particulate matter. Even with diligent contractors sweeping up daily, microscopic debris becomes airborne and inevitably finds its way into the ventilation returns. As we remind our Mount Uniacke NS clients, a "new" home does not automatically equal a "clean" ventilation system.
The unseen accumulation process:
• Drywall sanding: Produces a flour-like dust that stays suspended in the air for hours, easily drifting into open vent boots.
• Hardwood cutting: Heavy sawdust falls into floor registers before grilles are officially installed.
• Insulation installation: Airborne fiberglass particles get pulled into the return ducting if the system is tested prematurely.
If left unaddressed, this debris travels straight to the HRV heat recovery core, turning a brand-new mechanical system into a strained, inefficient unit from day one.
The timeline of a new build is complex, with multiple trades overlapping to meet deadlines. During the busy spring and summer building seasons, heavy particulate matter is introduced into the environment daily. One local homeowner recently noted how crucial a tidy, efficient installation is during a summer project; when contractors prioritize a clean work environment, it helps, but even the best crews cannot stop airborne dust from entering an active air exchange network.
When you run the heating or cooling during the construction or major renovation phase—often done to dry drywall mud faster or keep workers comfortable—the system pulls this debris directly into the return vents. This creates an immediate burden on your HRV systems right out of the gate.
Sanding drywall and cutting wood generate suspended particles—often measuring as small as 2.5 microns (PM2.5)—that behave very differently than normal household dust. Standard household dust is primarily made of fabric fibers, pet dander, and skin cells. Construction dust is heavy, abrasive, and highly concentrated.
• Standard Household Dust — Particle Characteristics: Light, easily trapped by basic filters, organic material. — Impact on Ventilation Systems: Gradual buildup over months; easily managed with standard maintenance.
• Construction Debris — Particle Characteristics: Ultrafine, abrasive, inorganic (silica, gypsum, wood). — Impact on Ventilation Systems: Rapid clogging; coats internal components and bypasses basic filters.
Because systems are often tested or run temporarily before the final cleanup is complete, the ductwork acts as a vacuum for the entire job site.
You might assume the disposable filter installed by the builder will catch the mess. Unfortunately, standard construction-grade fiberglass filters are designed to stop large debris like hair and large dust bunnies, not ultrafine drywall powder. These microscopic particles bypass basic filters entirely. The dust settles deep within the ductwork, waiting to be circulated, ultimately leading to restricted airflow and reduced heat exchange efficiency the moment you take occupancy.
To understand why this specific type of dust is so damaging, you have to look at the mechanical heart of your ventilation setup: the HRV heat recovery core. This component is an intricate, honeycomb-like structure made of thin aluminum or specialized plastic plates. Its job is to cross outgoing stale indoor air with incoming fresh outdoor air, transferring the heat without mixing the air streams.
When our technicians open these units in Mount Uniacke NS, we see firsthand how skipping a post-construction cleaning sends a continuous stream of ultrafine dust straight into this delicate honeycomb structure. If you are wondering what happens if you don't maintain your HRV, the core is the first place to look for failure, often causing standard 75% to 80% Sensible Recovery Efficiency (SRE) ratings to plummet.
Ultrafine dust easily navigates through the ducts to the central unit. Once it reaches the core, a damaging chemical reaction occurs. Drywall dust is highly absorbent. When it combines with normal indoor humidity—or the moisture from fresh paint and curing concrete—it acts exactly like a paste. This paste coats the core's delicate transfer surfaces.
The mechanical breakdown:
• Insulating barrier: The drywall paste hardens into an insulating layer over the heat exchange plates.
• Blocked transfer: Heat can no longer pass efficiently from the warm exhaust air to the cold incoming air.
• Physical blockage: The narrow channels of the honeycomb structure physically plug up, stopping air from moving through the unit.
This buildup happens rapidly in new builds. Without intervention, a high-end, brand-new piece of equipment is quickly reduced to the efficiency of a heavily aged, neglected unit.
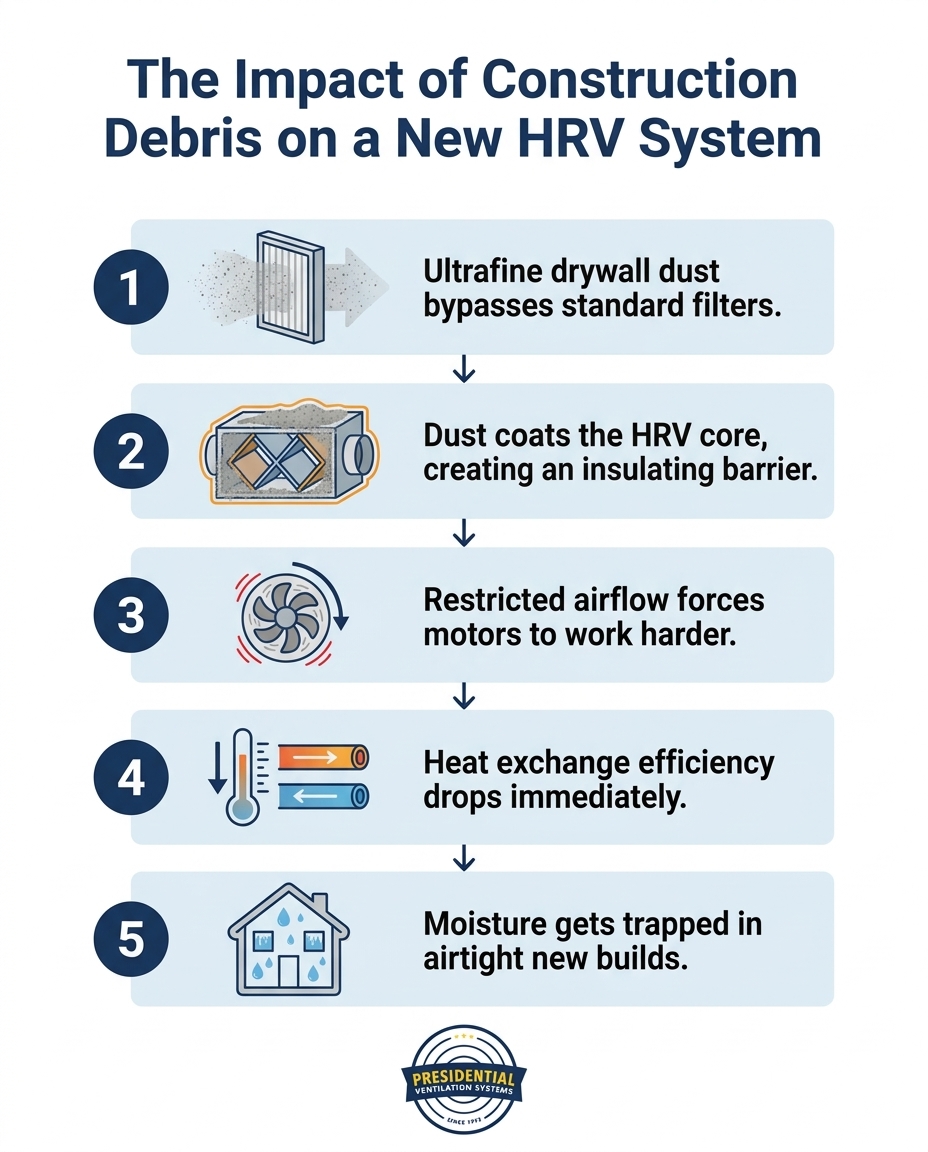
The secondary mechanical failures caused by a clogged core are often what homeowners notice first. The primary symptom is a sudden spike in energy usage or a home that feels stuffy despite the system running constantly. This is the direct result of restricted airflow and reduced heat exchange efficiency.
In a brand-new, airtight home, airflow must be perfectly balanced. When the channels of the HRV core become clogged with drywall dust, the volume of fresh air entering the home is drastically reduced. This creates a bottleneck. The static pressure inside the ductwork increases, forcing the system out of its optimal operating range. The blower motors, which are designed to push air with minimal resistance, suddenly have to push past 2,000 RPMs just to force air through the physical blockage.
Energy is wasted trying to overcome this resistance. The motors draw more electricity to maintain the required RPMs, negating the financial benefits of installing high-efficiency equipment in your new build. Furthermore, because the heat transfer surfaces are insulated by a layer of dust, the heat recovery rates plummet. Instead of capturing the heat from your outgoing air to warm the incoming winter air, that energy is lost to the outside, forcing your primary heating system to run longer and harder to make up the difference. This constant electrical strain leads directly to premature wear on blower motors and electrical components.
Modern new construction homes are built to rigorous energy codes, meaning they are highly airtight to prevent drafts and heat loss. While this is fantastic for your heating bill, it creates a unique challenge: airtight homes rely entirely on mechanical ventilation to expel indoor moisture. In Nova Scotia's damp maritime climate, managing high indoor humidity—especially keeping it below the critical 50% threshold during winter—is critical. The regional moisture levels make an efficiently running HRV heat recovery core essential to protect a brand-new airtight home from severe moisture damage.
Airtight construction traps moisture inside. Everyday activities like cooking, bathing, and even breathing generate significant humidity. More importantly, new building materials—such as fresh lumber, poured concrete, and interior paint—release gallons of moisture into the air during the first year of occupancy as they dry and cure.
The risks of trapped moisture:
• Window condensation: Water pools on sills, damaging brand-new trim and drywall.
• Poor indoor air quality: High humidity breeds mold and mildew in dark corners and closets.
• Material warping: Hardwood floors and cabinetry can swell or warp when indoor humidity remains unchecked.
In our years of servicing Mount Uniacke NS, we have seen how a dust-clogged HRV fails to expel this moisture effectively. When the airflow is restricted by construction debris, the damp, stale air stays trapped inside, putting your brand-new investment at immediate risk.
The transition from the installation phase to the occupancy phase is a critical window for your HVAC system's health. The final steps of an air exchanger installation involve balancing the airflow and testing the controls, but the job isn't truly finished until the post-build environment is completely clean. Because commercial and residential construction timelines often overlap, dust continues to enter newly installed systems right up until move-in day.
Our team at Presidential Ventilation Systems Ltd. brings deep local expertise in new construction HVAC, understanding exactly how Maritime building practices and timelines impact brand-new ventilation systems. Professional HVAC installers view the transition from a messy construction site to an occupied home as the most vulnerable time for mechanical equipment. If you have complementary systems, such as ducted heat pump systems, coordinating a professional cleaning immediately after construction protects the entire HVAC ecosystem. It ensures that restricted airflow and reduced heat exchange efficiency don't compromise the lifespan of your interconnected climate control units, while also maintaining system efficiency to ensure you qualify for regional energy rebates.
Assuming your system is clean simply because it is new is a costly mistake. One local homeowner scheduled a routine fall inspection and deep cleaning within the first 6 months of occupancy, only to realize the immense value of thorough testing and product care information after seeing the heavy particulate buildup removed from their seemingly "clean" new system. The evidence is clear: the HRV heat recovery core cannot process construction debris.
The immediate consequences of skipping a post-build cleaning include:
• Immediate reduction in heat exchange efficiency: Dust insulates the core, preventing heat transfer.
• Increased strain on blower motors: Motors overwork to push air through clogged channels, leading to higher electrical energy consumption.
• Poor indoor air quality: Ultrafine drywall dust recirculates continuously into your living spaces.
• Inability to manage indoor humidity: Airtight homes suffer from condensation and potential mold growth when ventilation fails.
• Premature component failure: Overworked motors and sensors burn out faster than their expected lifespan.
Highlighting the value of a thorough, professional inspection and deep clean to verify system health before move-in is essential. For property owners across our local service areas, scheduling this service is the ultimate peace-of-mind check.
A clear, technical understanding of how construction debris interacts with modern ventilation validates the absolute necessity of a post-build cleaning. Protecting the core from the abrasive, paste-like buildup of drywall dust ensures the system operates at peak efficiency from the moment you move in. By clearing out the hidden threats, our team ensures you eliminate the risks of restricted airflow and reduced heat exchange efficiency, allowing your equipment to properly manage the unique moisture loads of a new, airtight build.
Don't let the "new build myth" compromise your comfort. Consult with our local experts at Presidential Ventilation Systems Ltd. to clear out construction dust thoroughly, ensuring you start your new home journey with truly clean, healthy air.
Your new home is likely dusty because ultrafine construction debris, such as drywall dust and sawdust, has settled inside your ductwork. When the HVAC system kicks on, it continuously blows these hidden particles back into your living spaces. A professional duct cleaning removes this trapped debris at the source.
Yes, new builds almost always require duct cleaning before or immediately after move-in. During commercial and residential construction, the open ductwork acts as a collection point for sawdust, fiberglass, and drywall powder. Cleaning the system ensures this abrasive debris doesn't damage your brand-new HVAC equipment.
If an HRV core is clogged, the system cannot efficiently transfer heat between the incoming and outgoing air streams. This blockage restricts fresh airflow, forces the blower motors to overwork, and traps stale, humid air inside your home. In new airtight builds, this often leads to rapid window condensation.
Drywall dust affects an air exchanger installation by bypassing standard filters and coating the internal heat recovery core. Because drywall dust absorbs moisture, it forms a thick paste that blocks the narrow air channels. This immediately reduces the newly installed unit's efficiency and lifespan.
Yes, construction dust can permanently damage a new HRV system if left unaddressed. The constant electrical strain of pushing air through a clogged core can burn out the blower motors prematurely. Additionally, the abrasive nature of the dust can wear down delicate internal sensors and moving parts.