


In our years of experience at Presidential Ventilation Systems Ltd., coordinating the logistical sequencing of rough-ins, panel sets, and final hookups without delaying your overall construction schedule is a major challenge. This is why understanding exactly how we phase commercial electrical services for multi-unit builds in Sackville is critical for developers. Our team typically sees that when a multi-unit project falls behind schedule, the root cause traces back to poorly coordinated trade sequencing. Electrical phasing acts as the critical path that dictates the pace for all interior finishing trades, making it the linchpin of your entire project timeline.
For developers managing Sackville and Mount Uniacke commercial developments, the primary decision point revolves around determining the exact sequence and timing for integrating electrical and HVAC systems. A misstep here doesn't just delay our electricians; it halts the drywallers, insulation crews, and painters. For instance, a delay during the unpredictable freeze-thaw cycles of a Nova Scotia November can leave framing dangerously exposed. To keep your project moving forward, you need a highly structured approach to commercial contracting services that eliminates overlap and prevents costly downtime.
Key Logistical Considerations for Developers:
• Spatial coordination: Ensuring electrical conduits and massive HVAC ductwork do not compete for the same ceiling bulkheads.
• Milestone alignment: Synchronizing electrical rough-ins with mandatory municipal inspection dates.
• Resource allocation: Staggering crews across multiple units so that work flows continuously from one end of the building to the other.
In multi-unit commercial construction, the electrical contractor's schedule is the heartbeat of the project. Unlike exterior framing or roofing, interior electrical work is deeply embedded in the building's structural anatomy. Electrical rough-ins must be fully completed, tested, and inspected before any insulation or drywall can be installed. This creates a hard dependency: if the electrical phase stalls, every subsequent finishing trade is forced to stand down.
Delays in electrical phasing create severe cascading bottlenecks. If a crew is waiting on materials or struggling to navigate around an uncoordinated HVAC installation, the framing remains exposed. Drywall crews cannot hang board, which means tapers cannot mud, and painters cannot prime. In multi-unit builds, this domino effect is magnified across dozens of units, potentially adding weeks to the overall timeline and significantly increasing carrying costs.
The typical impact of poor phasing we observe:
• Rescheduling fees: Subcontractors often charge mobilization fees if they arrive on-site and cannot begin work due to incomplete rough-ins.
• Inspection failures: Rushed work to make up for lost time frequently leads to failed municipal inspections, requiring rework and re-inspection delays.
• Compromised building envelopes: Delays in reaching weather-tight status leave interior components vulnerable to moisture damage.
Beyond the immediate schedule, proper phasing is essential for financial planning. Emphasizing the importance of planning for Efficiency Nova Scotia commercial construction rebates during the initial design phase ensures that all energy-efficient components are documented and installed in the correct sequence. If you are ready to streamline your next project, we highly recommend you book a commercial electrical consultation early in the design phase.
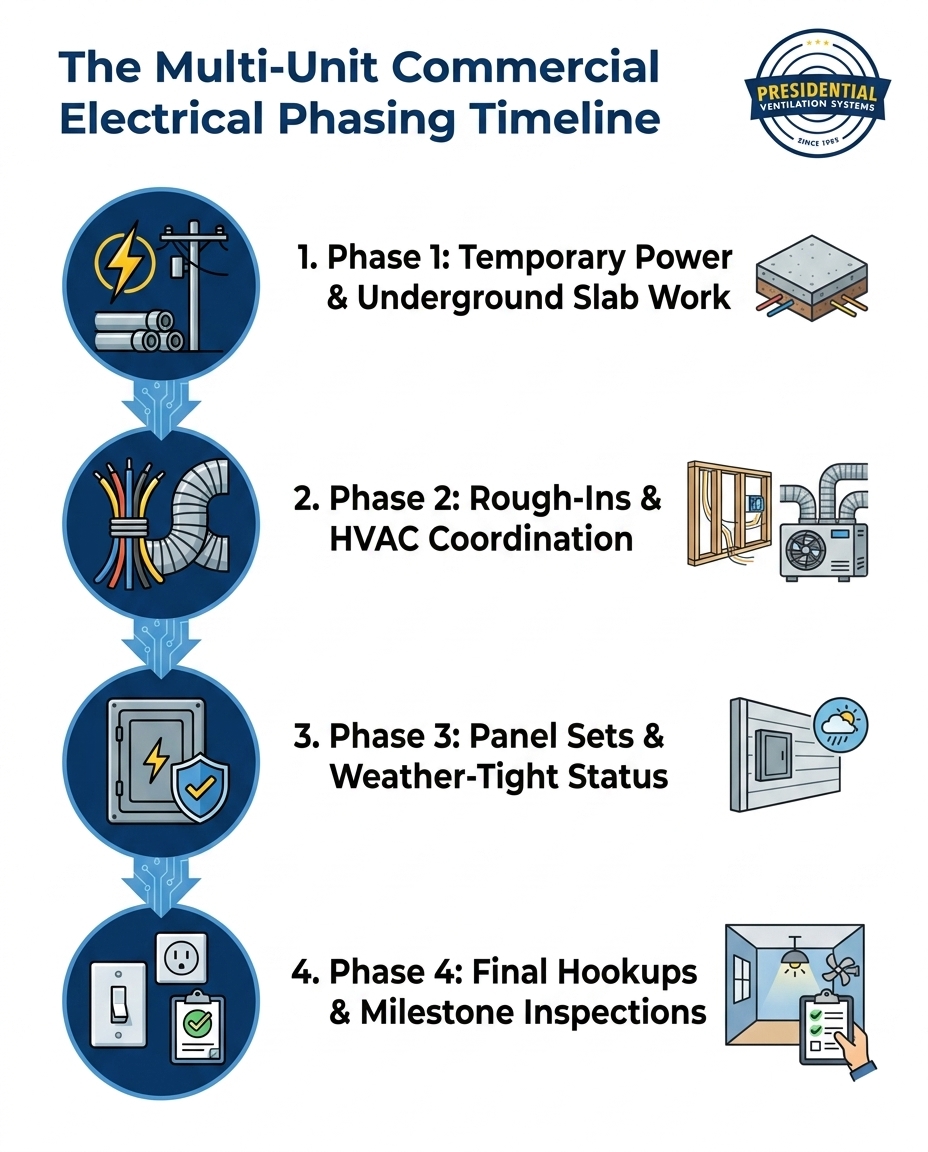
The foundation of any successful multi-unit build begins long before the walls are framed. Phase 1 focuses on establishing the core infrastructure required to power the construction site and laying the groundwork for the building's permanent electrical system. Our licensed commercial electrical and HVAC contractors know firsthand that precision during this phase prevents catastrophic tear-outs later.
1. Setting Up Temporary Site Power: Before any major construction can begin, the site requires safe, reliable temporary power. This involves installing temporary service poles, weather-resistant distribution panels, and ground-fault protected circuits. Temporary power enables framing crews, welders, and heavy machinery operators to work efficiently without relying on noisy, expensive gas generators.
2. Trenching and Underground Conduits: Before the concrete foundation is poured, all underground electrical conduits must be meticulously mapped, trenched, and laid to meet specific depth requirements—often requiring a minimum of 600mm of cover for standard commercial voltage feeds. This includes the main service feeds from the utility transformer to the electrical room, as well as any sub-feeds for exterior lighting, parking lot infrastructure, or detached utility structures.
3. Stub-Ups and Slab Work: Conduits must be properly stubbed up into the exact locations where the main electrical panels and utility meters will eventually sit. A miscalculation of even a few inches during this step can result in major structural conflicts once the walls are framed.
4. Coordination with Local Utilities: Early-stage groundwork requires strict adherence to Nova Scotia Building Code Regulations and tight coordination with local utility providers. Inspections of the underground trenches and conduit bedding must be completed and signed off before the concrete trucks arrive to pour the slab.
Once the building is framed, Phase 2 begins. The rough-in phase is arguably the most complex logistical puzzle in multi-unit construction. It involves running miles of wire, setting hundreds of device boxes, and preparing the infrastructure for future fixtures across multiple units. Because space inside walls and ceiling plenums is highly restricted, the critical path relationship between electrical rough-ins and HVAC ductwork installation must be managed flawlessly.
In commercial builds, HVAC ductwork is massive and rigid, while electrical wiring is flexible but subject to strict code requirements regarding proximity to heat sources and structural supports. If an electrical crew runs their main trunk lines directly through a space designated for a commercial air handler return, the resulting structural conflict requires costly tear-outs and rework. Careful pre-planning by our team at this stage prevents these spatial clashes.
This is where integrated project management becomes invaluable. Utilizing a single crew handling both HVAC ductwork and electrical rough-ins eliminates scheduling conflicts between competing subcontractors. Instead of two separate companies fighting for ceiling space, a unified team installs the ductwork and routes the electrical home runs in a synchronized flow.
This integrated approach is highly effective across all Nova Scotia service areas. For example, during a recent summer renovation project on a 24-unit property in Sackville, our project managers faced the challenge of replacing extensive old ductwork while integrating a new, highly efficient 20-ton commercial VRF (Variable Refrigerant Flow) heat pump system. By utilizing a single team for both the HVAC ductwork and the electrical rough-ins, the new system was installed seamlessly, kept entirely within budget, and performed flawlessly without the usual subcontractor scheduling conflicts.
As the rough-in phase concludes, the project transitions into Phase 3: setting the electrical panels, trimming out the utility rooms, and racing to secure the building envelope. In a multi-unit complex, the logistics of panel sets are substantial. Each unit requires its own sub-panel, while the main electrical room houses the heavy-duty distribution equipment, meter centers, and main disconnects.
Nova Scotia's unpredictable maritime weather requires accelerated rough-in and panel phasing to protect exposed electrical components from high humidity and winter storms. Electrical panels, breakers, and sensitive HVAC control boards cannot be exposed to bulk moisture. Therefore, achieving weather-tight status—where the roof is sealed, windows are installed, and exterior doors are secured—is a massive milestone that dictates when the expensive electrical hardware can be safely mounted.
Key steps during Phase 3 include:
• Mounting meter banks: Securing the multi-gang meter sockets on the exterior or in the dedicated electrical room.
• Setting unit sub-panels: Installing the breaker panels in each individual apartment or commercial suite.
• Terminating home runs: Connecting all the rough-in wiring to the appropriate breakers within the panels.
Upgrading or setting main breaker panels in commercial environments requires careful load calculations and safety protocols. During a recent summer central heat pump installation on a large Sackville development, our team encountered specific concerns regarding the capacity of the existing electrical panel to handle the new commercial-grade load—specifically, whether the current service required an upgrade to an 800-amp 3-phase system. Because we managed both the HVAC installation and the electrical upgrades, we were able to provide immediate assistance, resolving the electrical panel concerns on the spot to keep the project moving forward without delay. For developers budgeting these phases, understanding breaker panel upgrade costs early in the design phase prevents mid-construction financial surprises.
The final phase of commercial electrical phasing brings the building to life. Phase 4 occurs after the drywall is finished, the walls are painted, and the flooring is installed. This phase requires meticulous attention to detail to ensure the finished surfaces are not damaged while the final electrical components are installed.
1. Final Fixture Installation: Electricians install all switches, receptacles, lighting fixtures, emergency exit signs, and hardwired smoke detectors across every unit.
2. HVAC Final Connections: The electrical team provides the final high-voltage connections to the rooftop units, heat pumps, and interior air handlers, while the low-voltage control wiring is terminated at the thermostats.
3. Circuit Testing and Energizing: Every single circuit in the building is tested for continuity, proper grounding, and correct polarity. Once verified, the systems are safely energized.
4. Milestone Inspections: Strict adherence to Nova Scotia Power commercial inspection requirements is mandatory. The final inspection verifies that all work complies with the code, allowing the utility to authorize permanent power to the building.
5. Efficiency Documentation: Proper phasing documentation ensures eligibility for commercial construction rebates. Handing over detailed load calculations, equipment specifications, and inspection reports allows the developer to claim their Efficiency Nova Scotia incentives, such as prescriptive rebates for advanced HVAC controls and high-efficiency heat recovery ventilators (HRVs).
One of the most persistent scheduling nightmares we see developers face is coordinating separate electrical and HVAC subcontractors. When a multi-unit build relies on two different companies to handle the climate control and the power infrastructure, the risk of miscommunication skyrockets. If the HVAC crew installs a commercial air handler but the electrical crew hasn't run the appropriate high-voltage feed to that specific location, the project stalls while the general contractor negotiates change orders.
Beyond scheduling, split-liability warranty risks occur when two different trades point fingers over system integration issues. If a heat pump fails to communicate with the thermostat, the HVAC technician might blame the low-voltage wiring, while the electrician blames the equipment's control board. This finger-pointing leaves the developer stuck in the middle, paying for extended troubleshooting and delaying unit occupancy.
Integrated project management streamlines the construction schedule and simplifies accountability. Because our team at Presidential Ventilation Systems handles both HVAC and electrical hookups, we eliminate trade bottlenecks and split-liability risks entirely. When one team is responsible for the entire mechanical and electrical scope, the workflow is seamless, and warranty claims are handled through a single point of contact.
• Scheduling — Separate Subcontractors: High risk of overlapping conflicts and delays. — Single-Source (HVAC & Electrical): Synchronized phasing; crews work in tandem.
• Accountability — Separate Subcontractors: Split liability; risk of finger-pointing on warranty issues. — Single-Source (HVAC & Electrical): One point of contact for all system integration.
• Spatial Coordination — Separate Subcontractors: Frequent clashes in ceiling plenums and bulkheads. — Single-Source (HVAC & Electrical): Pre-planned routing eliminates structural conflicts.
• Rebate Processing — Separate Subcontractors: Requires gathering documentation from multiple vendors. — Single-Source (HVAC & Electrical): Unified documentation for Efficiency Nova Scotia.
The general sequence begins with groundwork and foundation pouring, followed by structural framing. Once framed, the critical rough-in phase begins, typically sequencing plumbing first, then HVAC ductwork, and finally electrical wiring. After all rough-ins pass inspection, the building moves to insulation, drywall, painting, and finally, the finishing stages where final electrical and plumbing fixtures are installed.
Timelines vary significantly based on the unit count, the complexity of the systems, and the size of the crew. For a standard 12-unit building, rough-ins can take anywhere from 3 to 6 weeks. Utilizing a single-source contractor for both HVAC and electrical coordination drastically speeds up this timeline by eliminating the waiting periods between different subcontractors.
HVAC ductwork rough-ins typically happen alongside or just before electrical rough-ins to manage spatial constraints effectively. Because large commercial ductwork is inflexible, it claims the primary space in ceiling plenums first. The electrical team then routes their flexible conduits and wire runs around the HVAC infrastructure, which is why coordination between these two trades is vital.
Electrical rough-ins in multi-unit builds utilize a staggered, assembly-line approach. Instead of wiring the entire building at once, crews complete Phase 1 rough-ins on the first floor or block of units, then move to the next. This continuous flow allows the insulation and drywall trades to begin work on the completed units while the electricians continue roughing in the rest of the building.
Nova Scotia Power requires multiple standard inspection milestones before walls can be closed. This typically includes an underground/slab inspection, a comprehensive rough-in inspection to verify wire routing and box placement, and a final inspection after all devices and panels are installed. Passing these inspections on the first attempt is required to keep the project timeline intact.
As we constantly remind developers across Sackville and Mount Uniacke, a clear, logistical breakdown of how rough-ins, panel sets, and final hookups are sequenced is the best defense against construction delays. By treating electrical phasing as the critical path, developers can avoid the cascading bottlenecks that derail multi-unit projects. We strongly encourage developers to plan their trade sequencing early to maximize efficiency, protect the building envelope, and secure valuable commercial rebates. Partnering with licensed commercial electrical and HVAC contractors who offer integrated solutions will keep your build on schedule and ensure a superior final product.


In our years of experience at Presidential Ventilation Systems Ltd., coordinating the logistical sequencing of rough-ins, panel sets, and final hookups without delaying your overall construction schedule is a major challenge. This is why understanding exactly how we phase commercial electrical services for multi-unit builds in Sackville is critical for developers. Our team typically sees that when a multi-unit project falls behind schedule, the root cause traces back to poorly coordinated trade sequencing. Electrical phasing acts as the critical path that dictates the pace for all interior finishing trades, making it the linchpin of your entire project timeline.
For developers managing Sackville and Mount Uniacke commercial developments, the primary decision point revolves around determining the exact sequence and timing for integrating electrical and HVAC systems. A misstep here doesn't just delay our electricians; it halts the drywallers, insulation crews, and painters. For instance, a delay during the unpredictable freeze-thaw cycles of a Nova Scotia November can leave framing dangerously exposed. To keep your project moving forward, you need a highly structured approach to commercial contracting services that eliminates overlap and prevents costly downtime.
Key Logistical Considerations for Developers:
• Spatial coordination: Ensuring electrical conduits and massive HVAC ductwork do not compete for the same ceiling bulkheads.
• Milestone alignment: Synchronizing electrical rough-ins with mandatory municipal inspection dates.
• Resource allocation: Staggering crews across multiple units so that work flows continuously from one end of the building to the other.
In multi-unit commercial construction, the electrical contractor's schedule is the heartbeat of the project. Unlike exterior framing or roofing, interior electrical work is deeply embedded in the building's structural anatomy. Electrical rough-ins must be fully completed, tested, and inspected before any insulation or drywall can be installed. This creates a hard dependency: if the electrical phase stalls, every subsequent finishing trade is forced to stand down.
Delays in electrical phasing create severe cascading bottlenecks. If a crew is waiting on materials or struggling to navigate around an uncoordinated HVAC installation, the framing remains exposed. Drywall crews cannot hang board, which means tapers cannot mud, and painters cannot prime. In multi-unit builds, this domino effect is magnified across dozens of units, potentially adding weeks to the overall timeline and significantly increasing carrying costs.
The typical impact of poor phasing we observe:
• Rescheduling fees: Subcontractors often charge mobilization fees if they arrive on-site and cannot begin work due to incomplete rough-ins.
• Inspection failures: Rushed work to make up for lost time frequently leads to failed municipal inspections, requiring rework and re-inspection delays.
• Compromised building envelopes: Delays in reaching weather-tight status leave interior components vulnerable to moisture damage.
Beyond the immediate schedule, proper phasing is essential for financial planning. Emphasizing the importance of planning for Efficiency Nova Scotia commercial construction rebates during the initial design phase ensures that all energy-efficient components are documented and installed in the correct sequence. If you are ready to streamline your next project, we highly recommend you book a commercial electrical consultation early in the design phase.
The foundation of any successful multi-unit build begins long before the walls are framed. Phase 1 focuses on establishing the core infrastructure required to power the construction site and laying the groundwork for the building's permanent electrical system. Our licensed commercial electrical and HVAC contractors know firsthand that precision during this phase prevents catastrophic tear-outs later.
1. Setting Up Temporary Site Power: Before any major construction can begin, the site requires safe, reliable temporary power. This involves installing temporary service poles, weather-resistant distribution panels, and ground-fault protected circuits. Temporary power enables framing crews, welders, and heavy machinery operators to work efficiently without relying on noisy, expensive gas generators.
2. Trenching and Underground Conduits: Before the concrete foundation is poured, all underground electrical conduits must be meticulously mapped, trenched, and laid to meet specific depth requirements—often requiring a minimum of 600mm of cover for standard commercial voltage feeds. This includes the main service feeds from the utility transformer to the electrical room, as well as any sub-feeds for exterior lighting, parking lot infrastructure, or detached utility structures.
3. Stub-Ups and Slab Work: Conduits must be properly stubbed up into the exact locations where the main electrical panels and utility meters will eventually sit. A miscalculation of even a few inches during this step can result in major structural conflicts once the walls are framed.
4. Coordination with Local Utilities: Early-stage groundwork requires strict adherence to Nova Scotia Building Code Regulations and tight coordination with local utility providers. Inspections of the underground trenches and conduit bedding must be completed and signed off before the concrete trucks arrive to pour the slab.
Once the building is framed, Phase 2 begins. The rough-in phase is arguably the most complex logistical puzzle in multi-unit construction. It involves running miles of wire, setting hundreds of device boxes, and preparing the infrastructure for future fixtures across multiple units. Because space inside walls and ceiling plenums is highly restricted, the critical path relationship between electrical rough-ins and HVAC ductwork installation must be managed flawlessly.
In commercial builds, HVAC ductwork is massive and rigid, while electrical wiring is flexible but subject to strict code requirements regarding proximity to heat sources and structural supports. If an electrical crew runs their main trunk lines directly through a space designated for a commercial air handler return, the resulting structural conflict requires costly tear-outs and rework. Careful pre-planning by our team at this stage prevents these spatial clashes.
This is where integrated project management becomes invaluable. Utilizing a single crew handling both HVAC ductwork and electrical rough-ins eliminates scheduling conflicts between competing subcontractors. Instead of two separate companies fighting for ceiling space, a unified team installs the ductwork and routes the electrical home runs in a synchronized flow.
This integrated approach is highly effective across all Nova Scotia service areas. For example, during a recent summer renovation project on a 24-unit property in Sackville, our project managers faced the challenge of replacing extensive old ductwork while integrating a new, highly efficient 20-ton commercial VRF (Variable Refrigerant Flow) heat pump system. By utilizing a single team for both the HVAC ductwork and the electrical rough-ins, the new system was installed seamlessly, kept entirely within budget, and performed flawlessly without the usual subcontractor scheduling conflicts.
As the rough-in phase concludes, the project transitions into Phase 3: setting the electrical panels, trimming out the utility rooms, and racing to secure the building envelope. In a multi-unit complex, the logistics of panel sets are substantial. Each unit requires its own sub-panel, while the main electrical room houses the heavy-duty distribution equipment, meter centers, and main disconnects.
Nova Scotia's unpredictable maritime weather requires accelerated rough-in and panel phasing to protect exposed electrical components from high humidity and winter storms. Electrical panels, breakers, and sensitive HVAC control boards cannot be exposed to bulk moisture. Therefore, achieving weather-tight status—where the roof is sealed, windows are installed, and exterior doors are secured—is a massive milestone that dictates when the expensive electrical hardware can be safely mounted.
Key steps during Phase 3 include:
• Mounting meter banks: Securing the multi-gang meter sockets on the exterior or in the dedicated electrical room.
• Setting unit sub-panels: Installing the breaker panels in each individual apartment or commercial suite.
• Terminating home runs: Connecting all the rough-in wiring to the appropriate breakers within the panels.
Upgrading or setting main breaker panels in commercial environments requires careful load calculations and safety protocols. During a recent summer central heat pump installation on a large Sackville development, our team encountered specific concerns regarding the capacity of the existing electrical panel to handle the new commercial-grade load—specifically, whether the current service required an upgrade to an 800-amp 3-phase system. Because we managed both the HVAC installation and the electrical upgrades, we were able to provide immediate assistance, resolving the electrical panel concerns on the spot to keep the project moving forward without delay. For developers budgeting these phases, understanding breaker panel upgrade costs early in the design phase prevents mid-construction financial surprises.
The final phase of commercial electrical phasing brings the building to life. Phase 4 occurs after the drywall is finished, the walls are painted, and the flooring is installed. This phase requires meticulous attention to detail to ensure the finished surfaces are not damaged while the final electrical components are installed.
1. Final Fixture Installation: Electricians install all switches, receptacles, lighting fixtures, emergency exit signs, and hardwired smoke detectors across every unit.
2. HVAC Final Connections: The electrical team provides the final high-voltage connections to the rooftop units, heat pumps, and interior air handlers, while the low-voltage control wiring is terminated at the thermostats.
3. Circuit Testing and Energizing: Every single circuit in the building is tested for continuity, proper grounding, and correct polarity. Once verified, the systems are safely energized.
4. Milestone Inspections: Strict adherence to Nova Scotia Power commercial inspection requirements is mandatory. The final inspection verifies that all work complies with the code, allowing the utility to authorize permanent power to the building.
5. Efficiency Documentation: Proper phasing documentation ensures eligibility for commercial construction rebates. Handing over detailed load calculations, equipment specifications, and inspection reports allows the developer to claim their Efficiency Nova Scotia incentives, such as prescriptive rebates for advanced HVAC controls and high-efficiency heat recovery ventilators (HRVs).
One of the most persistent scheduling nightmares we see developers face is coordinating separate electrical and HVAC subcontractors. When a multi-unit build relies on two different companies to handle the climate control and the power infrastructure, the risk of miscommunication skyrockets. If the HVAC crew installs a commercial air handler but the electrical crew hasn't run the appropriate high-voltage feed to that specific location, the project stalls while the general contractor negotiates change orders.
Beyond scheduling, split-liability warranty risks occur when two different trades point fingers over system integration issues. If a heat pump fails to communicate with the thermostat, the HVAC technician might blame the low-voltage wiring, while the electrician blames the equipment's control board. This finger-pointing leaves the developer stuck in the middle, paying for extended troubleshooting and delaying unit occupancy.
Integrated project management streamlines the construction schedule and simplifies accountability. Because our team at Presidential Ventilation Systems handles both HVAC and electrical hookups, we eliminate trade bottlenecks and split-liability risks entirely. When one team is responsible for the entire mechanical and electrical scope, the workflow is seamless, and warranty claims are handled through a single point of contact.
• Scheduling — Separate Subcontractors: High risk of overlapping conflicts and delays. — Single-Source (HVAC & Electrical): Synchronized phasing; crews work in tandem.
• Accountability — Separate Subcontractors: Split liability; risk of finger-pointing on warranty issues. — Single-Source (HVAC & Electrical): One point of contact for all system integration.
• Spatial Coordination — Separate Subcontractors: Frequent clashes in ceiling plenums and bulkheads. — Single-Source (HVAC & Electrical): Pre-planned routing eliminates structural conflicts.
• Rebate Processing — Separate Subcontractors: Requires gathering documentation from multiple vendors. — Single-Source (HVAC & Electrical): Unified documentation for Efficiency Nova Scotia.
The general sequence begins with groundwork and foundation pouring, followed by structural framing. Once framed, the critical rough-in phase begins, typically sequencing plumbing first, then HVAC ductwork, and finally electrical wiring. After all rough-ins pass inspection, the building moves to insulation, drywall, painting, and finally, the finishing stages where final electrical and plumbing fixtures are installed.
Timelines vary significantly based on the unit count, the complexity of the systems, and the size of the crew. For a standard 12-unit building, rough-ins can take anywhere from 3 to 6 weeks. Utilizing a single-source contractor for both HVAC and electrical coordination drastically speeds up this timeline by eliminating the waiting periods between different subcontractors.
HVAC ductwork rough-ins typically happen alongside or just before electrical rough-ins to manage spatial constraints effectively. Because large commercial ductwork is inflexible, it claims the primary space in ceiling plenums first. The electrical team then routes their flexible conduits and wire runs around the HVAC infrastructure, which is why coordination between these two trades is vital.
Electrical rough-ins in multi-unit builds utilize a staggered, assembly-line approach. Instead of wiring the entire building at once, crews complete Phase 1 rough-ins on the first floor or block of units, then move to the next. This continuous flow allows the insulation and drywall trades to begin work on the completed units while the electricians continue roughing in the rest of the building.
Nova Scotia Power requires multiple standard inspection milestones before walls can be closed. This typically includes an underground/slab inspection, a comprehensive rough-in inspection to verify wire routing and box placement, and a final inspection after all devices and panels are installed. Passing these inspections on the first attempt is required to keep the project timeline intact.
As we constantly remind developers across Sackville and Mount Uniacke, a clear, logistical breakdown of how rough-ins, panel sets, and final hookups are sequenced is the best defense against construction delays. By treating electrical phasing as the critical path, developers can avoid the cascading bottlenecks that derail multi-unit projects. We strongly encourage developers to plan their trade sequencing early to maximize efficiency, protect the building envelope, and secure valuable commercial rebates. Partnering with licensed commercial electrical and HVAC contractors who offer integrated solutions will keep your build on schedule and ensure a superior final product.

Your new commercial rooftop unit (RTU) has finally arrived, the 50-ton heavy-duty crane is positioned in the parking lot, and the mechanical installation crew is ready to work. Then, progress grinds to a complete halt. The electrical capacity on the roof does not match the new equipment requirements. Our commercial installation teams at Presidential Ventilation Systems frequently see this scenario play out during the busy fall changeover season. Coordinating Three-Phase Power Hookups for Commercial Rooftop Units in Dartmouth, NS, is frequently the most overlooked step in facility upgrades. This single oversight leads to severe logistical delays, wasted crane rental fees, and massive scheduling conflicts across different trades. As a facility manager, you face a critical decision: do you try to juggle multiple separate subcontractors, or do you hire a single multi-trade contractor to handle the entire project seamlessly? When you need comprehensive commercial HVAC and ventilation services, getting the electrical and mechanical sequence right the first time is exactly what keeps your project on schedule.
The primary frustration for property managers during a commercial HVAC installation is the siloed nature of the traditional construction industry. Usually, an HVAC technician installs the physical unit, while a completely separate electrical contractor handles the high-voltage wiring. If these two entities do not communicate perfectly during the planning phase, you end up with a severe capacity mismatch on installation day. The mechanical team assumes the electrician pulled the right permits and installed the correct disconnects, while the electrician assumes the HVAC team ordered equipment that matches the existing building load.
This disconnect creates a logistical nightmare. When a crane is sitting idle in Dartmouth commercial districts like Burnside or Dartmouth Crossing, you are paying hefty hourly equipment fees for machinery that isn't moving. If the electrical hookup is wrong, the mechanical team cannot commission the unit. They have to leave the site, wait for the electrician to return, upgrade the wiring, and then schedule a second mechanical visit to finalize the startup. These trade silos cause massive scheduling overruns and leave your building without proper climate control for days or even weeks longer than anticipated.
Common Crane Day Bottlenecks Include:
• Mismatched voltage requirements: The new unit requires 460V, but the existing rooftop disconnect only supplies 208V.
• Missing electrical permits: The mechanical permit was pulled, but the electrical service upgrade request was forgotten.
• Physical interference: The new sheet metal curb blocks the existing electrical conduit pathways, requiring immediate on-site rerouting.
• Communication breakdowns: The electrician is scheduled for Tuesday, but the crane and HVAC team arrive on Monday due to weather shifts.
Establishing a unified, multi-trade approach eliminates these blind spots. When the people designing the ductwork, installing the mechanical components, and wiring the high-voltage connections all work for the same company, the hidden bottlenecks disappear.
To understand why electrical coordination is so critical, you have to understand the fundamental difference between standard residential power and commercial power delivery. Most homes and light commercial spaces operate on single-phase power. This system uses one primary alternating current to deliver electricity. While sufficient for smaller appliances, single-phase power experiences brief moments where the voltage drops to zero during its cycle. For heavy-duty commercial loads, like a 15-ton or 25-ton RTU, this fluctuation creates inefficiency and heat.
Three-phase power, on the other hand, uses three distinct alternating currents, each slightly offset in time. As one current drops, another is peaking. This provides a constant, smooth, and uninterrupted flow of electricity. For heavy-duty commercial rooftop units, this smooth power delivery is not just a preference; it is an engineering requirement. It reduces the mechanical strain on massive compressor motors and massive blower fans, allowing them to start up easier and run cooler.
• Power Delivery — Single-Phase Power: Fluctuating (drops to zero in cycles) — Three-Phase Power: Continuous and smooth
• Common Voltage — Single-Phase Power: 120V / 240V — Three-Phase Power: 208V / 460V / 575V
• Motor Efficiency — Single-Phase Power: Lower efficiency, requires start capacitors — Three-Phase Power: High efficiency, self-starting
• Equipment Wear — Single-Phase Power: Higher vibration and heat generation — Three-Phase Power: Lower vibration, longer lifespan
• Typical Application — Single-Phase Power: Residential and light commercial — Three-Phase Power: Heavy-duty commercial RTUs and industrial
Major commercial brands like Daikin and Lennox engineer their high-capacity RTUs specifically for three-phase power. Depending on the size of your facility, these units typically require 208-volt, 460-volt, or even 575-volt three-phase connections. If your building currently only has single-phase service, or if your existing three-phase service lacks the necessary amperage to support a modern, high-efficiency unit, you will need a substantial electrical upgrade before the new HVAC equipment can even be turned on. Our Red Seal electricians emphasize that proper electrical sizing is the foundation that ensures the longevity of your commercial heating services and cooling operations.
The operational lifespan of a commercial RTU is directly tied to the quality of the electricity feeding it. In our 30+ years serving Nova Scotia, our HVAC technicians consistently see that units running on properly balanced three-phase power outlast their single-phase counterparts. Here is why the electrical phase matters so much to the mechanical components:
• Reduced electrical phase imbalance: Three-phase motors do not require start capacitors or run capacitors, which are common failure points in single-phase systems. The power naturally rotates the motor.
• Lower operating temperatures for motor windings: Because the power delivery is continuous, the motor does not have to work as hard to maintain momentum, generating significantly less heat inside the compressor shell.
• Fewer premature mechanical failures: Smoother rotation means less vibration. Less vibration means less wear on bearings, belts, and mounting hardware over the unit's 15-to-20-year lifespan.
Upgrading the electrical capacity is only half the battle; protecting that high-voltage connection from the elements is equally important. In our experience servicing commercial rooftops across Dartmouth, we find that standard indoor electrical components fail rapidly when exposed to harsh rooftop environments. With Dartmouth's specific coastal maritime climate factors—high humidity, heavy salt air blowing in from the harbor, and aggressive winter temperatures that frequently dip below -15°C in February—improperly sealed rooftop electrical hookups will actively corrode in a matter of months.
Every commercial RTU requires a dedicated electrical disconnect switch mounted within sight of the unit. This allows technicians to safely cut power during maintenance or emergency repairs. However, you cannot use a standard metal electrical box on a Dartmouth rooftop. The local building codes and environmental realities necessitate NEMA 4X rated electrical enclosures. A NEMA 4X rating means the enclosure is completely watertight, dust-tight, and most importantly, highly resistant to corrosion. If a contractor installs a cheaper NEMA 3R box (which is only weather-resistant, not corrosion-resistant), the salt air will rapidly degrade the hinges, the internal contacts, and the copper wiring.
Furthermore, extreme winter weather cycling takes a massive toll on rooftop wiring conduits. When moisture penetrates a poorly sealed conduit fitting during a mild, rainy afternoon, it pools inside. When the temperature plummets overnight, that water freezes and expands, cracking the conduit and exposing the high-voltage wires to the elements. Heavy snow loads can also physically crush unsupported electrical runs across flat commercial roofs. Working with contractors who deeply understand Dartmouth commercial service areas ensures that your installation includes robust weatherproofing designed specifically for our coastal reality.
Protecting your investment requires meticulous attention to the exterior electrical details. A proper commercial installation addresses three main environmental threats:
• Combating salt-air corrosion on electrical contacts: Using specialized dielectric greases on connections and utilizing stainless steel or non-metallic polycarbonate enclosures to prevent rust.
• Preventing moisture ingress during freeze-thaw cycles: Utilizing liquid-tight flexible metal conduit (LFMC) with specialized compression fittings that will not loosen as the temperature swings from -15°C to +10°C during volatile spring thaw cycles.
• Securing conduits against high coastal winds: Using heavy-duty, UV-resistant rooftop conduit supports (often called block supports) that keep the wiring elevated above standing water and secure during intense Nor'easter storm systems that frequently hit Nova Scotia between November and March.
If your building lacks the required three-phase capacity for a new RTU, you cannot simply flip a switch. Our electrical division regularly coordinates with Nova Scotia Power (NSP), and we always advise clients that this administrative process must begin long before the HVAC equipment is ordered. Facility managers are often caught off guard by utility upgrade lead times, which can easily take 6 to 12 weeks depending on the neighborhood's grid infrastructure.
The process begins with a comprehensive load calculation. A licensed electrician must evaluate everything currently running in your building—lighting, computers, machinery, and existing HVAC—and add the specific electrical draw of the proposed new rooftop units. This calculation is submitted to NSP to prove that the grid infrastructure outside your building (the transformers and overhead lines) can handle the increased demand. If the local transformer is undersized, NSP will need to schedule a heavy infrastructure upgrade, which can add months to your project timeline.
This is why matching electrical hookup specs to commercial rooftop units early in the design phase is non-negotiable. If you order a 460V unit but NSP determines they can only supply 208V three-phase to your specific street without a massive infrastructure overhaul, you are stuck with incompatible equipment. Local electrical codes also dictate exactly where the new main service panels, meters, and rooftop disconnect switches must be placed, requiring careful architectural planning.
To prevent your HVAC project from stalling, the utility upgrade must run parallel to the equipment procurement. The standard sequence looks like this:
1. Verifying existing building load calculations: An in-house electrician assesses your current panels and compares them against the submittals for the new commercial RTU.
2. Submitting upgrade requests to the utility: The formal application is sent to Nova Scotia Power, detailing the required amperage and voltage for the new three-phase service.
3. Ordering the mechanical equipment: Once NSP approves the service upgrade and confirms the timeline, the heavy-duty RTU is officially ordered from the manufacturer.
4. Scheduling the power shutdown and transition: The final cut-over requires a coordinated building shutdown, typically scheduled over a weekend or overnight to minimize disruption to your commercial tenants.

The ultimate solution to the coordination problem is consolidating your project under a single contractor with in-house expertise across all required trades. The traditional multi-subcontractor model inherently breeds conflict. If the custom roof curb doesn't fit the existing ductwork, the sheet metal contractor blames the HVAC supplier. If the RTU won't turn on, the mechanical contractor blames the electrician's wiring. You, the facility manager, are stuck managing the delays while they argue.
A unified in-house team approach changes everything. At Presidential Ventilation Systems, our team of approximately 70 employees includes Red Seal electricians, HVAC technicians, and sheet metal fabricators all working under one roof. This eliminates communication silos and scheduling conflicts. The electrician reviewing the load calculation is sitting across the desk from the HVAC technician sizing the rooftop unit. Furthermore, custom sheet metal fabrication and installation for rooftop units can be seamlessly integrated with the electrical and mechanical phases. If a duct transition needs to be modified to avoid an electrical conduit run, it happens immediately in our own fabrication shop, not three weeks later through a third-party vendor.
This single point of accountability protects your project timeline and your budget. One longstanding issue our multi-trade team resolved last summer perfectly illustrates the danger of siloed knowledge. A commercial facility in a Dartmouth business park had a heat pump system that remained broken for months after previous companies failed to fix it. Because they lacked overlapping expertise, the mechanical and electrical components were never evaluated together. When our multi-trade technician arrived, they properly diagnosed the real issue—a complex electrical fault mimicking a mechanical failure—explained the process thoroughly, and successfully repaired the unit. That is the power of integrated trade knowledge.
When the crane finally arrives, a multi-trade team ensures a flawless execution. The advantages are immediate and measurable:
• Synchronized arrival of mechanical and electrical teams: No waiting for a third-party electrician to show up. The whole team arrives together, ready to execute their specific roles.
• Immediate resolution of on-site electrical panel issues: If a breaker trips or a wire needs extending during the physical placement of the unit, the licensed electrician is already on the roof to handle it instantly.
• Faster commissioning and handover: Because the electrical and mechanical systems were designed to work together from day one, the startup sequence is smooth, allowing your building to regain climate control hours faster.
Commercial HVAC units use 3-phase power because it provides a continuous, smooth flow of electricity without the voltage drops found in single-phase systems. This continuous power allows heavy-duty compressor motors—like those found in 10-ton to 25-ton units—and massive blower fans to operate with higher efficiency and significantly less heat generation. Ultimately, three-phase power reduces mechanical wear and tear, extending the lifespan of expensive commercial rooftop units.
Coordinating electrical and HVAC for an RTU installation requires finalizing the mechanical equipment specifications first, then performing a building load calculation to ensure the electrical panel can support it. The most effective way to manage this coordination is to hire a single multi-trade contractor who employs both Red Seal electricians and HVAC technicians. This eliminates scheduling conflicts and ensures that the electrical disconnects and mechanical curbs are installed in perfect synchronization.
The electrical requirements for a commercial HVAC unit vary heavily based on the system's tonnage and the manufacturer's specifications. Most heavy-duty commercial units require 208-volt, 460-volt, or 575-volt three-phase power connections. Additionally, local electrical codes require a dedicated, weather-rated disconnect switch mounted within sight of the rooftop unit to allow for safe maintenance and emergency shut-offs.
You strictly need a licensed electrician to handle the high-voltage connections for a commercial rooftop unit, as HVAC technicians are generally not licensed to upgrade main service panels or pull commercial electrical permits. However, you do not need to hire a separate electrical company if you choose a multi-trade HVAC contractor that employs in-house Red Seal electricians to handle the wiring legally and safely.
Wiring a 3-phase rooftop AC unit involves routing three separate hot wires and a ground wire from the main commercial breaker panel to a rooftop disconnect, and then to the unit's contactor. Because this involves highly dangerous commercial voltages (up to 575V) and strict adherence to the Canadian Electrical Code, this work must never be attempted as a DIY project; it requires a licensed commercial electrician to ensure proper phase balancing and safety.
The size of the electrical disconnect required for a commercial RTU is dictated by the unit's Maximum Overcurrent Protection (MOCP) and Minimum Circuit Ampacity (MCA) ratings, which are printed on the equipment's data plate. An electrician will use these numbers to size the disconnect box, the fuses or breakers, and the wire gauge. In coastal areas like Dartmouth, the disconnect must also be housed in a NEMA 4X corrosion-resistant enclosure.
Proper three-phase electrical planning is the foundation of any successful commercial RTU installation. Without it, you risk severe project delays, wasted crane rental fees, and premature equipment failure. Navigating utility upgrades, coastal weatherproofing requirements, and complex load calculations requires specialized knowledge that spans multiple construction disciplines.
In our 30+ years serving Nova Scotia, we have proven that the greatest peace of mind comes from using a single, unified multi-trade contractor. By keeping Red Seal electricians, HVAC technicians, and custom sheet metal fabricators under one roof, we eliminate the communication bottlenecks that plague commercial upgrades. We can also help you navigate any available commercial energy efficiency rebates to maximize your investment. If you are a facility manager planning a rooftop unit replacement, reach out to Presidential Ventilation Systems today to request a free estimate and book a comprehensive professional assessment of your building's HVAC and electrical infrastructure.

Standard air conditioning and heating compressors can draw up to five times their running amps on startup—a massive electrical spike that happens in a fraction of a second. At Presidential Ventilation Systems, when assessing solar-ready heat pumps for off-grid properties near Mount Uniacke, NS, we find the most critical factor is preventing that massive electrical spike from instantly overwhelming your standalone solar inverter. If you rely on a battery bank for your daily power, treating a new heating system like a standard household appliance is a recipe for total system shutdowns and cold winter nights.
For homeowners managing rural Mount Uniacke off-grid properties, balancing intense heating demands with limited battery capacity requires specialized equipment and careful electrical planning. A traditional compressor pulls a massive surge of power every time it cycles on. In a grid-tied home, the local utility grid absorbs that heavy hit without you ever noticing. Off the grid, your solar inverter bears the full brunt of that demand. If the surge exceeds the inverter's maximum capacity, the safety mechanisms trigger, the system trips, and your home loses power entirely.
Selecting the right heat pump systems involves looking far beyond standard thermal heating capacity. The focus must shift heavily toward strict electrical load constraints. You have to evaluate exactly how much power the unit requires to start up, how much it needs to maintain temperature, and how those numbers align with your specific battery storage and solar generation capabilities.
Fortunately, heating an off-grid home no longer requires burning through cords of wood or relying exclusively on expensive propane deliveries. Ductless units equipped with specific solar-ready technology offer a highly viable path to reliable off-grid heating, provided they are properly assessed before installation. These specialized units are engineered from the ground up to respect the limitations of standalone power systems.
In our 30+ years of experience evaluating rural Nova Scotia energy systems, our team has learned that off-grid heating is an electrical engineering challenge first and an HVAC challenge second. You need a system that sips power steadily rather than gulping it down all at once. By focusing on equipment designed specifically for off-grid limitations, you can keep your home comfortable year-round without constantly worrying about draining your hard-earned solar reserves.
To understand why standard heating equipment fails so spectacularly on off-grid systems, you have to look at a metric called Locked Rotor Amps (LRA). LRA refers to the massive, instantaneous electrical spike required to break the inertia of a stationary compressor motor and get it spinning. For a brief moment, the motor acts almost like a dead short, pulling an enormous amount of current from your power source.
When a traditional compressor kicks on, that LRA spike hits your solar inverter like a hammer. If you have a solar inverter rated for a specific continuous output, a standard compressor's startup surge can easily double or triple that limit in milliseconds. The physical process of an inverter trip happens because the sudden, massive amp draw forces the inverter to protect itself from overheating and catastrophic failure. It simply shuts down, leaving your entire home in the dark.
One of the most dangerous miscalculations our HVAC and electrical technicians see off-grid homeowners make is sizing their solar array and battery bank based solely on a heat pump's running amps. A standard unit might only draw a modest amount of power while it is actively heating your living room. On paper, that running draw looks perfectly safe for your battery bank. However, the running amps completely ignore the violent electrical demand required to start the cycle.
If your system cycles on and off ten times a day, that is ten separate LRA spikes hitting your inverter. Calculating only the running load gives a false sense of security that shatters the first time the thermostat calls for heat. This is exactly why strict low-amp draw and startup surge limits must dictate safe off-grid HVAC integration. You cannot afford to install equipment that treats your battery bank like an endless utility grid.
This is where specialized ductless heat pumps prove their worth. By understanding the severe threat that LRA poses to your solar infrastructure, you can narrow your focus exclusively to systems engineered to bypass this problem entirely. Protecting your inverter means eliminating the spike before it ever happens.

The solution to the startup surge problem lies in a fundamental shift in how the compressor operates. This shift is what defines a true gridless heat pump. Unlike traditional single-stage units that only know two speeds—100% on or 100% off—solar-ready systems utilize variable speed compressors driven by DC-inverter technology. This completely changes the electrical relationship between your heating system and your battery bank.
Instead of demanding a massive initial spike of power to force the motor into motion, DC-inverter technology gradually ramps up the compressor's speed. It starts slowly, drawing a tiny amount of current, and smoothly accelerates over several minutes until it reaches the necessary heating capacity. This soft-start mechanism effectively eliminates the Locked Rotor Amp spike, fully protecting your solar inverter from sudden overloads.
Once a DC-inverter system reaches the target indoor temperature, it does not shut off completely. Instead, it continuously adjusts its output, slowing down the compressor to maintain the temperature while sipping minimal power from the battery bank. This continuous, low-level operation is incredibly efficient. It avoids the constant stop-and-start cycles that drain batteries and wear out mechanical components.
At Presidential Ventilation Systems, we frequently discuss the benefits of gridless heat pumps for off-grid cabins with our local customers because they provide a steady, predictable electrical draw. When your power consumption is predictable, managing your solar reserves becomes much easier. You know exactly what the system will demand overnight, allowing you to plan your other electrical usage accordingly.
However, simply buying a unit with an inverter label is not enough. It is vital to match the specific DC-inverter electrical specifications with your existing solar array's continuous output capabilities. The maximum ramped-up draw must still fall comfortably within your inverter's safe operating limits, leaving enough headroom for your refrigerator, well pump, and lighting.
Operating an off-grid system in Nova Scotia requires planning for the worst-case scenario, and that scenario arrives in January and February. During these deep winter freezes, off-grid properties face a brutal dual challenge: your home's heating demand reaches its absolute peak at the exact same time your solar generation hours hit their lowest point of the year. Shorter days, lower sun angles, and frequent snow cover mean your battery bank gets less time to recharge just when it needs to work the hardest.
To survive this period without running a backup generator constantly, you must understand the Coefficient of Performance (COP). COP is a measurement of heating efficiency—it tells you how much heat energy the unit produces for every unit of electrical energy it consumes. Standard units lose their efficiency rapidly as temperatures drop, but true cold-climate heat pumps are engineered to maintain a high COP even when the thermometer dips to -20 degrees Celsius.
Why does COP matter so much for an off-grid home? Because a drop in COP directly translates to an increase in electrical draw. If your heat pump becomes less efficient in extreme cold, it has to pull more amps from your battery bank to generate the same amount of heat indoors. If you install a system with a poor cold-weather COP, your battery bank could easily be depleted overnight during a severe cold snap.
Careful load planning requires calculating the system's electrical demand based on its performance at -20 degrees Celsius, not its performance on a mild autumn afternoon. Mount Uniacke's specific microclimate realities—including high summer humidity that requires robust cooling and deep winter freezes that demand maximum heating output—mean you cannot rely on generic, mild-climate equipment. As a Daikin Comfort Pro contractor, we recommend climate-tested units that guarantee high efficiency when the weather is at its worst, protecting both your comfort and your critical solar reserves.
One of the biggest risks off-grid homeowners face is hiring a contractor who treats a heat pump purely as an HVAC appliance. In a standard grid-tied home, a technician can focus primarily on airflow, refrigerant lines, and thermal sizing, assuming the home's electrical panel can handle the load. Off-grid, that assumption is dangerous. An off-grid heat pump must be assessed as a complex, highly restrictive electrical load first and foremost.
With over 30 years of experience integrating complex electrical upgrades with central and ductless heating transitions, our team at Presidential Ventilation Systems has learned that a dual assessment is absolutely mandatory. Before any equipment is purchased or installed, the thermal load of the home must be calculated right alongside the electrical constraints of the solar array, the inverter, and the battery bank. If the person installing your system does not deeply understand off-grid electrical limitations, you are risking catastrophic inverter failure.
Because our company employs approximately 70 skilled professionals, featuring Red Seal electrical, sheet-metal, ventilation, and HVAC expertise under one roof, we assess both the heating requirements and the electrical realities simultaneously. This integrated approach prevents the costly surprises that often derail off-grid projects. For example, during a recent central heat pump installation, an unexpected electrical panel concern threatened to halt the project entirely. Because our team handles both sides of the equation, an in-house electrical team member stepped in immediately to address and work through the panel upgrade concerns, ensuring the new system could function safely without delays.
Relying on an established local contractor with in-house capabilities across multiple skilled trades provides a distinct safety and reliability benefit. It means the person evaluating your solar inverter's surge capacity works directly with the person sizing your compressor. This seamless integration is the only way to guarantee that your new heating system will respect the strict boundaries of your standalone power grid, preventing costly system failures and ensuring long-term reliability.
When planning your off-grid heating strategy, the way you distribute the air throughout your home has a massive impact on your total electrical consumption. The two primary options—ductless mini-splits and central ducted systems—present very different electrical footprints. Understanding these differences is crucial for protecting your battery bank.
Individual ductless wall cassettes utilize small, highly efficient DC motors to quietly push air into a specific room. Because there is no ductwork, there is no air resistance to overcome. In contrast, central ducted systems require a large blower motor to force air through a network of sheet metal or flex ducting throughout the entire house. Overcoming the static pressure of ductwork requires significantly more electrical energy.
• Blower Motor Amp Draw — Ductless Mini-Split Systems: Very low; utilizes small, localized DC fans in each wall cassette. — Central Ducted Systems: Higher; requires a powerful central blower to overcome ductwork static pressure.
• Zoning Capabilities — Ductless Mini-Split Systems: Excellent; you can turn off cassettes in unused rooms to conserve battery power. — Central Ducted Systems: Limited; typically heats the entire home at once, increasing overall electrical demand.
• Air Resistance — Ductless Mini-Split Systems: None; air is delivered directly into the living space. — Central Ducted Systems: High; energy is expended pushing air through long runs of ductwork.
• Off-Grid Viability — Ductless Mini-Split Systems: Highly recommended for most standard battery banks and smaller solar arrays. — Central Ducted Systems: Viable only with highly robust, large-capacity solar arrays and battery banks.
The zoning capabilities of ductless systems offer a massive advantage for off-grid living. By allowing you to heat only the occupied spaces—such as keeping the living room warm during the day and only heating the bedroom at night—you can drastically reduce your overall electrical consumption. This micro-management of your heating load is one of the most effective ways to conserve critical battery power during long winter nights.
While ducted heat pump systems can be successfully integrated into off-grid properties, they require a much more robust electrical infrastructure. If your property features a massive, high-capacity solar array and an oversized battery bank, a central system may be viable. However, for the average rural off-grid setup, the localized, low-draw nature of ductless distribution is almost always the safer and more reliable electrical choice.
Moving forward with a solar-ready heating project requires careful, methodical planning. The very first step is ensuring that an electrical load calculation is completed directly alongside the HVAC thermal sizing. You need a clear, documented understanding of exactly how many continuous amps the new system will pull at -20 degrees Celsius, and you need to verify that your inverter and battery bank can comfortably support that load alongside your other household needs.
Because high-efficiency, cold-climate DC-inverter units represent a significant investment in your home's infrastructure, it is worth exploring your financial options. Professional heat pump financing may be available to help manage the upfront costs of these specialized systems, allowing you to secure the right technology for your off-grid constraints. (Keep in mind that financing terms and eligibility requirements vary, so it is always best to confirm current options directly with our team at Presidential Ventilation Systems).
Additionally, while provincial and federal rebates often exist for energy-efficient heating upgrades, program eligibility for off-grid properties can be complex and subject to change. Some programs have specific requirements regarding grid connectivity. We highly recommend confirming current rebate programs and eligibility criteria during your initial consultation with us to ensure you maximize any available incentives.
Ultimately, the success of your off-grid heating project comes down to proper planning and expert execution. A professional assessment by a certified, dual-trade contractor is the only way to guarantee that your new system will keep your home comfortable without overwhelming your solar array. Do not leave your winter comfort to chance—ensure your system is engineered for the realities of off-grid living.
A gridless heat pump is a heating and cooling system specifically engineered to operate safely on off-grid solar and battery power. These systems utilize DC-inverter technology to eliminate the massive startup electrical surges that typically trip standalone solar inverters. By ramping up power gradually and maintaining a low, continuous amp draw, they provide reliable climate control without overloading limited power reserves.
Yes, you can run a heat pump off the grid, provided you select the correct technology and properly size your solar array. It requires a unit with a variable-speed DC-inverter compressor to prevent startup spikes from tripping your system. Additionally, your battery bank and inverter must be professionally assessed to ensure they can handle the continuous electrical load required during deep winter freezes.
Standard, single-stage heat pumps use a massive amount of amps on startup, often pulling three to five times their normal running current for a fraction of a second. This is known as Locked Rotor Amps (LRA) and is a major problem for off-grid homes. However, specialized solar-ready units use inverter technology to bypass this issue, starting slowly and using very few amps to get running.
The number of solar panels required depends entirely on the specific amp draw of the mini-split, the climate you live in, and the size of your battery bank. A professional electrical load calculation is required to determine the exact generation capacity needed to keep the unit running through cold winter nights. There is no one-size-fits-all number, as winter performance demands significantly more power than summer cooling.
DC-inverter heat pumps prevent power surges by using variable-speed technology rather than a traditional on/off switch. When the system turns on, it draws a very small amount of electricity and gradually speeds up the compressor motor over several minutes. This smooth, controlled acceleration completely eliminates the sudden, hard electrical spike that causes off-grid inverters to trip and shut down.
Mount Uniacke experiences deep winter freezes in January and February, which drastically reduces the heating efficiency of the system while simultaneously occurring during the shortest solar generation days of the year. This requires sizing the battery bank and the heat pump based on its maximum electrical draw at extremely low temperatures (like -20°C). You must plan for the worst-case scenario where heating demand is highest and solar recharge time is lowest.
Heating an off-grid property requires precision, planning, and specialized expertise to protect your vital solar reserves. With over 30 years of experience and in-house Red Seal electrical, ventilation, and HVAC professionals, our team at Presidential Ventilation Systems is equipped to accurately assess your property's unique constraints. Contact us today to request a free estimate and ensure your off-grid home stays reliably warm all winter long.