


When you walk outside and see your primary heating source encased in white, do you panic? One of the most common homeowner questions answered during a Nova Scotia damp, freezing winter is whether a frost-covered outdoor unit is a normal occurrence or an impending system failure. It is incredibly unsettling to rely on a machine to keep your family warm, only to find it looking like a solid block of ice. However, not all frost means your system is broken. In many cases, a light coating of white frost is entirely normal and expected. The challenge is knowing exactly how to distinguish between a routine operational cycle and a mechanical failure that requires immediate attention.
If you are looking for reliable heating solutions, explore our ductless heat pumps and premium Lennox ductless systems.
To understand why this happens, you have to look at how the equipment operates. The outdoor unit acts as a heat exchanger. Even when it feels bitterly cold outside, there is still ambient heat energy in the air. Your system extracts that heat and moves it indoors. During this process, the outdoor coil drops to a temperature significantly lower than the surrounding air. When moisture in the air meets that freezing metal coil, it instantly turns to frost. This natural physical reaction happens to every heat pump, but the severity depends heavily on your local environment and the health of your equipment.
The physics of condensation explain why frost forms, but your specific location dictates how fast it happens. In Mount Uniacke NS, our specific weather patterns create the perfect storm for rapid, heavy frost accumulation. The cold, damp Maritime winters mean the outdoor air holds significantly more moisture than the air in dry, inland climates.
When your system works to pull heat from that highly saturated damp air, the excess moisture condenses and freezes on the coils at an accelerated rate. This means local systems have to work significantly harder to manage frost buildup than units installed in drier regions of the country. A homeowner in a dry climate might rarely notice frost on their unit, while a homeowner on the coast will see it almost daily.
• Average Humidity — Mount Uniacke (Maritime Winter): Often exceeds 70-80% — Inland (Dry Cold Winter): Usually below 40%
• Frost Accumulation — Mount Uniacke (Maritime Winter): Rapid, heavy, and frequent — Inland (Dry Cold Winter): Slow, light, and rare
• System Workload — Mount Uniacke (Maritime Winter): High demand on defrost controls — Inland (Dry Cold Winter): Minimal defrost intervention needed
Because of this high moisture content, your equipment is under constant pressure to clear itself. If the system cannot keep up with the rapid accumulation of maritime humidity, that thin layer of frost will quickly compound into a solid sheet of ice. Understanding this regional difference is the first step in knowing what to expect from your equipment as the temperature drops.
Modern systems are specifically designed to handle a Nova Scotia damp, freezing winter automatically. They manage the constant moisture through a built-in mechanism called the defrost cycle. When you understand how this cycle works, you will feel much more confident evaluating the health of your unit.
Here is exactly how your system clears itself of normal frost:
1. Sensor activation: Advanced sensors inside the outdoor unit detect that frost is beginning to impede the necessary airflow across the outdoor coil.
2. Reversing the flow: A specialized reversing valve shifts the system's operation temporarily. Instead of pulling heat from outside, it takes a small amount of warm air from inside your home and redirects it to the outdoor unit.
3. Melting the frost: This sudden burst of internal heat rapidly warms the outdoor coils, melting the accumulated frost. You might even see a cloud of steam rising from the outdoor unit during this phase, which is perfectly normal.
4. Returning to normal: Once the sensors detect that the coil is clear and the temperature has normalized, the reversing valve shifts back, and the system returns to heating your home.
During freezing weather, a system typically enters this mode every 30 to 90 minutes. A normal cycle lasts between 5 and 15 minutes before switching back to heating mode. If you are researching new equipment, our best ductless heat pumps guide explains how different modern models handle these cycles with greater efficiency.
How do you know when to worry and when to let the machine do its job? Use this clear, non-technical checklist to evaluate your system in Mount Uniacke NS. Knowing what to look for will save you from unnecessary panic and help you catch real problems early.
• Normal frost appearance: Look for a light, white, powdery coating on the coils. It closely resembles the thin frost you see on your car windshield on a crisp autumn morning.
• Normal frost behavior: This powdery layer should completely disappear after the 5 to 15-minute automatic defrost cycle runs. The metal coils should be clearly visible again.
• Problematic ice appearance: Watch out for a thick, solid, clear, or milky ice casing. This looks like a heavy block of ice rather than a light dusting of snow.
• Problematic ice location: If the solid ice encases the inner coils entirely, blocks the metal fins from view, or reaches the moving fan blades, you have a serious problem.
• The impact of solid ice: Solid ice restricts airflow completely. When air cannot pass through the outdoor coils, the system's efficiency drops to zero. It can no longer extract heat, meaning your home will quickly grow cold.
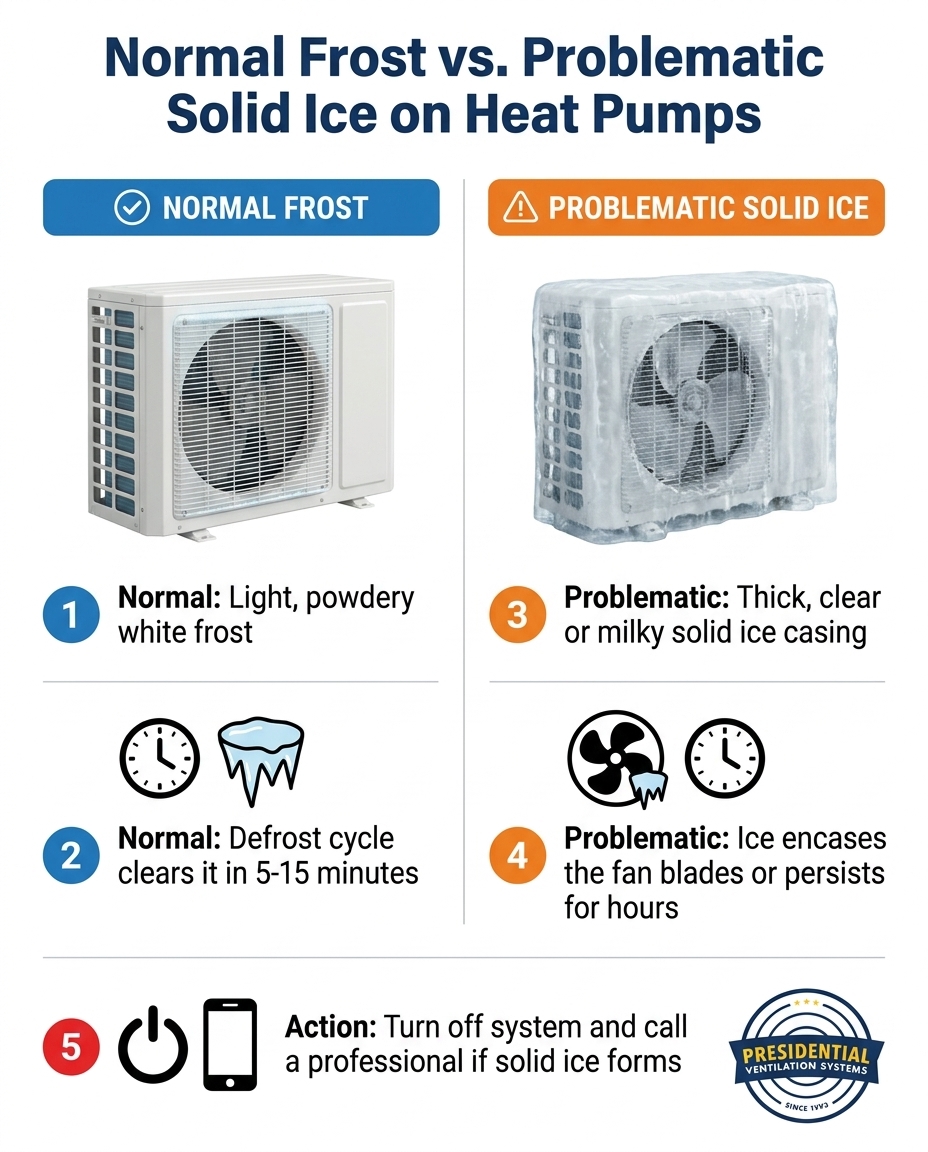
If your system is encased in a solid block of ice during a Nova Scotia damp, freezing winter, it is no longer a weather issue—it is a mechanical failure. When the defrost cycle cannot keep up, or fails to trigger entirely, several common malfunctions are usually to blame. Understanding these failures helps you communicate clearly with your technician.
Low refrigerant levels: The system relies on a precise volume of refrigerant to absorb and release heat. If there is a leak in the line, the pressure drops, causing the coils to run at a much lower temperature than designed. This extreme cold causes ambient moisture to freeze rapidly, overwhelming the defrost cycle.
Dirty outdoor coils: Proper operation requires continuous airflow. If leaves, dirt, or debris block the metal fins on the outdoor unit, air cannot circulate. Without proper air circulation, the heat exchange process stalls, and the trapped moisture freezes solid against the metal.
Malfunctioning components: The system relies on moving parts and electronics to clear itself. A broken outdoor fan motor will stop air from moving across the coils. Similarly, a failing defrost control board or a faulty temperature sensor will prevent the system from knowing when it needs to initiate the melting cycle.
A typical pattern we see is recurring icing being misdiagnosed by inexperienced technicians, leading to repeated breakdowns. For example, one local homeowner reached out last fall when their mini splits stopped working properly and began freezing up. A previous company had completely misdiagnosed the issue, leaving the family frustrated and without reliable heat as temperatures dropped. A proper, thorough diagnostic quickly identified the actual root cause of the freezing. The technician confirmed the manufacturer warranty coverage and immediately arranged for the correct repair. The problem was resolved promptly, and the system returned to normal, efficient operation. Proper diagnostics ensure you are not just melting the ice today, but fixing the underlying failure permanently.
When you see a thick block of ice on your primary heat source in Mount Uniacke NS, the temptation to fix it yourself is incredibly strong. You just want your home warm again. However, taking matters into your own hands usually results in catastrophic damage to the equipment.
Never use sharp objects: Taking an ice pick, screwdriver, or snow shovel to chip away the ice is highly dangerous. The refrigerant lines coiled inside the unit are made of thin, fragile metal. They are easily punctured by the slightest impact. A single slip with a tool will vent your refrigerant into the atmosphere, turning a simple sensor repair into a total system replacement.
Avoid boiling water: Pouring boiling water over freezing metal components is a common but destructive myth. This causes rapid thermal expansion. The sudden, extreme temperature shift can warp the metal coils, crack sensitive internal parts, and permanently damage the delicate electronics housed inside the casing.
Protect your warranty: Manufacturers are very strict about unauthorized tampering. DIY damage typically voids manufacturer warranties instantly. If you puncture a coil while trying to chip away ice, you will be left entirely responsible for the repair or replacement costs.
Knowing when to intervene is the most important part of winter system management. If you notice a problem, you need to take immediate action to protect the most expensive components of your equipment.
The Problem: You have inspected the outdoor unit and confirmed it is covered in a thick, solid casing of clear or milky ice that does not melt after 15 to 20 minutes.
The Cause: The system is suffering from restricted airflow, low refrigerant, or a broken defrost board. Because of this, the compressor is now straining heavily against a solid wall of ice during a Nova Scotia damp, freezing winter.
The Solution: Immediately turn off the system using your indoor thermostat. Do not just lower the target temperature; switch the system completely to the "off" position. If your home has a backup heating source, use it. Continuing to run a completely frozen unit will destroy the compressor, which is the heart of the machine and the most expensive part to replace.
Once the system is safely powered down, it is time to call a professional for heat pump installation, diagnostics, or repair. Older systems often struggle to keep up with heavy frost loads as their components wear down. If your unit is aging and freezing frequently, it might be more cost-effective to replace it. We specialize in premium brands like Daikin and Lennox, which feature advanced defrost control boards designed specifically for cold, damp climates. Furthermore, upgrading a failing, inefficient system often qualifies you for Efficiency Nova Scotia rebates, making a modern, reliable replacement much more accessible for your home.
Navigating winter heating issues can be stressful when the temperature drops. Whether you rely on single-zone ductless units or are exploring ducted heat pump systems, understanding how your equipment handles frost in Mount Uniacke NS is essential. Here are detailed answers to the most common questions homeowners ask when they see ice on their units.
A heat pump covered in ice is either undergoing a normal defrost cycle or suffering from a mechanical failure like restricted airflow or low refrigerant. The outdoor coil naturally accumulates frost as it pulls heat from the freezing ambient air. If the system is functioning correctly, it will melt this frost automatically using its built-in sensors. However, if the ice is thick, solid, and persists for hours without melting, it indicates a malfunction that requires a professional diagnostic.
Yes, a light layer of white, powdery frost is a completely normal part of winter operation. As the unit extracts heat from the damp outdoor air, condensation forms and freezes on the cold metal coils. The system's built-in defrost cycle is specifically designed to melt this light frost away quickly and efficiently. It is only considered abnormal and problematic when that light frost turns into a solid, impenetrable block of ice that encases the unit.
The safest way to unfreeze your outside unit is to turn the system completely off at the thermostat and call a professional technician for help. You can also switch the system to a "fan-only" mode if your specific model allows it, which helps circulate air to slowly melt the ice without running the compressor. You must never attempt to chip the ice away with sharp tools or pour boiling hot water over the unit, as these methods will cause severe damage and void your warranty.
A standard defrost cycle typically takes between 5 and 15 minutes to complete from start to finish. During freezing weather, the system may automatically initiate this cycle every 30 to 90 minutes to keep the outdoor coils clear of frost. If you notice your unit staying in defrost mode for significantly longer than 15 minutes without returning to normal heating mode, the control board or sensors may be failing.
Yes, allowing a completely frozen heat pump to continue running can lead to catastrophic compressor failure. The solid ice blocks all necessary airflow, forcing the compressor to work incredibly hard without successfully transferring any heat into your home. This severe mechanical strain can quickly cause the compressor to overheat and burn out, leading to a highly expensive repair or forcing a complete system replacement.
Now that you know the clear difference between normal white frost and problematic solid ice, you can monitor your system confidently throughout a Nova Scotia damp, freezing winter. You have the exact criteria for when to let the defrost cycle run its course and when to shut the unit off at the thermostat to protect your compressor. If you notice thick, clear ice encasing your fan blades, or if your system is struggling to keep your home warm, do not wait for the problem to worsen. Reach out for a professional diagnostic to catch minor issues before they become major failures, or explore modern, high-efficiency upgrades designed to handle our maritime climate effortlessly.


When you walk outside and see your primary heating source encased in white, do you panic? One of the most common homeowner questions answered during a Nova Scotia damp, freezing winter is whether a frost-covered outdoor unit is a normal occurrence or an impending system failure. It is incredibly unsettling to rely on a machine to keep your family warm, only to find it looking like a solid block of ice. However, not all frost means your system is broken. In many cases, a light coating of white frost is entirely normal and expected. The challenge is knowing exactly how to distinguish between a routine operational cycle and a mechanical failure that requires immediate attention.
If you are looking for reliable heating solutions, explore our ductless heat pumps and premium Lennox ductless systems.
To understand why this happens, you have to look at how the equipment operates. The outdoor unit acts as a heat exchanger. Even when it feels bitterly cold outside, there is still ambient heat energy in the air. Your system extracts that heat and moves it indoors. During this process, the outdoor coil drops to a temperature significantly lower than the surrounding air. When moisture in the air meets that freezing metal coil, it instantly turns to frost. This natural physical reaction happens to every heat pump, but the severity depends heavily on your local environment and the health of your equipment.
The physics of condensation explain why frost forms, but your specific location dictates how fast it happens. In Mount Uniacke NS, our specific weather patterns create the perfect storm for rapid, heavy frost accumulation. The cold, damp Maritime winters mean the outdoor air holds significantly more moisture than the air in dry, inland climates.
When your system works to pull heat from that highly saturated damp air, the excess moisture condenses and freezes on the coils at an accelerated rate. This means local systems have to work significantly harder to manage frost buildup than units installed in drier regions of the country. A homeowner in a dry climate might rarely notice frost on their unit, while a homeowner on the coast will see it almost daily.
• Average Humidity — Mount Uniacke (Maritime Winter): Often exceeds 70-80% — Inland (Dry Cold Winter): Usually below 40%
• Frost Accumulation — Mount Uniacke (Maritime Winter): Rapid, heavy, and frequent — Inland (Dry Cold Winter): Slow, light, and rare
• System Workload — Mount Uniacke (Maritime Winter): High demand on defrost controls — Inland (Dry Cold Winter): Minimal defrost intervention needed
Because of this high moisture content, your equipment is under constant pressure to clear itself. If the system cannot keep up with the rapid accumulation of maritime humidity, that thin layer of frost will quickly compound into a solid sheet of ice. Understanding this regional difference is the first step in knowing what to expect from your equipment as the temperature drops.
Modern systems are specifically designed to handle a Nova Scotia damp, freezing winter automatically. They manage the constant moisture through a built-in mechanism called the defrost cycle. When you understand how this cycle works, you will feel much more confident evaluating the health of your unit.
Here is exactly how your system clears itself of normal frost:
1. Sensor activation: Advanced sensors inside the outdoor unit detect that frost is beginning to impede the necessary airflow across the outdoor coil.
2. Reversing the flow: A specialized reversing valve shifts the system's operation temporarily. Instead of pulling heat from outside, it takes a small amount of warm air from inside your home and redirects it to the outdoor unit.
3. Melting the frost: This sudden burst of internal heat rapidly warms the outdoor coils, melting the accumulated frost. You might even see a cloud of steam rising from the outdoor unit during this phase, which is perfectly normal.
4. Returning to normal: Once the sensors detect that the coil is clear and the temperature has normalized, the reversing valve shifts back, and the system returns to heating your home.
During freezing weather, a system typically enters this mode every 30 to 90 minutes. A normal cycle lasts between 5 and 15 minutes before switching back to heating mode. If you are researching new equipment, our best ductless heat pumps guide explains how different modern models handle these cycles with greater efficiency.
How do you know when to worry and when to let the machine do its job? Use this clear, non-technical checklist to evaluate your system in Mount Uniacke NS. Knowing what to look for will save you from unnecessary panic and help you catch real problems early.
• Normal frost appearance: Look for a light, white, powdery coating on the coils. It closely resembles the thin frost you see on your car windshield on a crisp autumn morning.
• Normal frost behavior: This powdery layer should completely disappear after the 5 to 15-minute automatic defrost cycle runs. The metal coils should be clearly visible again.
• Problematic ice appearance: Watch out for a thick, solid, clear, or milky ice casing. This looks like a heavy block of ice rather than a light dusting of snow.
• Problematic ice location: If the solid ice encases the inner coils entirely, blocks the metal fins from view, or reaches the moving fan blades, you have a serious problem.
• The impact of solid ice: Solid ice restricts airflow completely. When air cannot pass through the outdoor coils, the system's efficiency drops to zero. It can no longer extract heat, meaning your home will quickly grow cold.
If your system is encased in a solid block of ice during a Nova Scotia damp, freezing winter, it is no longer a weather issue—it is a mechanical failure. When the defrost cycle cannot keep up, or fails to trigger entirely, several common malfunctions are usually to blame. Understanding these failures helps you communicate clearly with your technician.
Low refrigerant levels: The system relies on a precise volume of refrigerant to absorb and release heat. If there is a leak in the line, the pressure drops, causing the coils to run at a much lower temperature than designed. This extreme cold causes ambient moisture to freeze rapidly, overwhelming the defrost cycle.
Dirty outdoor coils: Proper operation requires continuous airflow. If leaves, dirt, or debris block the metal fins on the outdoor unit, air cannot circulate. Without proper air circulation, the heat exchange process stalls, and the trapped moisture freezes solid against the metal.
Malfunctioning components: The system relies on moving parts and electronics to clear itself. A broken outdoor fan motor will stop air from moving across the coils. Similarly, a failing defrost control board or a faulty temperature sensor will prevent the system from knowing when it needs to initiate the melting cycle.
A typical pattern we see is recurring icing being misdiagnosed by inexperienced technicians, leading to repeated breakdowns. For example, one local homeowner reached out last fall when their mini splits stopped working properly and began freezing up. A previous company had completely misdiagnosed the issue, leaving the family frustrated and without reliable heat as temperatures dropped. A proper, thorough diagnostic quickly identified the actual root cause of the freezing. The technician confirmed the manufacturer warranty coverage and immediately arranged for the correct repair. The problem was resolved promptly, and the system returned to normal, efficient operation. Proper diagnostics ensure you are not just melting the ice today, but fixing the underlying failure permanently.
When you see a thick block of ice on your primary heat source in Mount Uniacke NS, the temptation to fix it yourself is incredibly strong. You just want your home warm again. However, taking matters into your own hands usually results in catastrophic damage to the equipment.
Never use sharp objects: Taking an ice pick, screwdriver, or snow shovel to chip away the ice is highly dangerous. The refrigerant lines coiled inside the unit are made of thin, fragile metal. They are easily punctured by the slightest impact. A single slip with a tool will vent your refrigerant into the atmosphere, turning a simple sensor repair into a total system replacement.
Avoid boiling water: Pouring boiling water over freezing metal components is a common but destructive myth. This causes rapid thermal expansion. The sudden, extreme temperature shift can warp the metal coils, crack sensitive internal parts, and permanently damage the delicate electronics housed inside the casing.
Protect your warranty: Manufacturers are very strict about unauthorized tampering. DIY damage typically voids manufacturer warranties instantly. If you puncture a coil while trying to chip away ice, you will be left entirely responsible for the repair or replacement costs.
Knowing when to intervene is the most important part of winter system management. If you notice a problem, you need to take immediate action to protect the most expensive components of your equipment.
The Problem: You have inspected the outdoor unit and confirmed it is covered in a thick, solid casing of clear or milky ice that does not melt after 15 to 20 minutes.
The Cause: The system is suffering from restricted airflow, low refrigerant, or a broken defrost board. Because of this, the compressor is now straining heavily against a solid wall of ice during a Nova Scotia damp, freezing winter.
The Solution: Immediately turn off the system using your indoor thermostat. Do not just lower the target temperature; switch the system completely to the "off" position. If your home has a backup heating source, use it. Continuing to run a completely frozen unit will destroy the compressor, which is the heart of the machine and the most expensive part to replace.
Once the system is safely powered down, it is time to call a professional for heat pump installation, diagnostics, or repair. Older systems often struggle to keep up with heavy frost loads as their components wear down. If your unit is aging and freezing frequently, it might be more cost-effective to replace it. We specialize in premium brands like Daikin and Lennox, which feature advanced defrost control boards designed specifically for cold, damp climates. Furthermore, upgrading a failing, inefficient system often qualifies you for Efficiency Nova Scotia rebates, making a modern, reliable replacement much more accessible for your home.
Navigating winter heating issues can be stressful when the temperature drops. Whether you rely on single-zone ductless units or are exploring ducted heat pump systems, understanding how your equipment handles frost in Mount Uniacke NS is essential. Here are detailed answers to the most common questions homeowners ask when they see ice on their units.
A heat pump covered in ice is either undergoing a normal defrost cycle or suffering from a mechanical failure like restricted airflow or low refrigerant. The outdoor coil naturally accumulates frost as it pulls heat from the freezing ambient air. If the system is functioning correctly, it will melt this frost automatically using its built-in sensors. However, if the ice is thick, solid, and persists for hours without melting, it indicates a malfunction that requires a professional diagnostic.
Yes, a light layer of white, powdery frost is a completely normal part of winter operation. As the unit extracts heat from the damp outdoor air, condensation forms and freezes on the cold metal coils. The system's built-in defrost cycle is specifically designed to melt this light frost away quickly and efficiently. It is only considered abnormal and problematic when that light frost turns into a solid, impenetrable block of ice that encases the unit.
The safest way to unfreeze your outside unit is to turn the system completely off at the thermostat and call a professional technician for help. You can also switch the system to a "fan-only" mode if your specific model allows it, which helps circulate air to slowly melt the ice without running the compressor. You must never attempt to chip the ice away with sharp tools or pour boiling hot water over the unit, as these methods will cause severe damage and void your warranty.
A standard defrost cycle typically takes between 5 and 15 minutes to complete from start to finish. During freezing weather, the system may automatically initiate this cycle every 30 to 90 minutes to keep the outdoor coils clear of frost. If you notice your unit staying in defrost mode for significantly longer than 15 minutes without returning to normal heating mode, the control board or sensors may be failing.
Yes, allowing a completely frozen heat pump to continue running can lead to catastrophic compressor failure. The solid ice blocks all necessary airflow, forcing the compressor to work incredibly hard without successfully transferring any heat into your home. This severe mechanical strain can quickly cause the compressor to overheat and burn out, leading to a highly expensive repair or forcing a complete system replacement.
Now that you know the clear difference between normal white frost and problematic solid ice, you can monitor your system confidently throughout a Nova Scotia damp, freezing winter. You have the exact criteria for when to let the defrost cycle run its course and when to shut the unit off at the thermostat to protect your compressor. If you notice thick, clear ice encasing your fan blades, or if your system is struggling to keep your home warm, do not wait for the problem to worsen. Reach out for a professional diagnostic to catch minor issues before they become major failures, or explore modern, high-efficiency upgrades designed to handle our maritime climate effortlessly.

Are you noticing weak airflow from your vents or rising energy bills, even though you change your air filter regularly? If you are researching why standard one-inch filters choke high-efficiency ducted heat pumps, you are likely dealing with a fundamental mismatch between modern HVAC technology and outdated filtration methods. Many homeowners upgrade to advanced, energy-efficient climate control systems but continue sliding the same basic disposable filters into the return grille, completely unaware that they are suffocating their equipment.
The core issue rarely stems from a mechanical defect in the heat pump itself. Instead, the typical pattern we see is a homeowner trying to improve their indoor air quality by purchasing a restrictive high-MERV 1-inch pleated filter from a big-box store. While these dense filters capture fine dust and allergens, they also act like a brick wall against the air trying to return to your system. This creates a severe bottleneck.
Proper filtration is a holistic airflow issue, not just a disposable product choice. You eventually reach a critical decision point: continue replacing 1-inch filters every single month while your system struggles to breathe, or upgrade the physical ductwork to accommodate a high-capacity filtration system that actually supports your equipment's performance.
Related resource: Learn more about how proper airflow supports our ducted heat pump systems.
To understand why your heat pump is struggling, you first need to understand a mechanical concept called static pressure. In simple terms, static pressure is the measurement of resistance to airflow within your ductwork. Every component in your HVAC system—from the sweeping curves of the sheet metal to the grilles in your floor—adds a certain amount of resistance. Your system's blower motor is engineered to overcome a very specific, calculated amount of this resistance.
Think of your heat pump's blower motor like your own lungs. If you go for a run while breathing normally, your lungs easily pull in the volume of air you need. Now, try running that same distance while breathing entirely through a narrow drinking straw. The intense strain you feel in your chest is exactly what your system's blower motor experiences when it faces high static pressure. It is forced to work exponentially harder just to pull the same volume of air, measured in cubic feet per minute (CFM), through the ductwork.
When you install a dense filter into a narrow slot, you drastically increase that resistance. If you need to order replacement heat pump filters, understanding how surface area dictates this pressure drop is critical to keeping your system healthy.
The fatal flaw of the high-MERV 1-inch pleated filter is its severe lack of surface area. MERV stands for Minimum Efficiency Reporting Value, which measures how effectively a filter traps microscopic particles. To achieve a high MERV rating, manufacturers pack the filter media tightly to catch more debris.
• Dense pleating: In a 1-inch space, the pleats are incredibly shallow and tightly packed together, leaving almost no open space for air to bypass the trapped dust.
• Rapid clogging: Because there is so little surface area, the face of the filter loads up with dust, pet dander, and hair almost immediately.
• Spiking pressure: Within just a few weeks of use, that 1-inch filter becomes severely clogged, causing the static pressure inside your ductwork to spike to unsafe levels.
Your heat pump requires a massive, continuous volume of air to transfer heat effectively. When that air is blocked by a small, dense filter, the entire thermodynamic process begins to break down.
The static pressure problem becomes even more destructive when we look at the specific technology inside modern high-efficiency heat pumps. Older furnaces used basic motors that simply moved less air when the filter got dirty. Modern systems use advanced ECM (Electronically Commutated Motors) that behave very differently when faced with a restriction.
Here is exactly how a high-MERV 1-inch pleated filter damages a modern ECM blower motor:
1. Sensing the restriction: ECM motors have built-in microprocessors programmed to maintain a precise, constant airflow (CFM). When the dense 1-inch filter restricts the air, the motor's sensors detect the drop in volume.
2. Ramping up RPMs: To compensate for the blockage and hit its programmed airflow target, the ECM automatically increases its speed and torque. It begins spinning faster and pulling more electricity to fight the resistance.
3. Constant maximum output: In Nova Scotia, heat pumps run almost continuously through freezing winters and humid summers. This near-constant operation means the blower motor is running at maximum RPMs year-round just to overcome the dense filter.
4. Overheating and failure: Electric motors are cooled by the air flowing over them. With restricted airflow and maximum electrical draw, the motor quickly overheats. Over time, this constant strain degrades the bearings and internal electronics, leading to premature motor failure.
Blower motor replacements are major, costly repairs. The most frustrating part for homeowners is that these failures are entirely preventable. By correcting the structural airflow design, you allow the ECM motor to operate at a low, quiet, and highly efficient speed exactly as the manufacturer intended.
The permanent solution to this airflow crisis is not found in the filter aisle of a hardware store. It requires a structural modification to your ductwork known as a 4-inch media cabinet. This is a dedicated, custom-fitted sheet-metal housing installed directly into the return air drop next to your indoor air handler.
Instead of a shallow 1-inch filter, this cabinet houses a massive, deeply pleated 4-inch filter. The difference in performance comes down to simple geometry. A 4-inch filter contains exponentially more physical filter media folded into those deep pleats. This massive increase in surface area means you can finally use a high-MERV filter to capture allergens without creating a restrictive wall. The air easily flows through the vast surface area, keeping static pressure low and protecting your ECM blower motor.
Because there is so much more material to hold dust and debris, a 4-inch media filter only needs to be replaced every 6 to 12 months, rather than every 30 days.
You cannot simply shove a 4-inch filter into a 1-inch slot, nor can you tape a larger box to the side of your system and expect it to work. Upgrading your filtration requires professional mechanical modification.
With our 30+ years Nova Scotia HVAC and sheet-metal expertise, we advocate for custom-fabricated media cabinets because aerodynamic flow is highly sensitive. The return air drop must be properly sized and transitioned. If the sheet metal is poorly designed, the air will create turbulence, bypassing the filter entirely or whistling through gaps. Custom sheet-metal fabrication ensures an airtight seal, preventing dirty basement or utility room air from being sucked into your pristine heating system. This commitment to proper mechanical design separates a long-lasting system from one plagued by constant breakdowns.

When a heat pump's airflow is choked, the consequences extend far beyond the mechanical room. Your central ductwork is the respiratory system of your entire home. If the air cannot move freely through the central air handler, the air in your living spaces quickly stagnates.
During the humid summer months, your heat pump removes moisture from the air by passing it over a cold indoor coil. If high static pressure slows that airflow to a crawl, the coil can actually freeze solid into a block of ice, shutting down your cooling completely. Even if it doesn't freeze, the weak airflow prevents the system from properly circulating and dehumidifying the distant rooms in your home, leaving bedrooms feeling sticky and uncomfortable.
In the winter, poor circulation prevents the warm air from reaching the furthest corners of your house, resulting in cold spots and uneven heating. Furthermore, your central heat pump often works in tandem with other indoor air quality equipment. For example, maintaining your HRV system is critical for fresh air exchange, but if your primary ductwork is choked by a restrictive filter, that fresh air cannot be properly distributed throughout the home. Maintaining clear, low-pressure airflow is the absolute foundation of a healthy, comfortable indoor environment.
When deciding how to handle your home's filtration, it helps to look at the hidden costs and daily frustrations of the standard 1-inch filter compared to the peace of mind that comes with a structural upgrade. Relying on 1-inch filters is an ongoing burden that actively puts your expensive heat pump at risk.
Most homeowners forget to change their 1-inch filter every 30 days. When life gets busy and that filter stays in place for 60 or 90 days, the static pressure reaches critical levels, causing severe wear and tear on the system's internal components. Positioning a 4-inch cabinet as a permanent upgrade is an investment in the heat pump's lifespan.
• Surface Area — High-MERV 1-Inch Pleated Filter: Extremely limited; pleats are shallow and tightly packed. — Custom 4-Inch Media Cabinet: Massive; deep pleats allow high volume of air to pass easily.
• Static Pressure — High-MERV 1-Inch Pleated Filter: High; severely restricts airflow and strains the ECM motor. — Custom 4-Inch Media Cabinet: Low; supports optimal CFM and allows the motor to run efficiently.
• Replacement Frequency — High-MERV 1-Inch Pleated Filter: Must be replaced every 30 days to prevent system damage. — Custom 4-Inch Media Cabinet: Only requires replacement every 6 to 12 months.
• System Protection — High-MERV 1-Inch Pleated Filter: Causes overheating, coil freezing, and premature breakdowns. — Custom 4-Inch Media Cabinet: Protects the blower motor and extends the lifespan of the heat pump.
• Installation — High-MERV 1-Inch Pleated Filter: Slides into standard, often leaky, factory filter slots. — Custom 4-Inch Media Cabinet: Requires professional sheet-metal fabrication for an airtight seal.
Addressing airflow is a critical part of comprehensive system care. We highly encourage homeowners to have their static pressure and ductwork evaluated during their next service visit. Incorporating this check into a preventative HVAC maintenance plan ensures your system is always breathing easily and operating at peak efficiency.
Weak airflow is most commonly caused by a clogged or highly restrictive air filter that creates high static pressure within the ductwork. When you use a dense filter, the system's blower motor cannot push air through the dense physical barrier, resulting in a very low volume of air making it to your room vents. Checking and replacing a dirty filter is the first step, but if the airflow remains weak, your ductwork may be undersized or you may need a deeper filter cabinet to reduce the resistance.
Yes, a restrictive filter forces the blower motor to overwork, which can lead to overheating, premature motor failure, and frozen indoor coils. Modern heat pumps rely on a specific, constant volume of air to transfer heat safely. When a high-MERV 1-inch pleated filter chokes that airflow, the internal components run hotter and harder than designed. This constant strain dramatically shortens the lifespan of the equipment, turning a simple maintenance oversight into a major mechanical failure.
Yes, 4-inch media cabinets provide exponentially more surface area, allowing for excellent indoor air quality filtration without choking the system. Because the filter media is folded deeply, air can pass through easily while still trapping microscopic dust and allergens. Beyond protecting your expensive heat pump from blower motor failure, they offer incredible convenience, as you only need to remember to change the filter once or twice a year instead of every single month.
You can use a high-MERV filter only if you have a media cabinet deep enough (like a 4-inch or 5-inch model) to handle the increased airflow resistance. We strongly warn against using high-MERV 1-inch filters, as they almost always cause unsafe static pressure levels that suffocate the system. If you want hospital-grade filtration or have severe allergies, you must upgrade the physical ductwork to accommodate a thicker filter so the system can still breathe.
For standard 1-inch filter slots, a MERV 8 filter is usually the maximum recommended rating to prevent severe airflow restriction and equipment issues. Anything higher in a 1-inch format becomes too dense. However, if you upgrade to a professionally installed 4-inch media cabinet, you can safely use MERV 11 or even MERV 13 filters without harming the equipment, giving you superior air cleaning and optimal system performance simultaneously.
In Nova Scotia, where heat pumps run year-round to combat freezing winters and humid summers, you should inspect a 4-inch filter every 6 months and replace it at least annually. Because your system rarely gets a break, it is filtering air constantly. Homes with multiple pets, recent renovations, or heavy dust accumulation may require more frequent changes, so pulling the filter out for a visual inspection at the change of seasons is a wise habit.
You do not have to settle for weak airflow, noisy vents, or the constant chore of replacing restrictive 1-inch filters every few weeks. Airflow issues can be permanently solved with the right mechanical modifications, ensuring your home stays perfectly comfortable without destroying your equipment in the process. Stop fighting with dense, undersized filters and take the steps necessary to protect your heat pump investment.
With our 30+ years Nova Scotia HVAC and sheet-metal expertise, our team can evaluate your system's static pressure and design a custom solution. Reach out to Presidential Ventilation Systems today to request a free estimate for a custom 4-inch media cabinet upgrade, and give your heat pump the clear, unrestricted airflow it needs to perform flawlessly for years to come.

The damp, biting cold of a Nova Scotia winter is already settling in, making a reliable heating system an absolute necessity for your home's safety. If you are dealing with a sudden, complete system failure, understanding exactly how we execute same-day heat pump replacements during freezing Maritime temperatures is critical. When a heat pump dies in January or February, waiting days for a replacement is simply not an option. You are immediately faced with the concrete problem of rapid home heat loss and the very real threat of frozen pipes. The critical decision point becomes finding a contractor capable of the specific staging and multi-trade team coordination required to rip out a dead system and install a new one before your home drops below freezing. If you are facing a sudden breakdown, learn more about our heat pump systems and ductless heat pump replacement solutions.
When your primary heating system fails in the middle of a freezing Nova Scotia winter, the clock immediately starts ticking. Nova Scotia's unique climate features high humidity combined with rapid, aggressive temperature fluctuations. This damp cold penetrates building materials much faster than dry cold, accelerating indoor heat loss. Understanding the physical realities of this heat loss explains why a rapid, same-day response is not just a convenience, but a structural necessity for your property.
Once a heat pump stops producing warm air, a standard home's internal temperature can plummet below 10 degrees Celsius within a mere 24 hours. As the ambient temperature inside the house drops, the risk profile shifts from personal discomfort to severe property damage. The primary danger zone involves your indoor plumbing infrastructure. Water lines running through exterior walls, basements, and crawlspaces are the first to freeze. When water freezes, it expands, causing copper and PEX pipes to split. The ensuing water damage from a burst pipe often requires extensive renovations, making the initial heating failure seem minor in comparison. The 24-hour window following a breakdown is the critical timeframe for taking decisive action.
Many homeowners attempt to bridge the gap during a heating failure by purchasing multiple temporary space heaters. While this might keep a single bedroom tolerable, it is an inadequate and highly expensive stopgap for whole-home heating. Space heaters cannot circulate warm air into the hidden cavities of your home where plumbing resides. Furthermore, running multiple high-wattage space heaters simultaneously overloads residential electrical panels, creating significant fire hazards and frequent breaker trips. Restoring your central or primary ductless heat is the only safe, effective way to protect your entire property.
• Portable Space Heaters — Coverage Area: Single small room only — Safety Risks: High fire risk, overloaded circuits — Effectiveness in Freezing Weather: Inadequate for protecting home plumbing
• Wood/Pellet Stoves — Coverage Area: Localized main living area — Safety Risks: Requires constant monitoring and fuel — Effectiveness in Freezing Weather: Leaves distant rooms and basements vulnerable
• New Heat Pump System — Coverage Area: Whole-home or multi-zone coverage — Safety Risks: Safe, dedicated electrical circuits — Effectiveness in Freezing Weather: Maintains consistent, safe ambient temperatures
Executing a true same-day replacement requires far more than just rushing a unit to your driveway. Modern heat pump installations are complex projects that demand both mechanical (HVAC) and electrical expertise. In our 30+ years of experience serving Nova Scotia, we have seen that relying on third-party electrical subcontractors is the number one cause of installation delays across the industry. When a company has to wait for a separate electrical contractor to fit your emergency into their schedule, a one-day job easily stretches into a three-day freezing ordeal.
The traditional multi-day wait for an electrician is entirely bypassed by our operational model. With approximately 70 employees and multiple skilled trades operating under one roof, we eliminate the scheduling bottlenecks that paralyze other contractors. When you call our team, you are not waiting for two different companies to coordinate their calendars. A single call dispatches a complete, unified team ready to handle every aspect of the project from start to finish.
Speed must never come at the expense of safety, especially when dealing with high-voltage electricity and pressurized refrigerants. Having in-house Red Seal HVAC and electrical tradespeople ensures that every phase of your emergency replacement meets strict Nova Scotia building codes. Licensed professionals guarantee that the work is done safely, legally, and flawlessly, maintaining the highest quality standards even under intense emergency time constraints.
• Unified Dispatch: HVAC technicians and electricians arrive together, eliminating standby time.
• Code Compliance: All electrical tie-ins and mechanical mountings are performed by Red Seal certified experts.
• Seamless Communication: In-house teams communicate directly, preventing the missteps common with outsourced labor.
• Guaranteed Accountability: One company handles the entire warranty and installation process, leaving no room for finger-pointing.
The moment an emergency call comes in, our methodology kicks into gear. True same-day replacement begins before the technicians even pull into your driveway. It requires precision staging, accurate diagnostics, and a warehouse infrastructure capable of supporting immediate deployment.
The first step is a rapid but thorough initial diagnostic phase. We must confirm that the system is truly dead and not simply in need of a 24/7 central heat pump repair. If a component like a compressor has catastrophically failed and replacement is the only safe, viable option, the technician immediately sizes the replacement unit accurately based on your home's specific heating load requirements.
While the technician is completing the assessment on-site, our warehouse logistics team is already in motion. Maintaining a robust local inventory is crucial. As a Daikin Comfort Pro, we have immediate access to premium Daikin and Lennox units. The warehouse team pulls the exact required unit, pre-stages the necessary materials—including insulated line sets, electrical whips, and mounting brackets—and loads the secondary dispatch vehicles.
1. Initial Diagnostic: Technician confirms catastrophic failure and rules out simple repairs.
2. System Sizing: Immediate calculation of the correct tonnage and BTUs for the replacement unit.
3. Inventory Pull: Warehouse team secures the specific heat pump model from local stock.
4. Material Staging: All required copper, wiring, and mounting hardware are loaded for immediate transport.
5. Simultaneous Dispatch: The installation crew, including both mechanical and electrical trades, is deployed to the home.
Removing the old unit safely is a critical phase of the operation. Working outdoors in ice, snow, and biting wind requires specific safety protocols. The extraction must be done swiftly to prepare the site for the new installation, but it must also adhere to strict environmental and safety regulations.
Environmental compliance is mandatory, regardless of the weather. Before any lines are cut, the old refrigerant must be safely recovered. Handling pressurized systems in the cold presents specific challenges, as refrigerant pressures drop significantly in freezing Maritime winter storms. Our technicians utilize specialized recovery machines designed to extract the chemical safely, ensuring nothing is vented into the atmosphere.
Once the system is depressurized, the physical removal begins. This involves removing outdated line sets, disconnecting old control wiring, and physically hauling away the dead compressor and indoor heads. The outdoor pad must be completely cleared of ice or snow buildup to ensure a level, stable foundation for the new equipment. The wall penetrations are also inspected and prepped, ensuring they are clear and ready to accept the new, properly insulated line sets without allowing winter drafts into the home.
The core of our same-day promise lies in the synchronized, parallel workflow of our multi-trade team. This is where the Presidential Advantage truly shines. While the HVAC technicians are managing the mechanical side of the installation, the electricians are simultaneously handling the electrical panel and high-voltage connections. One local homeowner reached out in the dead of winter when their primary heating system failed completely. Because we dispatched both mechanical and electrical teams simultaneously, we successfully completed the winter installation quickly and professionally within a single day, restoring heat before the home's plumbing was ever at risk.
The mechanical team begins by securing the new outdoor unit. In Nova Scotia, it is critical that the compressor is mounted on a stand above the anticipated snow line to prevent ice accumulation from blocking airflow during defrost cycles. Concurrently, the indoor heads are mounted, and the team begins flaring and connecting the new copper line sets. These lines must be heavily insulated to prevent heat loss as the refrigerant travels between the indoor and outdoor units.
While the mechanical connections are being made, our in-house Red Seal electricians are hard at work. They ensure the electrical panel can safely handle the load of the new system, wiring the dedicated circuits and installing the required outdoor disconnect switch. Nova Scotia building codes mandate strict electrical safety checks for heat pump installations. Because our electricians are on staff, this electrical tie-in happens exactly when the HVAC team needs it, cutting the standard installation time in half and preventing hours of idle waiting.
With the physical installation complete, the final phase is system commissioning. This is the rigorous testing process that ensures the new heat pump will perform flawlessly against the freezing Nova Scotia winter. We do not leave the property until we have verified that the home is actively warming up.
Before any refrigerant is released into the new lines, the system undergoes a high-pressure nitrogen test to check for microscopic leaks, followed by a deep vacuum process to remove all moisture from the copper piping. Once a perfect seal is confirmed, the system is charged. Cold-weather commissioning involves verifying the refrigerant charge in low ambient temperatures and manually triggering the defrost cycles to ensure the outdoor unit can effectively shed ice during winter storms.
The final step is handing the system over to you. The lead technician will walk you through the operation of your new heat pump, ensuring you are comfortable with the controls.
1. Thermostat Operation: Demonstrating how to set schedules, adjust temperatures, and use the remote controls effectively.
2. Airflow Direction: Explaining how to adjust the vanes for optimal winter heat distribution.
3. Winter Maintenance: Providing clear instructions on keeping the outdoor unit clear of snowdrifts and ice buildup.
4. Filter Cleaning: Showing you how to easily remove and wash the indoor filters to maintain efficiency.
5. Temperature Verification: Measuring the ambient air output to confirm the home is actively recovering its heat.
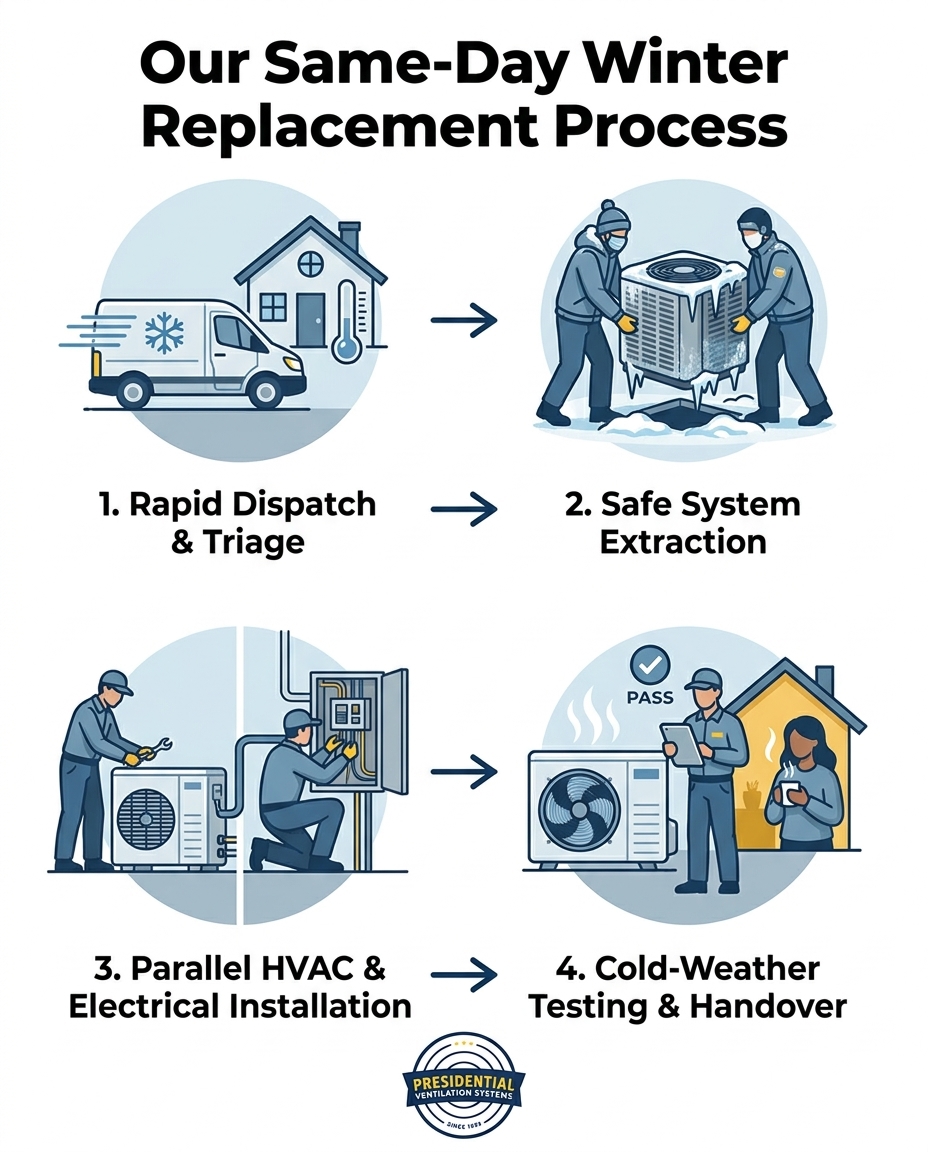
A sudden winter heat pump failure is an unexpected and stressful event. Beyond the physical cold, there is the immediate anxiety regarding the logistics of an unplanned replacement. While speed is the absolute priority to protect your home, we understand that navigating the administrative and financial aspects is just as important for your peace of mind.
Even in an emergency, homeowners should explore available provincial and federal rebate programs. High-efficiency systems often qualify for significant incentives. It is important to note that professional installation by a licensed contractor is strictly required for rebate eligibility. While programs and eligibility requirements can change frequently, our team will help you understand the current landscape and provide the necessary documentation to support your applications. Always confirm current programs with our office during your initial consultation.
To help manage the upfront investment of an unexpected winter breakdown, flexible payment options may be available. Utilizing emergency heat pump financing can ease the immediate financial burden, allowing you to install a reliable, high-efficiency system without draining your emergency savings all at once. Because financing terms and eligibility vary, we encourage you to speak directly with our team to confirm the options that best suit your situation.
Can a heat pump be replaced in the winter?
Yes, a heat pump can absolutely be replaced during the winter months. Professional HVAC teams utilize specialized equipment to safely recover refrigerant and perform installations even in sub-freezing temperatures. The key is working with a contractor who has the resources to execute the replacement quickly before the home loses too much heat.
How long does it take to replace a heat pump?
A standard heat pump replacement typically takes between 4 to 8 hours, depending on the complexity of the system and the weather conditions. When a contractor utilizes a parallel workflow with in-house mechanical and electrical teams, the process is highly streamlined. This coordination ensures the entire rip-and-replace process can be completed in a single day.
What happens if my heat pump dies in the winter?
If your heat pump dies in the winter, your home's internal temperature will begin dropping rapidly, putting your plumbing at severe risk of freezing and bursting. It is critical to contact an emergency HVAC provider immediately to assess the system. Relying on temporary space heaters is not a safe or effective long-term solution for protecting your property.
Can you install a mini split in the freezing cold?
Yes, ductless mini splits can be installed in freezing conditions by experienced technicians. The process requires careful handling of the copper line sets and specialized vacuum procedures to ensure no moisture is trapped in the system. Proper cold-weather commissioning is essential to verify that the unit is operating correctly before the technicians leave.
Do I need to hire a separate electrician for a heat pump replacement?
If you hire a multi-trade contractor with in-house Red Seal electricians, you do not need to hire a separate electrical company. This in-house capability is crucial during an emergency, as it eliminates the multi-day delays often caused by waiting for third-party subcontractors to arrive and wire the system.
A dead heating system doesn't have to mean days of freezing temperatures and the looming threat of burst pipes. When you have the right team on your side, restoring comfort and safety to your property is a streamlined, highly coordinated process. Our in-house roster of Red Seal HVAC and electrical experts ensures that how we execute same-day heat pump replacements during freezing Maritime temperatures remains the standard for reliability. We provide a clear, reassuring breakdown of the exact staging and team coordination process that proves a same-day replacement is safe, efficient, and handled entirely by a single multi-trade contractor. Contact Presidential Ventilation Systems today for an immediate assessment and a free estimate to secure your home's heat.