

Proper electric stove wiring is the foundation of a safe, efficient kitchen. Unlike standard 120-volt outlets, electric stoves need specialized 240-volt circuits that handle 30 to 50 amps of power to run heating elements and controls simultaneously.
Here's what you need to know about electric stove wiring:
Getting your electric stove wiring right isn't just about code—it's about preventing electrical fires and ensuring your family's safety. The wrong wire size can cause dangerous overheating, while improper grounding increases shock risk.
Modern ranges are sophisticated, using 240V for heating elements and 120V for timers, lights, and displays. This dual-voltage requirement demands precise, professional wiring. Understanding these basics is crucial whether you're upgrading, installing a new range, or replacing an old setup.

Powering an electric stove involves a significant electrical load, far greater than smaller appliances. Electric ranges are kitchen powerhouses, requiring a dedicated circuit that supplies both 120-volt and 240-volt currents. The 240V powers the heavy-duty heating elements for cooking, while the 120V handles lighter loads like clocks, timers, and lights.
This dual-voltage need makes stove wiring different from standard outlets. It requires a dedicated circuit from the main panel with specific amperage ratings, wire gauges, and a high-capacity circuit breaker. Most stoves draw 30 to 50 amps, so a robust electrical infrastructure is non-negotiable. If you have frequent tripped breakers, it might be a sign you need an Electrical Service Upgrade to safely handle the load.
Different electric ranges have unique wiring needs for a safe installation.
Unlike freestanding ranges, drop-in cooktops and wall ovens are usually hardwired directly to a junction box. This requires circuit conductors sized exactly to the appliance's nameplate rating, per the National Electrical Code (NEC). Always check the nameplate (usually on the back, side, or in a drawer) for precise voltage and amperage requirements to correctly size the circuit and wiring.
Understanding amperage and voltage is key. Electric ranges use a 120/240-volt circuit: two 120V "hot" lines combine for 240V to power heating elements, a neutral wire handles 120V components (clock, lights), and a ground wire ensures safety. Amperage requirements vary by stove:
Matching the circuit's amperage to your stove's needs is crucial to prevent overloading, which can cause tripped breakers and fire hazards. Always check the manufacturer's specifications for the exact amperage required.
Selecting the correct materials for electric stove wiring is paramount for safety and code compliance. Cutting corners can lead to fire and shock hazards. The National Electrical Code (NEC) sets strict standards to protect your home and family. The right wire size, outlet, and cable are critical for a safe installation. For a comprehensive overview, you might find A Guide To Wire Size and Types for Electric Stoves And Ovens to be a helpful resource.
One of the most significant changes in electric stove wiring over the years has been the evolution of the outlet and cord configuration.

Historically, 3-prong outlets used a neutral wire that also served as the ground. This posed a shock hazard if the neutral wire failed, as the appliance's metal frame could become energized. To improve safety, the National Electrical Code (NEC) mandated 4-conductor circuits for all new installations since 1996. The 4-prong system includes a separate, dedicated ground wire, which provides an independent safety path and significantly reduces shock risk.
If your home has an existing 3-prong outlet, it's generally permitted to remain for an existing circuit. However, when installing a new range, you may need to switch the cord to a 3-prong version and follow the manufacturer's instructions to bond the neutral to the frame. For maximum safety, we always recommend upgrading to a 4-prong system whenever possible.
The wire gauge, or American Wire Gauge (AWG), refers to the thickness of the electrical wire. A lower AWG number indicates a thicker wire that can safely carry more current (amperage) without overheating. Using a wire that is too thin for the amperage it needs to carry is a major fire risk.
| Amperage (A) | Copper Wire Gauge (AWG) |
|---|---|
| 30 | 10 |
| 40 | 8 |
| 50 | 6 |
Note: These are general guidelines for typical residential applications. Always consult your appliance's nameplate and local electrical codes for precise requirements. For aluminum wire, a larger gauge (smaller AWG number) is generally needed for the same amperage due to its lower conductivity.
Beyond gauge, cable type is also important. The most common type for residential in-wall wiring is NM-B (Non-Metallic Sheathed) cable, often referred to by the brand name Romex. For ranges, you'll use 10/3, 8/3, or 6/3 NM-B cable. For exposed areas requiring more protection, individual THHN/THWN (Thermoplastic High Heat Nylon-coated/Thermoplastic Heat and Water resistant Nylon-coated) wires are often used within a protective conduit (either metal or PVC). This method is common in basements or garages. Always ensure your materials and installation method comply with local electrical codes.
Wiring an electric range can seem daunting, but it's a manageable task for many homeowners with the right preparation and safety protocols. However, electrical work carries inherent risks. If you're ever in doubt, please contact us for professional Electrical Hookup Services. Your safety is our priority. This guide focuses on connecting the power cord to the range, assuming a proper 240-volt circuit and receptacle are already installed.
Before you even think about touching wires, absolute safety is paramount.
Modern ranges are typically ready for a 4-prong connection, the safest standard.

If your home has an existing 3-slot receptacle, you'll need a 3-prong power cord and must pay careful attention to grounding.
While connecting to an existing 3-prong outlet might be permissible in older installations, it's generally considered less safe than a 4-prong system. If you have any doubts about handling a 3-prong connection, or if you're considering upgrading your outlet, please reach out to a qualified electrician.
Working with high-voltage electric stove wiring carries real risks of shock and fire if done incorrectly. A safe kitchen requires knowing what not to do. Minor errors, like using an undersized wire or miswiring, can cause fires or create shock hazards. Proper electrical work is critical in all settings, from homes to businesses needing Commercial Electrical Repairs, as safety principles are universal.
Here are some of the most frequent and dangerous mistakes we encounter with electric stove wiring:
While connecting a range cord can be a DIY task, many situations require a licensed electrician for safety and code compliance.

You should always call a licensed electrician if:
A licensed electrician ensures that your electric stove wiring is not only functional but also safe, compliant with all codes, and reliable for years to come.
We understand that electric stove wiring can be a complex topic with many nuances. Here are some frequently asked questions that we often encounter, providing clear and concise answers to help you steer your electrical needs.
The main difference is the connection method. Freestanding ranges use a plug-in cord and a dedicated receptacle, allowing for easy installation. Drop-in cooktops and wall ovens are typically hardwired directly into a junction box. For these hardwired appliances, the National Electrical Code (NEC) requires the circuit wiring to be sized exactly to the appliance's nameplate rating to ensure a stable power supply.
Since 1996, the National Electrical Code (NEC) has mandated 4-conductor circuits for new electric range installations to improve safety. This requires a 4-wire cord and a 4-prong outlet. Unlike older 3-prong systems where the neutral also acted as a ground, the 4-prong system has separate neutral and ground wires. This separation ensures the appliance's frame is always safely grounded, significantly reducing shock risk.
Electric ranges offer several advantages over gas:
These benefits make electric ranges a great choice for modern kitchens.
Navigating electric stove wiring is a critical step in ensuring your kitchen is not only functional but also safe and compliant with modern electrical standards. We've explored the essential requirements, from understanding amperage and voltage to choosing the right wire gauge and distinguishing between 3-prong and 4-prong outlets. We've also walked through the steps for connecting your range and highlighted common mistakes to avoid.
The importance of safety cannot be overstated when dealing with high-voltage appliances. Correct wiring is crucial not just for the immediate operation of your stove but also for the long-term longevity of your appliance and the overall safety of your home. It prevents overheating, reduces the risk of electrical fires, and protects against dangerous shocks.
Whether you're installing a brand-new range, upgrading an existing setup, or simply have questions about your home's electrical capacity, professional expertise is invaluable. For professional and safe installations in Nova Scotia, trust the experts at Presidential Ventilation Systems Ltd. We're dedicated to ensuring your electrical systems are up to code and perfectly suited for your needs.
Ensure your kitchen is powered correctly and safely by contacting us for Electrical Services in Halifax, NS. We proudly serve communities across Nova Scotia, including Kentville NS, Truro NS, Mount Uniacke NS, Dartmouth NS, Bridgewater NS, Bedford NS, and Windsor NS, providing reliable electrical solutions for all your residential and commercial needs.


Proper electric stove wiring is the foundation of a safe, efficient kitchen. Unlike standard 120-volt outlets, electric stoves need specialized 240-volt circuits that handle 30 to 50 amps of power to run heating elements and controls simultaneously.
Here's what you need to know about electric stove wiring:
Getting your electric stove wiring right isn't just about code—it's about preventing electrical fires and ensuring your family's safety. The wrong wire size can cause dangerous overheating, while improper grounding increases shock risk.
Modern ranges are sophisticated, using 240V for heating elements and 120V for timers, lights, and displays. This dual-voltage requirement demands precise, professional wiring. Understanding these basics is crucial whether you're upgrading, installing a new range, or replacing an old setup.
Powering an electric stove involves a significant electrical load, far greater than smaller appliances. Electric ranges are kitchen powerhouses, requiring a dedicated circuit that supplies both 120-volt and 240-volt currents. The 240V powers the heavy-duty heating elements for cooking, while the 120V handles lighter loads like clocks, timers, and lights.
This dual-voltage need makes stove wiring different from standard outlets. It requires a dedicated circuit from the main panel with specific amperage ratings, wire gauges, and a high-capacity circuit breaker. Most stoves draw 30 to 50 amps, so a robust electrical infrastructure is non-negotiable. If you have frequent tripped breakers, it might be a sign you need an Electrical Service Upgrade to safely handle the load.
Different electric ranges have unique wiring needs for a safe installation.
Unlike freestanding ranges, drop-in cooktops and wall ovens are usually hardwired directly to a junction box. This requires circuit conductors sized exactly to the appliance's nameplate rating, per the National Electrical Code (NEC). Always check the nameplate (usually on the back, side, or in a drawer) for precise voltage and amperage requirements to correctly size the circuit and wiring.
Understanding amperage and voltage is key. Electric ranges use a 120/240-volt circuit: two 120V "hot" lines combine for 240V to power heating elements, a neutral wire handles 120V components (clock, lights), and a ground wire ensures safety. Amperage requirements vary by stove:
Matching the circuit's amperage to your stove's needs is crucial to prevent overloading, which can cause tripped breakers and fire hazards. Always check the manufacturer's specifications for the exact amperage required.
Selecting the correct materials for electric stove wiring is paramount for safety and code compliance. Cutting corners can lead to fire and shock hazards. The National Electrical Code (NEC) sets strict standards to protect your home and family. The right wire size, outlet, and cable are critical for a safe installation. For a comprehensive overview, you might find A Guide To Wire Size and Types for Electric Stoves And Ovens to be a helpful resource.
One of the most significant changes in electric stove wiring over the years has been the evolution of the outlet and cord configuration.
Historically, 3-prong outlets used a neutral wire that also served as the ground. This posed a shock hazard if the neutral wire failed, as the appliance's metal frame could become energized. To improve safety, the National Electrical Code (NEC) mandated 4-conductor circuits for all new installations since 1996. The 4-prong system includes a separate, dedicated ground wire, which provides an independent safety path and significantly reduces shock risk.
If your home has an existing 3-prong outlet, it's generally permitted to remain for an existing circuit. However, when installing a new range, you may need to switch the cord to a 3-prong version and follow the manufacturer's instructions to bond the neutral to the frame. For maximum safety, we always recommend upgrading to a 4-prong system whenever possible.
The wire gauge, or American Wire Gauge (AWG), refers to the thickness of the electrical wire. A lower AWG number indicates a thicker wire that can safely carry more current (amperage) without overheating. Using a wire that is too thin for the amperage it needs to carry is a major fire risk.
| Amperage (A) | Copper Wire Gauge (AWG) |
|---|---|
| 30 | 10 |
| 40 | 8 |
| 50 | 6 |
Note: These are general guidelines for typical residential applications. Always consult your appliance's nameplate and local electrical codes for precise requirements. For aluminum wire, a larger gauge (smaller AWG number) is generally needed for the same amperage due to its lower conductivity.
Beyond gauge, cable type is also important. The most common type for residential in-wall wiring is NM-B (Non-Metallic Sheathed) cable, often referred to by the brand name Romex. For ranges, you'll use 10/3, 8/3, or 6/3 NM-B cable. For exposed areas requiring more protection, individual THHN/THWN (Thermoplastic High Heat Nylon-coated/Thermoplastic Heat and Water resistant Nylon-coated) wires are often used within a protective conduit (either metal or PVC). This method is common in basements or garages. Always ensure your materials and installation method comply with local electrical codes.
Wiring an electric range can seem daunting, but it's a manageable task for many homeowners with the right preparation and safety protocols. However, electrical work carries inherent risks. If you're ever in doubt, please contact us for professional Electrical Hookup Services. Your safety is our priority. This guide focuses on connecting the power cord to the range, assuming a proper 240-volt circuit and receptacle are already installed.
Before you even think about touching wires, absolute safety is paramount.
Modern ranges are typically ready for a 4-prong connection, the safest standard.
If your home has an existing 3-slot receptacle, you'll need a 3-prong power cord and must pay careful attention to grounding.
While connecting to an existing 3-prong outlet might be permissible in older installations, it's generally considered less safe than a 4-prong system. If you have any doubts about handling a 3-prong connection, or if you're considering upgrading your outlet, please reach out to a qualified electrician.
Working with high-voltage electric stove wiring carries real risks of shock and fire if done incorrectly. A safe kitchen requires knowing what not to do. Minor errors, like using an undersized wire or miswiring, can cause fires or create shock hazards. Proper electrical work is critical in all settings, from homes to businesses needing Commercial Electrical Repairs, as safety principles are universal.
Here are some of the most frequent and dangerous mistakes we encounter with electric stove wiring:
While connecting a range cord can be a DIY task, many situations require a licensed electrician for safety and code compliance.
You should always call a licensed electrician if:
A licensed electrician ensures that your electric stove wiring is not only functional but also safe, compliant with all codes, and reliable for years to come.
We understand that electric stove wiring can be a complex topic with many nuances. Here are some frequently asked questions that we often encounter, providing clear and concise answers to help you steer your electrical needs.
The main difference is the connection method. Freestanding ranges use a plug-in cord and a dedicated receptacle, allowing for easy installation. Drop-in cooktops and wall ovens are typically hardwired directly into a junction box. For these hardwired appliances, the National Electrical Code (NEC) requires the circuit wiring to be sized exactly to the appliance's nameplate rating to ensure a stable power supply.
Since 1996, the National Electrical Code (NEC) has mandated 4-conductor circuits for new electric range installations to improve safety. This requires a 4-wire cord and a 4-prong outlet. Unlike older 3-prong systems where the neutral also acted as a ground, the 4-prong system has separate neutral and ground wires. This separation ensures the appliance's frame is always safely grounded, significantly reducing shock risk.
Electric ranges offer several advantages over gas:
These benefits make electric ranges a great choice for modern kitchens.
Navigating electric stove wiring is a critical step in ensuring your kitchen is not only functional but also safe and compliant with modern electrical standards. We've explored the essential requirements, from understanding amperage and voltage to choosing the right wire gauge and distinguishing between 3-prong and 4-prong outlets. We've also walked through the steps for connecting your range and highlighted common mistakes to avoid.
The importance of safety cannot be overstated when dealing with high-voltage appliances. Correct wiring is crucial not just for the immediate operation of your stove but also for the long-term longevity of your appliance and the overall safety of your home. It prevents overheating, reduces the risk of electrical fires, and protects against dangerous shocks.
Whether you're installing a brand-new range, upgrading an existing setup, or simply have questions about your home's electrical capacity, professional expertise is invaluable. For professional and safe installations in Nova Scotia, trust the experts at Presidential Ventilation Systems Ltd. We're dedicated to ensuring your electrical systems are up to code and perfectly suited for your needs.
Ensure your kitchen is powered correctly and safely by contacting us for Electrical Services in Halifax, NS. We proudly serve communities across Nova Scotia, including Kentville NS, Truro NS, Mount Uniacke NS, Dartmouth NS, Bridgewater NS, Bedford NS, and Windsor NS, providing reliable electrical solutions for all your residential and commercial needs.
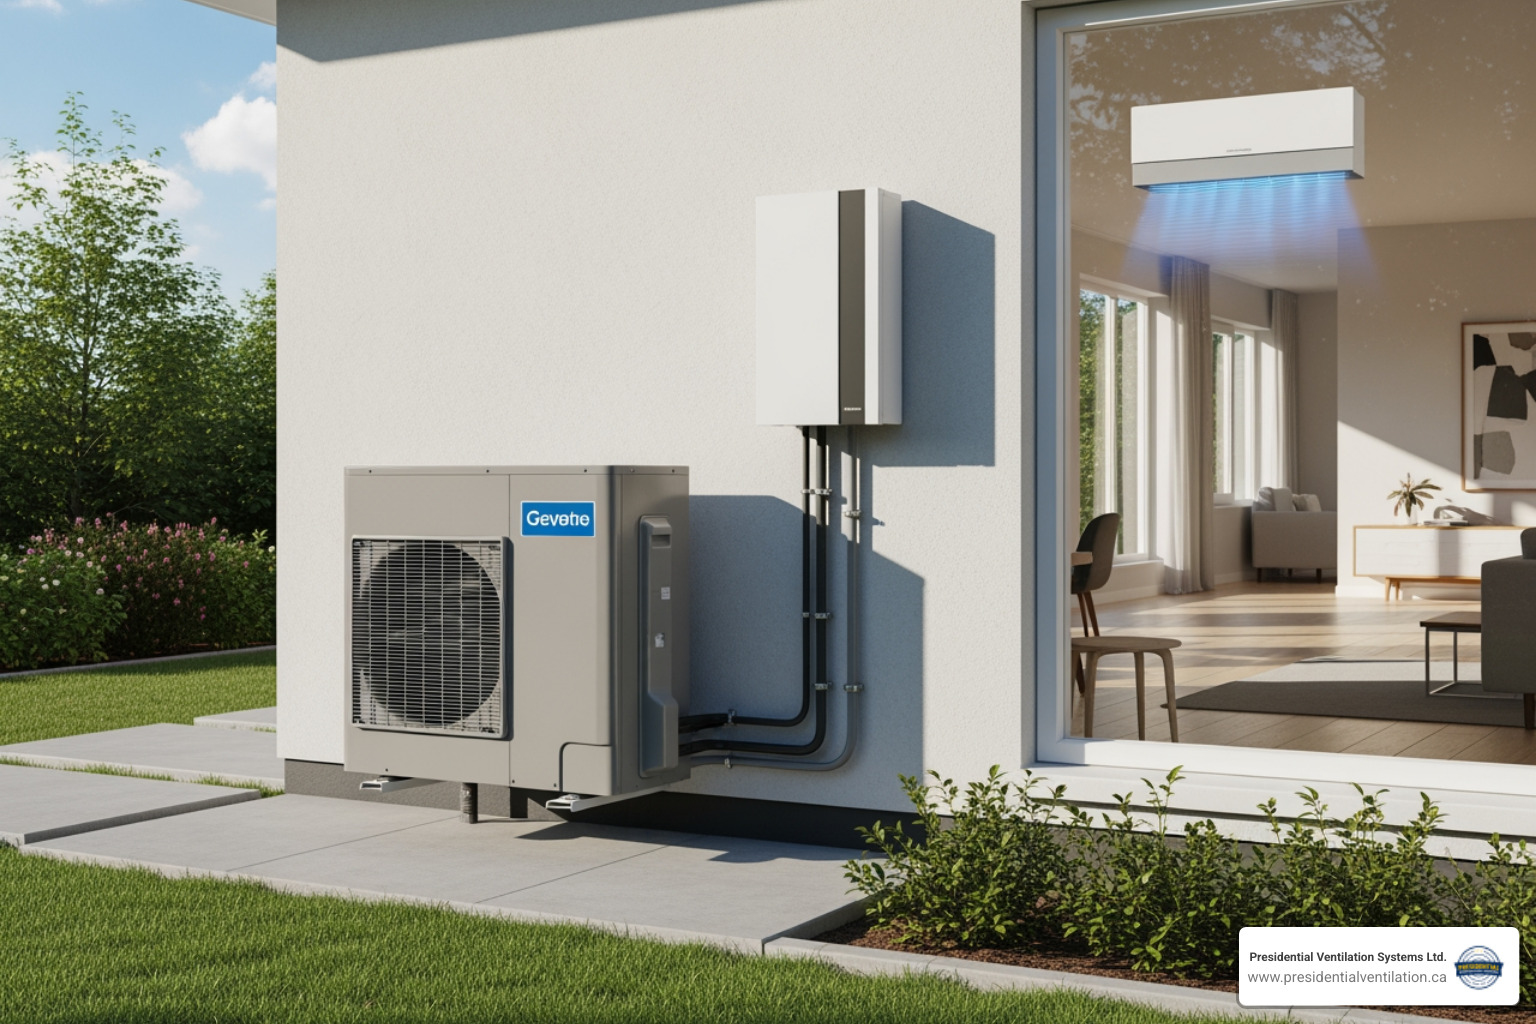
A mini split inverter heat pump is a highly efficient, ductless heating and cooling system that uses a variable-speed compressor to precisely control your home's temperature. Unlike traditional HVAC systems that operate on a simple on/off cycle, inverter technology allows the unit to continuously adjust its output. This means it can run at a lower, steady pace to maintain your desired temperature, rather than blasting on at full power and then shutting off. The result is superior energy efficiency, whisper-quiet operation, and a more consistently comfortable indoor environment throughout the year.
This technology is particularly well-suited for the variable climate of Nova Scotia, providing powerful heating during our cold winters and effective cooling during humid summers. By eliminating the need for bulky ductwork, these systems prevent the significant energy loss often associated with traditional forced-air systems, making them a smart, eco-friendly choice for modern homes.
What Makes Mini Split Inverter Heat Pumps Different:
If you're looking to upgrade your home comfort system in Halifax, Nova Scotia, Presidential Ventilation Systems Ltd. specializes in ductless heat pump solutions designed for our maritime climate. Contact our team for expert guidance on selecting and installing the right system for your home.
When we talk about revolutionizing home comfort, we're really talking about smart, adaptable systems that work with your home, not just for it. That's precisely what a mini split inverter heat pump brings to the table. These systems are marvels of modern engineering, designed to keep your living spaces in Nova Scotia perfectly conditioned, all while saving energy and operating with remarkable quietness.
At its heart, a heat pump doesn't generate heat; it moves it. In the winter, it extracts heat from the outside air—even when it's cold—and transfers it indoors. In the summer, it reverses the process, pulling heat from inside your home and releasing it outdoors. This magical heat transfer is orchestrated by a few key components, all working in harmony to keep you comfortable.
The real game-changer here is the "inverter" technology. Imagine trying to drive a car by constantly slamming the gas pedal to the floor and then completely letting off. That's how older, non-inverter HVAC systems operate – they're either all on or all off. Now, picture smoothly accelerating and decelerating, maintaining your desired speed with precision. That's the inverter difference. It allows the system to continuously adjust its power output, matching the exact heating or cooling needs of your home. This variable-speed technology means less energy waste and more consistent comfort for you. For a deeper dive, check out The "Inverter" Difference.
A mini split inverter heat pump system is surprisingly simple in its makeup, especially when compared to traditional ducted systems. It primarily consists of two main units:
This ductless design means we avoid the energy losses associated with extensive ductwork, a significant advantage for homeowners in Nova Scotia. You can explore more about these systems on our Ductless Heat Pumps page.
The "inverter" in a mini split inverter heat pump is what sets it apart, allowing for continuous comfort and exceptional efficiency. Unlike older, conventional heat pumps or air conditioners that operate with a single-speed compressor (meaning they're either fully on or fully off), an inverter system uses a variable-speed compressor.
Think of it this way: a traditional system is like a light switch – it's either on or off, full power or no power. An inverter system, however, is like a dimmer switch. It can continuously adjust its speed and power output to precisely match the heating or cooling demand. This means:
This smarter way of working not only saves energy but also extends the life of the compressor by reducing the stress of frequent hard starts and stops. It's a win-win for efficiency, comfort, and long-term reliability. If you're curious about how this compares to other systems, we have a detailed guide on the Difference Between Ductless and Ducted systems.
When considering a new heating and cooling solution for your Nova Scotia home, the advantages of a mini split inverter heat pump are truly compelling. These systems offer a blend of efficiency, flexibility, and comfort that often surpasses traditional HVAC setups. Let's break down the key benefits that make them an increasingly popular choice for homeowners.
| Feature | Mini Split Inverter Heat Pumps -|| Efficiency | High (SEER up to 35). Variable-speed compressor minimizes energy waste. No ductwork means no energy loss through leaks. -|| Zoning | Excellent. Each indoor unit creates its own temperature zone, allowing for personalized comfort in different rooms. -|| Installation | Less invasive and faster than traditional ducted systems. Requires only a small hole in the wall for the conduit. -|| Air Quality | Superior. Multi-stage filtration systems in each unit remove dust, pollen, and other allergens directly from the air you breathe. -|
One of the most significant benefits of a mini split inverter heat pump is its remarkable energy efficiency. Traditional HVAC systems often waste a considerable amount of energy through ductwork, with some studies suggesting losses as high as 30% due to leaks, poor insulation, and long runs. Ductless systems eliminate this problem entirely. Furthermore, the inverter technology allows the compressor to adjust its speed, using only the precise amount of energy needed to maintain the desired temperature. This is far more efficient than the constant on-and-off cycling of conventional systems, which consumes a large amount of energy during each startup. Many of our models are ENERGY STAR® certified, ensuring they meet strict energy performance standards. This translates directly into lower utility bills and a reduced carbon footprint for your household. You can even explore potential government rebates and incentives that make upgrading to a high-efficiency system even more affordable.
Ductless mini splits offer unparalleled flexibility in both function and form. The ability to create different temperature zones within your home is a major advantage. With a multi-zone system, you can connect several indoor units to a single outdoor unit, each controlled by its own thermostat. This means you can keep your living room cool and comfortable during the day while leaving unused bedrooms at a more energy-saving temperature. At night, you can cool your bedrooms without wasting energy on the rest of the house. This level of control not only improves comfort for everyone in the family but also maximizes energy savings by not heating or cooling unoccupied spaces.
From a design perspective, the indoor units are sleek, modern, and designed to blend into your home's decor. The most common are wall-mounted units, which are compact and placed high on a wall. However, for rooms where wall space is limited or a different aesthetic is desired, there are other options like floor-standing models, which resemble traditional radiators, and ceiling cassettes that fit flush into the ceiling. This versatility makes it easy to find the perfect solution for any room, as detailed in our Ductless Heat Pump Halifax Guide.
Indoor air quality is a growing concern for many homeowners. Traditional forced-air systems can accumulate dust, pollen, pet dander, and other allergens within their extensive ductwork, which are then circulated throughout your home every time the system runs. Ductless mini splits eliminate this problem. Since there is no ductwork, there's no place for these contaminants to build up. Each indoor unit has its own multi-stage filtration system that continuously cleans the air in the specific zone it serves. These filters are highly effective at capturing dust, pollen, pet dander, and other microscopic particles, providing cleaner, healthier air for you and your family. The filters are also easily accessible and washable, making maintenance simple. Regular cleaning ensures the system runs efficiently and continues to provide superior air quality. Learn more about How to Clean Your Ductless Heat Pump Filters to keep your air fresh and your system running smoothly.
HRV maintenance in Lower Sackville, NS keeps your home's air fresh, your energy bills lower, and your family healthier. Here's what you need to know:
Quick Answer for Lower Sackville Homeowners:
If you live in Lower Sackville, you know Nova Scotia's damp climate can make your home feel stuffy. Modern homes are built tighter to save energy, but this traps pollutants, allergens, and excess moisture inside without proper ventilation.
This is where your HRV system helps. It exchanges stale indoor air with fresh outdoor air while recovering heat, so you get fresh air without losing warmth. However, like any system, it needs regular care to work effectively.
For expert guidance on maximizing your system's performance, check out our complete guide to HRV System Benefits, or if you're ready to schedule service, visit our HRV Systems page.

A Heat Recovery Ventilator (HRV) is essential for a healthy, energy-efficient home in Lower Sackville. It works by continuously exchanging stale indoor air with fresh outdoor air. What makes it remarkable is its ability to recover heat from the outgoing air and transfer it to the incoming fresh air. This process means you can enjoy fresh air without compromising your home's energy efficiency.
In modern, tightly sealed homes designed for energy-efficiency, air exchange is minimal. While this saves on heating and cooling costs, it can lead to a buildup of indoor air pollutants, allergens, and excess moisture. Our HRV systems address this by actively ventilating homes, removing these unwanted elements and replacing them with clean, fresh air. This is particularly important for the Nova Scotia climate, where fluctuating temperatures and high humidity pose unique challenges. By continually removing stale air and bringing in fresh, filtered air, HRVs help maintain optimal humidity levels and remove airborne pollutants, ensuring a healthier living environment.
Our homes in Lower Sackville are increasingly built with energy efficiency in mind, featuring tighter seals and better insulation. While this is fantastic for reducing energy consumption, it can also trap indoor air pollutants. Without adequate ventilation, our homes can become breeding grounds for stale air, allergens, and harmful substances.
Without this exchange, the air becomes stagnant. This can lead to a buildup of carbon dioxide (CO2), which can make you feel drowsy, and it traps Volatile Organic Compounds (VOCs) from everyday items like cleaning products and furniture. These VOCs can contribute to respiratory issues and other health concerns.
An HRV system ensures a continuous flow of fresh air, diluting these indoor pollutants and expelling them to the outside. This constant exchange means we breathe cleaner air, reducing our exposure to allergens and irritants, and ultimately leading to improved indoor air quality and a healthier living space for everyone under our roof.
Nova Scotia's damp coastal climate presents unique challenges for homeowners in Lower Sackville. One common issue is condensation buildup on windows and walls, particularly during colder months. This is not just an aesthetic problem; it is a red flag for excessive indoor humidity, which can lead to mold and mildew growth. Mold thrives in damp environments and can severely impact indoor air quality, triggering allergies and respiratory problems.
Our HRV systems are champions at managing this humidity. By continuously exchanging air and expelling moisture-laden indoor air, they help prevent condensation and minimize the risk of mold. In winter, they play another crucial role: pre-heating the cold incoming air. As the stale, warm indoor air is exhausted, its heat is transferred to the fresh, cold outdoor air entering our homes. This process significantly reduces the workload on our heating systems, helping us maintain comfortable indoor temperatures without constantly running the furnace and keeping energy bills in check. The benefits of these systems are extensive, and we encourage you to explore all the ways an HRV can improve your home by visiting our detailed page on HRV System Benefits.
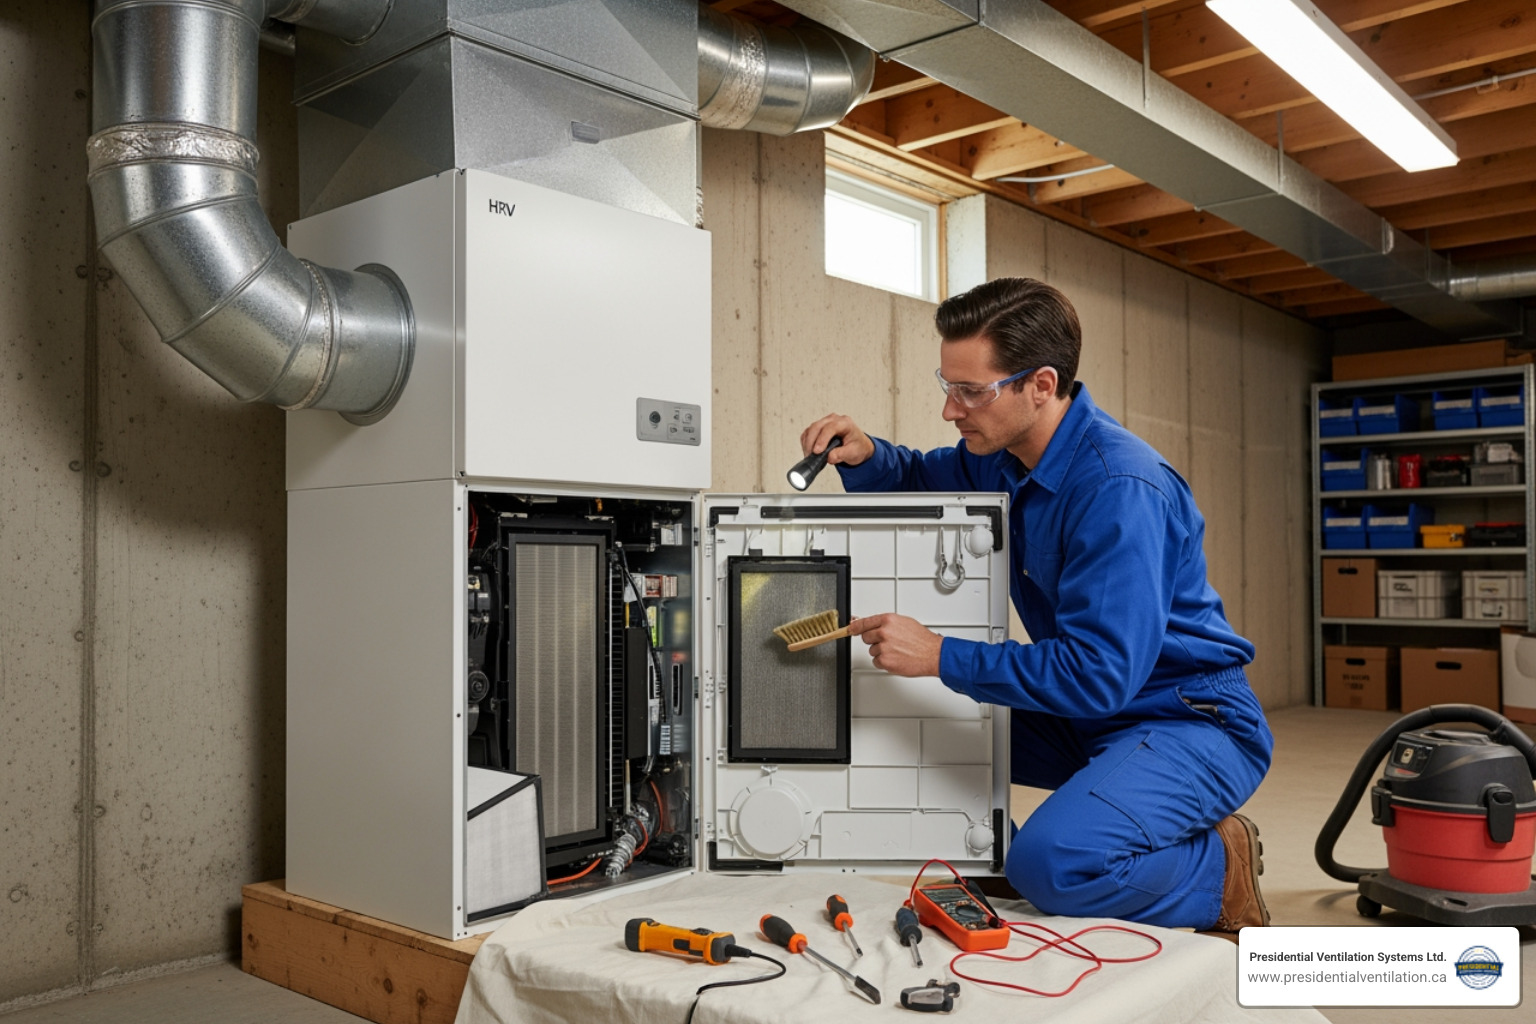
Just as you wouldn't skip a car's oil change, you shouldn't neglect your HRV system's upkeep. Professional HRV maintenance in Lower Sackville, NS is crucial for peak efficiency, a longer lifespan, and protecting your investment. While simple DIY tasks help, professional servicing offers a comprehensive inspection only trained technicians can provide.
Regular maintenance is not just about keeping things running; it's about protecting our home and our wallet. A well-maintained system can last significantly longer, potentially doubling its operational life compared to a neglected one. Think about it: a heat pump, for example, can last up to 20 years with proper care, while a neglected one might only survive 10. The same principle applies to our HRV systems. Furthermore, neglecting maintenance can even void our system's warranty, leaving us exposed to costly repairs that could have been avoided. We recommend an annual professional check-up to keep our HRV system in top condition.
When our certified technicians perform professional HRV maintenance in Lower Sackville, NS, we go beyond just a quick glance. Our comprehensive service visit ensures every critical component of your system is inspected, cleaned, and optimized for performance. Here's a look at what we typically include:
This thorough approach helps us catch minor issues before they escalate into major problems, ensuring your HRV provides consistent fresh air and energy efficiency year-round.
While professional HRV maintenance in Lower Sackville, NS is essential annually, there are several simple tasks we, as homeowners, can perform between visits to keep our systems running smoothly. These DIY efforts can significantly contribute to your HRV's efficiency and longevity:
For those interested in understanding filter efficiency, we recommend learning more about MERV ratings to choose the right filters for your system. These DIY tasks complement professional maintenance; they don't replace it.
Establishing a regular maintenance schedule for our HRV system is key to its performance and lifespan. For homeowners in Lower Sackville, we generally recommend a two-tiered approach:
Always refer to your HRV system's manufacturer guidelines for specific recommendations, as these can sometimes vary by model. Adhering to these schedules will help us maintain peak efficiency, extend the life of our HRV, and ensure our home always benefits from fresh, healthy air.
Your HRV system works tirelessly, but it can send signals that it needs attention. Ignoring these warnings can lead to reduced efficiency, poor indoor air quality, and even system failure or water damage. Catching these indicators early is a smart move for any Lower Sackville homeowner.
When an HRV isn't performing optimally, we might start to notice an increase in our energy bills, as the system works harder to achieve desired results. The air in our home might feel stale, or we might see condensation on our windows again, indicating a lapse in humidity control. A neglected HRV is like a neglected engine; it will eventually break down, leading to costly emergency repairs that could have been prevented with routine care.
Our HRV system is designed to operate efficiently and quietly, providing a continuous supply of fresh air. However, if we start to notice any of the following, it's a clear sign that our HRV maintenance in Lower Sackville, NS needs professional attention:
If any of these signs appear, it’s time to call in the professionals to diagnose and address the issue.
Skipping routine HRV maintenance in Lower Sackville, NS might seem like a way to save money in the short term, but it’s a costly gamble that rarely pays off. The consequences of neglect can be far-reaching, impacting our home, our health, and our finances:
For more insights into what happens when these systems are neglected, especially in our local climate, we have resources like our tips on HRV Systems Broken in Ellershouse NS Tips. Proactive care is always the more economical and healthier choice.
Living in Lower Sackville means experiencing the full spectrum of Nova Scotia's weather. Your HRV system needs to adapt to these seasonal shifts to maximize its efficiency year-round. Adjusting your HRV care with the seasons ensures you always benefit from fresh air and optimal energy recovery.
Proper seasonal adjustments and maintenance allow our HRV to perform its best, whether it's working overtime to recover heat in January or managing humidity in July. This proactive approach helps us maintain a comfortable indoor environment while keeping our utility bills in check, no matter what the weather outside brings.
Winter in Lower Sackville can be harsh, and our HRV system plays a critical role in maintaining comfort and air quality without skyrocketing heating bills. During these colder months, our HRV's primary function is to recover as much heat as possible from the outgoing stale air before expelling it.
A key consideration for winter operation is the HRV's frost control mode. In very cold temperatures, the moisture extracted from the indoor air can cause frost buildup on the heat exchange core. HRVs are designed with a defrost cycle (often by temporarily stopping the incoming air fan or using a small electric heater) to prevent this. It's crucial that this function is working correctly to avoid core freeze-up, which would block airflow and render the unit ineffective.
We also need to ensure proper drainage of the condensate produced. As warm, moist indoor air passes through the core and cools, water vapour condenses. This condensate needs a clear path to drain away. Clogged or frozen drain lines can lead to water backing up in the unit, potentially causing damage or leaks. Regular cleaning of the condensate pan and drain line is especially important before the deep freeze sets in. Maximizing heat recovery during cold snaps means ensuring our core is clean and free of obstructions, allowing for optimal heat transfer and keeping our homes warm and fresh.
As the Nova Scotia climate shifts to warmer, more humid summers, our HRV maintenance focus also adjusts. While winter emphasizes heat recovery, summer care centers on effective humidity control and ensuring the system operates efficiently in different conditions.
During the warmer months, the HRV continues to provide fresh air, but its role in moisture management becomes paramount. We often adjust the humidity control settings to ensure the system is effectively expelling excess indoor humidity, preventing that sticky, uncomfortable feeling and mitigating the risk of mold growth that thrives in damp environments.
Some advanced systems, or Energy Recovery Ventilators (ERVs, a close cousin to HRVs), can also help "pre-cool" incoming air by transferring some of the coolness from the outgoing conditioned air to the incoming fresh air. While a standard HRV primarily focuses on heat exchange, its continuous air exchange still prevents excess moisture from building up indoors. It’s also a good time to ensure all filters are clean and free-flowing to handle any increase in outdoor allergens. Preparing our system during the summer ensures it's ready for the cooler, damper conditions that fall will inevitably bring. For a deeper dive into how ventilation systems manage energy across seasons, especially in our region, explore our insights on Energy Recovery Ventilation Halifax NS.
Regular maintenance significantly impacts our home's energy efficiency, leading to noticeable savings on our utility bills. Here’s how:
While homeowners in Lower Sackville are encouraged to take an active role in their HRV's upkeep, DIY efforts cannot replace professional HRV maintenance in Lower Sackville, NS. There's a clear distinction between what you can safely do yourself and what requires a certified technician's expertise.
DIY tasks are generally limited to routine, accessible components. This includes cleaning or replacing filters every 1-3 months and periodically checking exterior vents for obstructions. These tasks are crucial for day-to-day operation and airflow.
However, professional expertise is essential for the more complex aspects of HRV maintenance. Our technicians are trained to:
Attempting to perform these advanced tasks without proper training can not only damage our system but also pose safety risks. Combining our diligent DIY efforts with annual professional servicing ensures our HRV remains efficient, reliable, and safe.
Absolutely! Regular HRV maintenance in Lower Sackville, NS is one of the most effective ways to significantly extend the lifespan of our system. Think of it like taking care of our car: consistent oil changes and tune-ups keep the engine running smoothly for years, whereas neglecting it leads to breakdowns and a much shorter life on the road.
Here’s how preventative care works its magic for our HRV:
By investing in routine maintenance, we’re not just ensuring our HRV runs efficiently; we’re protecting our investment and potentially doubling its operational life. A well-maintained system can last 20 years, while a neglected one might only survive 10.
Ensuring your Lower Sackville home has fresh, clean air and comfortable temperatures doesn't have to be a battle. Your HRV system is a powerful ally, providing continuous fresh air, controlling humidity, and recovering valuable heat to boost your home's energy efficiency.
The key to enjoying these benefits for years to come lies in consistent, proactive care. Regular HRV maintenance in Lower Sackville, NS is not just about fixing problems when they arise; it's about preventing them, preserving our investment, and protecting the health and comfort of our family. From the simple DIY tasks of changing filters to the comprehensive annual inspections performed by our certified technicians, every step contributes to a healthier, more energy-efficient home.
At Presidential Ventilation Systems Ltd., we are dedicated to providing the highest quality ventilation services to homeowners across Lower Sackville and the surrounding areas. With over 30 years of experience, we understand the unique needs of homes in Nova Scotia's climate. We're here to ensure your HRV system operates flawlessly, delivering improved air quality and energy savings season after season.
For comprehensive care and professional servicing of your ventilation system, explore our HRV Systems services. Let us help you maintain a healthy, comfortable, and efficient home environment.