


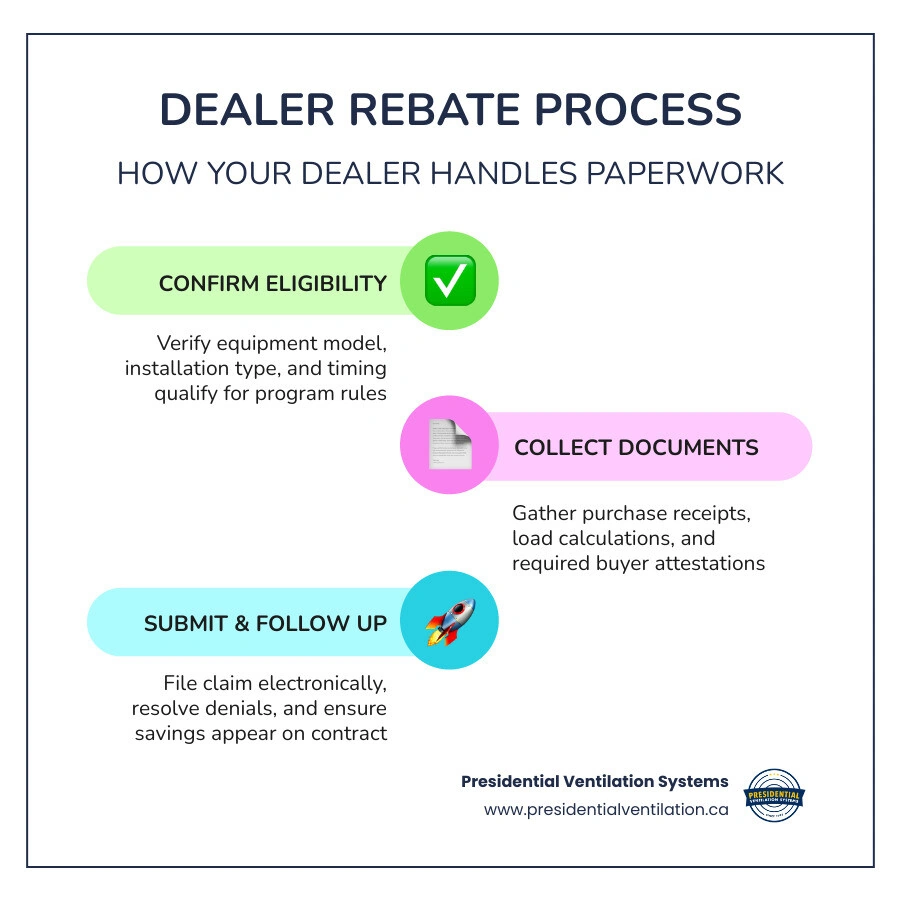
How your dealer helps you navigate ventilation paperwork is one of the most practical — and most overlooked — parts of any ventilation upgrade. When you invest in a new ventilation or air handling system, proper documentation ensures your system meets local building codes and performance standards. But those results don't happen automatically. Someone has to confirm system compatibility, gather the right design documents, submit plans on time, and make sure everything lines up in the final contract.
That someone is your dealer.
Here is a quick look at the key ways your dealer supports the documentation process:
1. Confirms system compatibility - Verifies that your specific equipment model, installation type, and design qualify under local ventilation standards
2. Gathers required documents - Collects installation records, load calculations, and any engineering specifications needed for submission
3. Submits the design plans - Files the ventilation design through the municipal or program portal, often electronically, on your behalf
4. Avoids common errors - Checks for missing model numbers, incorrect layout details, or mismatched customer data before submission
5. Reflects specifications in your contract - Ensures the system details and performance metrics appear correctly as a line item in your agreement
6. Follows up on design reviews - If a plan is rejected, your dealer reviews the file, corrects errors, and resubmits where possible
7. Stays current on building codes - Monitors shifting manufacturer, utility, and provincial requirements so your system remains fully compliant
It sounds straightforward, but the reality is more complex. System audits can result in delays when documentation is incomplete, and dealers who skip proper file management put both themselves and their customers at risk. Program rules change frequently, and submission portals sometimes have their own technical pitfalls.
Understanding this process before your installation helps you ask the right questions, bring the right documents, and walk away confident that your system is fully certified.
How your dealer helps you navigate ventilation paperwork terms simplified:
• efficiency Nova Scotia ventilation process explained
• how professional installation makes ventilation affordable
• how to maximize your ventilation system efficiency
When homeowners in Nova Scotia decide to upgrade their indoor air quality with modern, energy-efficient ventilation systems, they are often met with a maze of technical options. Navigating these options can feel like trying to balance a complex commercial air handling system without a flow hood. Fortunately, how your dealer helps you navigate ventilation paperwork is designed to take that weight off your shoulders.
Whether you reside in Halifax, Dartmouth, Lower Sackville, or Bedford, ensuring your system meets all local standards requires a clear understanding of how these systems are designed and certified.
Ventilation standards generally fall into two categories: manufacturer specifications and local building or provincial codes. Manufacturer specifications are designed to ensure high-efficiency equipment lines, such as advanced Energy Recovery Ventilators (ERVs) or Heat Recovery Ventilators (HRVs), operate at peak performance. These require precise dealer documentation to prove the equipment was installed according to strict engineering guidelines.
On the other hand, provincial programs focus on overall energy-efficiency improvements, such as upgrading to advanced ventilation systems that reduce the load on your heating and cooling systems.
To help local homeowners navigate these differences, we ensure that every step of the selection, installation, and filing process is streamlined. Learn more about how these systems work by reading about ventilation upgrades.
It is common to hear technical terms used interchangeably, but during system planning, they are handled very differently.
• Certified Ventilation Systems: These are verified directly by the equipment manufacturer or provincial standards (such as those in Nova Scotia). They are tied to specific equipment certifications, efficiency ratings, and professional installation standards. Because these systems must meet strict guidelines, they require official submission portals, rigorous documentation, and are subject to third-party audits.
• Standard Installations: These are basic setups that do not require complex external paperwork, specialized engineering portals, or third-party approvals. While a standard installation is a straightforward setup, a certified high-efficiency ventilation system must be formally documented and verified.
Understanding this distinction is critical because combining different system components is often subject to strict engineering rules. To make sure you get the most out of your home comfort investment, check out our guide on maximizing your ventilation system performance.
Upgrading your home’s ventilation is more than just swapping out an old exhaust fan. Modern systems require precise ventilation design, duct layout planning, and professional installation to operate at peak efficiency. Because these systems are highly technical, the documentation programs that support them are equally demanding.
We take the guesswork out of the entire administrative process. From the initial load calculations and duct design to the final air balancing report, we compile every piece of technical data required by provincial administrators. For a deeper dive into how this works locally, read our comprehensive resource on the Efficiency Nova Scotia ventilation process.
Filing for home ventilation certifications is a highly structured process. Manufacturers and provincial administrators use advanced submission portals to track and verify every installation. For dealers, maintaining absolute accuracy is vital; failure to do so can result in compliance discrepancies that can disrupt system approvals.
By handling this paperwork with professional precision, we protect our customers in communities from Fall River and Waverley to Mount Uniacke and Tantallon. If you are planning an upgrade in the HRM, you can explore localized options such as Halifax ventilation systems.
While your dealer does the heavy lifting, you will need to provide a few basic documents to establish your system's eligibility. Having these ready helps speed up the submission process:
1. Proof of Residence: A utility bill or municipal tax notice matching the installation address.
2. Signed Terms and Conditions: Program-specific forms where you acknowledge the terms of the system certification.
3. System Design Documents: Load calculations and duct design layouts (which we provide).
4. Completed Purchase Agreement: A detailed contract showing the model and serial numbers of the installed ventilation equipment.
If you are based in the Dartmouth area, you can learn more about specific local requirements by visiting our page on Dartmouth ventilation systems.
A single misplaced digit in a serial number or an incorrect installation date can cause an automated system to reject a certification application. Common errors that lead to delays or denials include:
• Mismatched customer names between the utility bill and the purchase contract.
• Missing or illegible equipment model and serial numbers.
• Failing to submit the application within the required post-installation window.
• Submitting incomplete load calculations or air balancing reports.
We prevent these headaches by using rigorous pre-submission validation. By double-checking every document against manufacturer and provincial databases before we hit "submit," we ensure a seamless approval process. Homeowners in the Mount Uniacke region can find out more about these high-efficiency standards through our Mount Uniacke high-efficiency ventilation page.
Timing is everything when it comes to securing your system certifications. Programs frequently change, and installation windows are strictly enforced. The table below outlines how different types of documentation are typically structured and managed:
• Standard Certification — Reviewing Body: Manufacturer — Typical Processing Time: 1 to 2 weeks — Key Requirement: Dealer-validated model eligibility — How It Affects Your System Approval: Confirms warranty and performance standards
• Provincial Compliance — Reviewing Body: Provincial Utility — Typical Processing Time: 4 to 8 weeks post-installation — Key Requirement: Post-installation inspection or certified air balancing report — How It Affects Your System Approval: Ensures compliance with local energy-efficiency codes
To ensure you don't miss out on these opportunities, it helps to plan your home upgrades around active program timelines. Residents of Mount Uniacke can review specific program eligibility windows at Mount Uniacke ventilation upgrades.
One of the most complex aspects of navigating system paperwork is understanding compatibility restrictions. Many utility programs require specific equipment pairings, while others focus on overall system design. Additionally, installation windows are non-negotiable. If a manufacturer specification requires installation by a certain date, even a delay of one day can affect the certification.
We track these shifting rules daily, ensuring your system is scheduled, installed, and documented well within all active deadlines.
System details must be correctly recorded on your purchase contract to avoid future warranty or auditing issues. We ensure that every line item — including equipment models, design specifications, and air balancing metrics — is clearly and professionally detailed on your contract, protecting you from unexpected technical adjustments down the road.
If a claim is denied due to an administrative or data-entry error on our part, we take full responsibility. Our team will review the denial notice, correct the paperwork, and resubmit it through the proper portal. We maintain detailed digital files of all installations, including load calculations, system designs, and signed terms, allowing us to quickly resolve discrepancies with program administrators.
Certified installations are highly convenient for homeowners because they ensure the system meets all local efficiency standards. However, this shifts the administrative responsibility to the dealer. We manage the certification process for you and apply to the manufacturer or provincial program for verification. This requires us to maintain flawless records to avoid any compliance issues during audits.
As a leading ventilation specialist with over 30 years of experience in Nova Scotia, we participate in ongoing manufacturer training and compliance monitoring. We work closely with provincial energy organizations and administrators to stay ahead of program updates, ensuring that our customers in Clayton Park, Cole Harbour, Eastern Passage, and beyond always receive accurate advice.
Upgrading your home's ventilation, ERV, or air handling system is an excellent way to improve your indoor air quality and lower your monthly energy footprint. While the paperwork involved in securing system certifications can seem daunting, you don't have to navigate it alone.
By trusting a professional, locally experienced team, you can rest assured that every form, calculation, and submission is handled with care. From Halifax and Dartmouth to Lower Sackville, Mount Uniacke, and the surrounding communities, we are here to ensure your home comfort upgrade is smooth, compliant, and fully optimized.
Are you ready to improve your home's ventilation and indoor air quality? Schedule a consultation for energy-efficient ventilation upgrades with Presidential Ventilation Systems Ltd. today, and let our experienced team handle the details for you.

How your dealer helps you navigate ventilation paperwork is one of the most practical — and most overlooked — parts of any ventilation upgrade. When you invest in a new ventilation or air handling system, proper documentation ensures your system meets local building codes and performance standards. But those results don't happen automatically. Someone has to confirm system compatibility, gather the right design documents, submit plans on time, and make sure everything lines up in the final contract.
That someone is your dealer.
Here is a quick look at the key ways your dealer supports the documentation process:
1. Confirms system compatibility - Verifies that your specific equipment model, installation type, and design qualify under local ventilation standards
2. Gathers required documents - Collects installation records, load calculations, and any engineering specifications needed for submission
3. Submits the design plans - Files the ventilation design through the municipal or program portal, often electronically, on your behalf
4. Avoids common errors - Checks for missing model numbers, incorrect layout details, or mismatched customer data before submission
5. Reflects specifications in your contract - Ensures the system details and performance metrics appear correctly as a line item in your agreement
6. Follows up on design reviews - If a plan is rejected, your dealer reviews the file, corrects errors, and resubmits where possible
7. Stays current on building codes - Monitors shifting manufacturer, utility, and provincial requirements so your system remains fully compliant
It sounds straightforward, but the reality is more complex. System audits can result in delays when documentation is incomplete, and dealers who skip proper file management put both themselves and their customers at risk. Program rules change frequently, and submission portals sometimes have their own technical pitfalls.
Understanding this process before your installation helps you ask the right questions, bring the right documents, and walk away confident that your system is fully certified.
How your dealer helps you navigate ventilation paperwork terms simplified:
• efficiency Nova Scotia ventilation process explained
• how professional installation makes ventilation affordable
• how to maximize your ventilation system efficiency
When homeowners in Nova Scotia decide to upgrade their indoor air quality with modern, energy-efficient ventilation systems, they are often met with a maze of technical options. Navigating these options can feel like trying to balance a complex commercial air handling system without a flow hood. Fortunately, how your dealer helps you navigate ventilation paperwork is designed to take that weight off your shoulders.
Whether you reside in Halifax, Dartmouth, Lower Sackville, or Bedford, ensuring your system meets all local standards requires a clear understanding of how these systems are designed and certified.
Ventilation standards generally fall into two categories: manufacturer specifications and local building or provincial codes. Manufacturer specifications are designed to ensure high-efficiency equipment lines, such as advanced Energy Recovery Ventilators (ERVs) or Heat Recovery Ventilators (HRVs), operate at peak performance. These require precise dealer documentation to prove the equipment was installed according to strict engineering guidelines.
On the other hand, provincial programs focus on overall energy-efficiency improvements, such as upgrading to advanced ventilation systems that reduce the load on your heating and cooling systems.
To help local homeowners navigate these differences, we ensure that every step of the selection, installation, and filing process is streamlined. Learn more about how these systems work by reading about ventilation upgrades.
It is common to hear technical terms used interchangeably, but during system planning, they are handled very differently.
• Certified Ventilation Systems: These are verified directly by the equipment manufacturer or provincial standards (such as those in Nova Scotia). They are tied to specific equipment certifications, efficiency ratings, and professional installation standards. Because these systems must meet strict guidelines, they require official submission portals, rigorous documentation, and are subject to third-party audits.
• Standard Installations: These are basic setups that do not require complex external paperwork, specialized engineering portals, or third-party approvals. While a standard installation is a straightforward setup, a certified high-efficiency ventilation system must be formally documented and verified.
Understanding this distinction is critical because combining different system components is often subject to strict engineering rules. To make sure you get the most out of your home comfort investment, check out our guide on maximizing your ventilation system performance.
Upgrading your home’s ventilation is more than just swapping out an old exhaust fan. Modern systems require precise ventilation design, duct layout planning, and professional installation to operate at peak efficiency. Because these systems are highly technical, the documentation programs that support them are equally demanding.
We take the guesswork out of the entire administrative process. From the initial load calculations and duct design to the final air balancing report, we compile every piece of technical data required by provincial administrators. For a deeper dive into how this works locally, read our comprehensive resource on the Efficiency Nova Scotia ventilation process.
Filing for home ventilation certifications is a highly structured process. Manufacturers and provincial administrators use advanced submission portals to track and verify every installation. For dealers, maintaining absolute accuracy is vital; failure to do so can result in compliance discrepancies that can disrupt system approvals.
By handling this paperwork with professional precision, we protect our customers in communities from Fall River and Waverley to Mount Uniacke and Tantallon. If you are planning an upgrade in the HRM, you can explore localized options such as Halifax ventilation systems.
While your dealer does the heavy lifting, you will need to provide a few basic documents to establish your system's eligibility. Having these ready helps speed up the submission process:
1. Proof of Residence: A utility bill or municipal tax notice matching the installation address.
2. Signed Terms and Conditions: Program-specific forms where you acknowledge the terms of the system certification.
3. System Design Documents: Load calculations and duct design layouts (which we provide).
4. Completed Purchase Agreement: A detailed contract showing the model and serial numbers of the installed ventilation equipment.
If you are based in the Dartmouth area, you can learn more about specific local requirements by visiting our page on Dartmouth ventilation systems.
A single misplaced digit in a serial number or an incorrect installation date can cause an automated system to reject a certification application. Common errors that lead to delays or denials include:
• Mismatched customer names between the utility bill and the purchase contract.
• Missing or illegible equipment model and serial numbers.
• Failing to submit the application within the required post-installation window.
• Submitting incomplete load calculations or air balancing reports.
We prevent these headaches by using rigorous pre-submission validation. By double-checking every document against manufacturer and provincial databases before we hit "submit," we ensure a seamless approval process. Homeowners in the Mount Uniacke region can find out more about these high-efficiency standards through our Mount Uniacke high-efficiency ventilation page.
Timing is everything when it comes to securing your system certifications. Programs frequently change, and installation windows are strictly enforced. The table below outlines how different types of documentation are typically structured and managed:
• Standard Certification — Reviewing Body: Manufacturer — Typical Processing Time: 1 to 2 weeks — Key Requirement: Dealer-validated model eligibility — How It Affects Your System Approval: Confirms warranty and performance standards
• Provincial Compliance — Reviewing Body: Provincial Utility — Typical Processing Time: 4 to 8 weeks post-installation — Key Requirement: Post-installation inspection or certified air balancing report — How It Affects Your System Approval: Ensures compliance with local energy-efficiency codes
To ensure you don't miss out on these opportunities, it helps to plan your home upgrades around active program timelines. Residents of Mount Uniacke can review specific program eligibility windows at Mount Uniacke ventilation upgrades.
One of the most complex aspects of navigating system paperwork is understanding compatibility restrictions. Many utility programs require specific equipment pairings, while others focus on overall system design. Additionally, installation windows are non-negotiable. If a manufacturer specification requires installation by a certain date, even a delay of one day can affect the certification.
We track these shifting rules daily, ensuring your system is scheduled, installed, and documented well within all active deadlines.
System details must be correctly recorded on your purchase contract to avoid future warranty or auditing issues. We ensure that every line item — including equipment models, design specifications, and air balancing metrics — is clearly and professionally detailed on your contract, protecting you from unexpected technical adjustments down the road.
If a claim is denied due to an administrative or data-entry error on our part, we take full responsibility. Our team will review the denial notice, correct the paperwork, and resubmit it through the proper portal. We maintain detailed digital files of all installations, including load calculations, system designs, and signed terms, allowing us to quickly resolve discrepancies with program administrators.
Certified installations are highly convenient for homeowners because they ensure the system meets all local efficiency standards. However, this shifts the administrative responsibility to the dealer. We manage the certification process for you and apply to the manufacturer or provincial program for verification. This requires us to maintain flawless records to avoid any compliance issues during audits.
As a leading ventilation specialist with over 30 years of experience in Nova Scotia, we participate in ongoing manufacturer training and compliance monitoring. We work closely with provincial energy organizations and administrators to stay ahead of program updates, ensuring that our customers in Clayton Park, Cole Harbour, Eastern Passage, and beyond always receive accurate advice.
Upgrading your home's ventilation, ERV, or air handling system is an excellent way to improve your indoor air quality and lower your monthly energy footprint. While the paperwork involved in securing system certifications can seem daunting, you don't have to navigate it alone.
By trusting a professional, locally experienced team, you can rest assured that every form, calculation, and submission is handled with care. From Halifax and Dartmouth to Lower Sackville, Mount Uniacke, and the surrounding communities, we are here to ensure your home comfort upgrade is smooth, compliant, and fully optimized.
Are you ready to improve your home's ventilation and indoor air quality? Schedule a consultation for energy-efficient ventilation upgrades with Presidential Ventilation Systems Ltd. today, and let our experienced team handle the details for you.
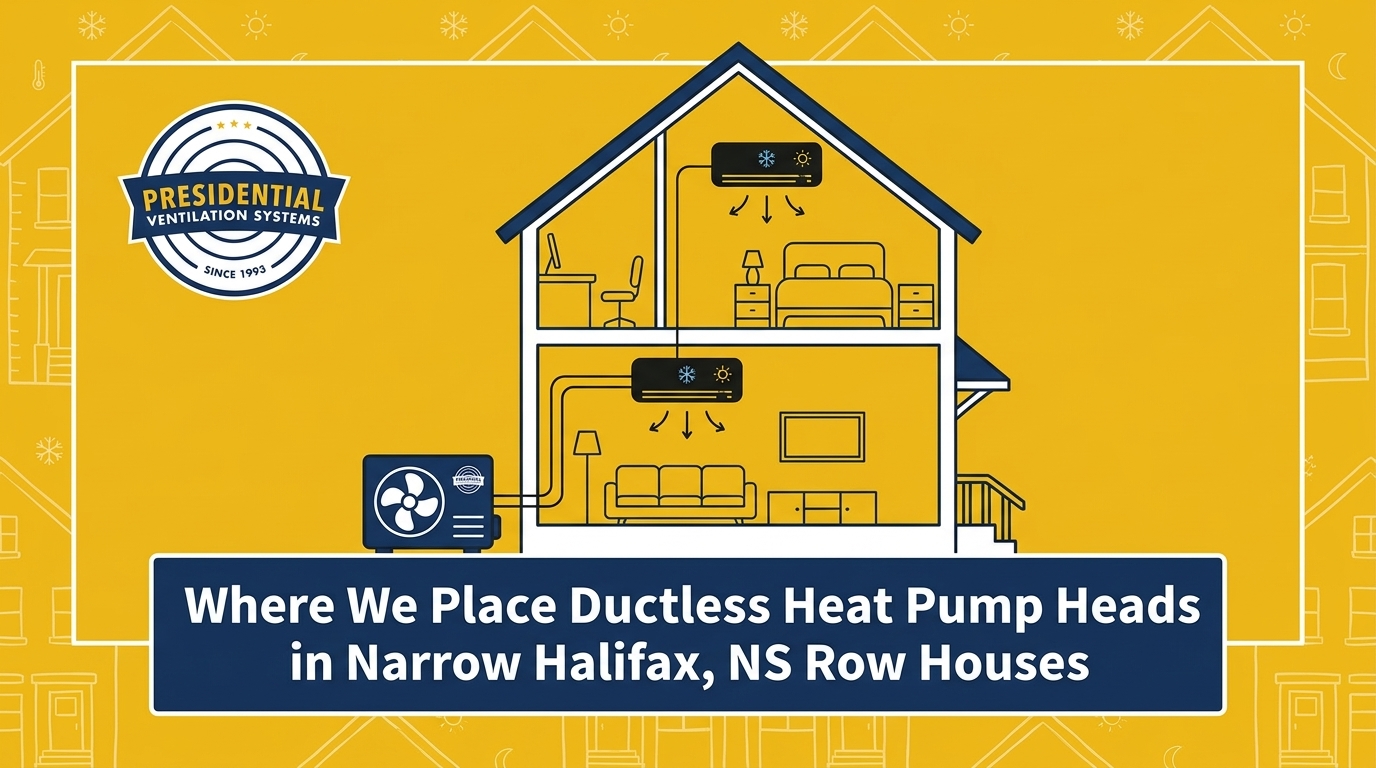
If you are wondering where we place ductless heat pump heads in narrow Halifax row houses, the answer usually begins with a familiar frustration: you turn up the thermostat because the back bedroom feels like an icebox, but within minutes, your front living room is sweltering. It is a frustrating cycle that plagues homeowners living in older, deeply rectangular properties. Achieving even temperature distribution in long, narrow historic Halifax row houses is a unique architectural challenge. When traditional heating methods fall short, many homeowners look to modern solutions, but standard ductless head placement often fails to push conditioned air all the way through multiple rooms in these "shotgun" style layouts.
As a trusted Nova Scotia contractor with over 30 years of experience, our team at Presidential Ventilation Systems knows the core issue is not the power of the equipment, but the geometry of the house. A standard wall-mounted unit blowing across a twelve-foot-wide room will hit the opposite wall and stop, leaving the rest of your home completely untouched by the warm or cool air. This highlights a critical decision point: selecting the exact wall and hallway orientations to maximize air throw without requiring a separate indoor head for every single small room.
Whether we are tackling residential retrofits, new construction, or commercial projects, when you are looking for comprehensive heating services, the physical layout of your property dictates the design. Getting a professional ductless heat pump installation from our experienced team means mapping out these structural hurdles before a single hole is drilled.
Historic Halifax row houses, particularly those Victorian and Edwardian properties found throughout the South End and North End, were simply not built with modern HVAC systems in mind. These homes feature brilliant craftsmanship, but their underlying structure complicates retrofits significantly. The most defining feature of a row house is the shared party wall. Because you share exterior walls with your neighbors on one or both sides, the available real estate for routing refrigerant lines, electrical wires, and drainage pipes is severely restricted.
Beyond the lack of exterior access, the interior construction poses its own set of risks. Most of these century-old homes utilize lath and plaster construction. Unlike modern drywall, lath and plaster is brittle, unpredictable, and easily damaged if technicians attempt to drill or mount heavy equipment without specialized knowledge of historic framing. You cannot simply attach a heavy indoor unit anywhere you please; it requires finding solid structural support without shattering the surrounding wall surface. Our Red Seal tradespeople are trained to navigate these delicate structures safely.
If you live within our Halifax service areas, you already know that our climate adds another layer of complexity. Halifax experiences damp, cold maritime winters and notably humid summers. In long, narrow homes, poor airflow traps this coastal moisture in back rooms and narrow corridors. If heat pump heads are placed incorrectly, this trapped, stagnant air quickly creates condensation issues, leading to dampness and potential mold growth along exterior walls.
Restricted routing paths: Traditional heat pump installations rely on running line sets down the outside of the house to connect the indoor head to the outdoor compressor. Shared party walls make this impossible on two sides of the home.
Structural delicacy: The 100-plus-year-old brick, stone, and timber framing behind these walls requires careful handling. Drilling through thick masonry or navigating around rough-hewn timber studs demands precision to maintain the structural integrity of the building.
Coastal humidity factors: When humid summer air enters a long corridor without proper mechanical circulation, it settles. A ductless unit placed in a front room will dehumidify that specific space, but the heavy, moist air in the back of the house remains trapped.
Preventing moisture buildup: Strategic airflow is your primary defense against condensation. By forcing conditioned air down the entire length of the property, you keep the air moving, which naturally regulates humidity levels and protects your historic interior finishes.
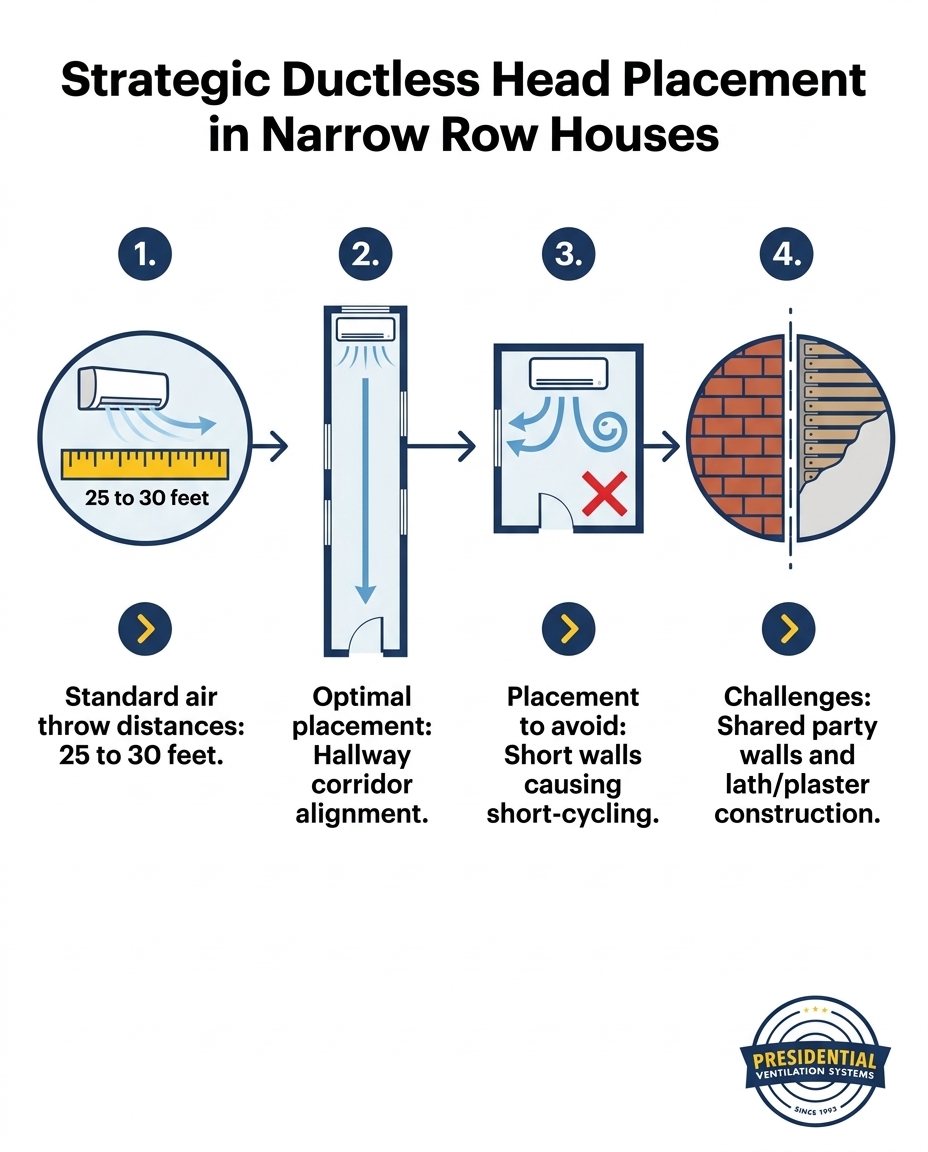
To properly condition a long, narrow footprint, we have to work with the architecture rather than fighting against it. Standard high-wall ductless units are incredibly powerful directional blowers. When unobstructed, a quality unit can throw air 25 to 30 feet across a room. Our technical strategy for narrow homes involves harnessing that distance to heat or cool multiple rooms simultaneously.
Instead of mounting a unit on a long wall so it blows across a narrow room, our installers align the indoor heads to blow straight down hallways and open corridors. This "corridor alignment" acts like a wind tunnel, pushing warm or cool air deep into the house. As the air travels down the hallway, it naturally disperses into adjoining bedrooms and living spaces, provided the doors remain open. This method significantly reduces the number of indoor units you need to purchase and maintain.
Multi-story row houses offer another unique opportunity: the stairwell. Stairwells are natural convection channels. Because heat rises and cool air falls, placing units strategically at the top or bottom of a stairwell can help distribute conditioned air across different levels of the home. Certain advanced equipment, like Lennox ductless systems and Daikin units, feature sophisticated louvers and fan controls that allow for precise directional airflow, making these long-throw strategies highly effective.
• Cross-Room Alignment — Airflow Behavior: Air hits the opposite wall quickly and stops. — Best Application in Narrow Homes: Only useful for isolated, closed-off rooms.
• Corridor Alignment — Airflow Behavior: Air travels 25-30 feet unobstructed. — Best Application in Narrow Homes: Ideal for open hallways feeding into side bedrooms.
• Stairwell Mounting — Airflow Behavior: Leverages natural rising heat and falling cool air. — Best Application in Narrow Homes: Perfect for multi-story historic properties.
Positioning at the extremes: We often look for mounting locations at the absolute furthest ends of a long footprint. By pointing the unit inward from the front or back of the house, the air has the maximum possible runway to travel before hitting an obstruction.
Reducing equipment clutter: Hallway throws prevent the need for a separate head in every small room. This not only saves on initial equipment costs but also preserves the historic aesthetic of your individual living spaces.
Leveraging multi-story layouts: Placing a cooling-focused unit at the top of a stairwell allows heavy, cold air to cascade down the stairs, cooling the upper landing and the floor below simultaneously.
Overcoming bottlenecks: Narrow, winding Victorian staircases can sometimes block airflow. Our professionals map these bottlenecks to ensure the unit is angled correctly to push air past corners and tight landings.
Retrofitting modern mechanical systems into heritage properties requires a delicate balance between achieving modern comfort and protecting the home's historic character. When shared party walls block access to the exterior, technicians must find creative, safe ways to route line sets through the interior of the home without ruining the visual appeal of your living spaces.
This process begins with mapping out the structural realities before a single tool is lifted. We look for hidden chases, unused chimney flues, or deep closets that can conceal refrigerant lines and wiring as they travel from the indoor head to the outdoor compressor. In our 30+ years of Nova Scotia HVAC, electrical, ventilation, and sheet-metal experience, our team of approximately 70 employees has learned exactly how to navigate these hidden spaces while preserving the integrity of lath and plaster walls.
Sometimes, these installations coincide with larger updates. One local homeowner reached out to us last summer during a major home renovation. They needed to replace an old heating system and outdated ductwork while staying within a strict budget. Our team was able to map out a new heat pump system that fit the structural realities of their older home, utilizing interior routing to bypass exterior wall limitations, and kept them informed through excellent post-install communication. If you are planning a similar project, reviewing the best ductless heat pumps for older homes is a great first step.
The risks of improper drilling: Lath and plaster is held together by mechanical "keys" where the plaster oozes between wooden strips. Aggressive drilling or heavy vibrations can break these keys, causing large sections of the wall to crumble and detach.
Securing heavy units: Indoor ductless heads are heavy. Technicians must locate the original, often irregularly spaced wooden studs behind the plaster to ensure the mounting bracket is safely and permanently anchored.
Creative line set hiding: When interior routing is required, line sets can be run through custom-built soffits, behind crown molding, or through the back of built-in cabinetry to keep them completely out of sight.
Maintaining visual appeal: The goal is always to make the modern equipment look as unobtrusive as possible, ensuring that the Victorian or Edwardian interior details remain the focal point of the room.
One of the most overlooked aspects of upgrading an older home is the electrical infrastructure. Ductless systems require dedicated electrical circuits to operate safely and efficiently. In homes built over a century ago, the existing electrical panels are rarely equipped to handle this sudden increase in demand. Finding safe routes for new wiring through narrow, obstructed wall cavities is a major hurdle.
This is where Presidential Ventilation Systems' comprehensive expertise makes a massive difference. Because we operate both in-house HVAC and electrical divisions, we do not just look at where the air needs to go; we simultaneously map out the safest, most code-compliant routes for the high-voltage wiring. Our Red Seal tradespeople coordinate directly, avoiding the disjointed, frustrating process of hiring and managing separate contractors for a single project.
We saw a classic example of this last summer when a homeowner was converting from an aging oil burner to a central heat pump system. During the initial assessment, it became clear their existing electrical panel couldn't handle the new load. Because we have in-house electricians, our team resolved the electrical panel upgrade alongside the central heat pump installation seamlessly, leaving the customer with a great working system and zero logistical headaches.
Streamlined project management: Having both trades under one roof means the electrician knows exactly what the HVAC technician needs, and vice versa. There are no delays waiting for a third party to finish their portion of the work.
Managing older panels: Upgrading from fossil fuels to heat pumps almost always requires an electrical service upgrade. Our professionals calculate the total load to ensure your historic home remains safe and fully compliant with current electrical codes.
Running wire through obstructions: Historic homes are full of fire blocking, solid timber beams, and narrow cavities. Safely routing new, dedicated circuits requires specialized tools and a deep understanding of heritage framing.
Code compliance: Meeting modern electrical codes in a 100-year-old property requires careful planning, ensuring all new wiring is properly protected and grounded without compromising the building's historic fabric.
Knowing where to place a ductless head is only half the battle; knowing where not to place it is equally critical. Poor placement in a narrow home will throttle the system's efficiency, drive up your energy bills, and leave you uncomfortable. Based on our 30+ years of Nova Scotia HVAC and electrical experience, we identify specific red zones during every assessment.
Strategic placement zones to avoid in older homes:
• Directly facing a close opposite wall: Placing a unit on the long wall of a narrow room causes the air to bounce straight back into the unit's return sensor.
• Above heat-producing appliances: Mounting units over stoves, ovens, or older incandescent light fixtures tricks the thermostat into thinking the whole room is warmer than it actually is.
• Tucked into tight, obstructed corners: Blocking the sides or bottom of the unit restricts return airflow, preventing the system from accurately reading the room's temperature.
• Directly above sensitive electronics: While rare, condensation leaks can happen. You should never place an indoor head directly above a television, computer setup, or valuable antique furniture.
• In areas with restricted drainage access: If the unit is placed somewhere that prevents gravity drainage for the condensation line, an internal condensate pump must be used, which adds noise and a potential point of failure.
When a unit is placed on a short wall in a narrow room, it suffers from a condition known as "short-cycling." The unit blasts conditioned air, which immediately bounces off the wall three feet away and is sucked right back into the unit. The internal thermostat registers this returned air, assumes the entire room has reached the desired temperature, and shuts off prematurely. The result is a system that turns on and off constantly, wearing out components while leaving the rest of the room entirely unconditioned.
Tricking the thermostat: Short-cycling prevents the system from running long enough to properly dehumidify the air or push temperatures into the far corners of the space, creating massive dead zones.
Impact on lifespan: Constantly starting and stopping puts immense strain on the compressor. Avoiding short-cycling through proper placement is one of the best ways to extend the lifespan of your equipment.
Restricted return airflow: A unit needs to pull in as much air as it pushes out. Tucking it behind a bulky armoire or high up in a vaulted, dead-end corner restricts this airflow, trapping moisture in the surrounding drywall or plaster.
Condensation line routing: Every ductless head produces water as it dehumidifies. The placement must allow for a safe, continuous downward slope for the drain line, routing that moisture safely out of your historic home.
Upgrading the mechanical systems in an older home is a significant investment, but various provincial and federal rebates can help offset the costs. However, qualifying for these incentives usually requires strict adherence to program guidelines. Proper installation by certified professionals is almost always a mandatory requirement to qualify for heat pump rebates. DIY installations or work done by uncertified individuals will typically void your eligibility entirely.
It is important to note that rebate programs, funding tiers, and eligibility requirements can change frequently. Homeowners should always confirm current programs with Presidential Ventilation Systems during the initial assessment. Because older homes often require comprehensive upgrades, you can sometimes bundle related work into your rebate applications. For example, combining an oil-to-heat-pump conversion with the necessary electrical panel upgrade may open doors for specific energy efficiency incentives.
Navigating the paperwork and technical requirements for these programs can be daunting. Working with an established contractor like Presidential Ventilation Systems, which employs approximately 70 people, means you have access to a dedicated administrative team that understands the rebate landscape. We help ensure that your equipment matches the required efficiency ratings and that all installation documentation is properly submitted, making the financial side of your historic home upgrade as smooth as the physical installation.
Heating and cooling a narrow row house requires strategic placement and a deep understanding of airflow dynamics, not just throwing more equipment at the problem. By utilizing long hallway throws, leveraging stairwells, and avoiding short-cycling traps, you can achieve even, consistent comfort throughout your entire home without compromising its historic charm.
There is immense peace of mind that comes from understanding exactly how and why a professional placement strategy works. You do not have to guess if the back bedroom will finally be warm this winter; the system is engineered to ensure it will be. Because every heritage property is unique, a careful, customized approach to both the HVAC and electrical routing is essential.
If you are tired of dealing with severe temperature imbalances in your older home, we encourage you to reach out. Request a free estimate from our team of Red Seal tradespeople. With 30+ years of local experience, we can map out a ductless heat pump installation that fits your home's exact structural realities perfectly.
How do you heat a long narrow house with a mini split?
Our team heats a long, narrow house by aligning the indoor unit to blow straight down the longest available corridor, usually a main hallway. This strategy uses the unit's 25-to-30-foot air throw to push conditioned air deep into the house, allowing it to disperse naturally into adjoining rooms rather than getting trapped in a single space.
Where should a mini split not be placed in an older home?
A mini split should never be placed on a wall directly facing a close opposite wall, as this causes the air to bounce back and short-cycle the system. You must also avoid placing units directly above heat-producing appliances, in tight corners that restrict return airflow, or on delicate lath and plaster walls without locating proper structural support.
Can one ductless heat pump heat a whole row house in Halifax?
While a single outdoor compressor can often power a whole row house, you will typically need more than one indoor head to achieve even comfort across multiple floors or closed-off sections. A professional assessment by our technicians is required to determine the exact number of zones needed based on your home's layout, insulation levels, and square footage.
How do you hide heat pump lines on a historic property with shared walls?
When shared party walls prevent exterior routing, our technicians hide line sets by routing them through the interior of the home. This involves utilizing hidden spaces like unused chimney flues, deep closets, custom-built soffits, or running lines behind crown molding to preserve the historic aesthetic.
Do I need an electrical panel upgrade for a ductless heat pump in an older home?
In many cases, yes. Older historic homes often have outdated electrical panels that cannot safely handle the dedicated circuits required by modern heat pumps. An assessment by one of our qualified in-house electricians will determine if your current service can support the new load or if an upgrade is necessary for safety and code compliance.

Are you struggling with identifying the source of vibration noises in your heat pump before winter, wondering if that loud hum is normal or a sign of trouble? You are not alone. When the temperature drops and the first real chill sets in, outdoor units have to work significantly harder to extract warmth from the freezing air. This sudden shift in operation often brings new, unfamiliar sounds to the surface, causing understandable anxiety for homeowners who rely on these systems to keep their families warm.
The core problem you face is distinguishing between safe, normal cold-weather operation and dangerous mechanical issues that require immediate attention. Ignoring a serious problem could leave you without heat during the worst weather, but panicking over a normal defrost cycle causes unnecessary stress. Knowing when to simply let the system run and when to call for a professional diagnostic before winter weather causes a total breakdown is essential for protecting your equipment.
In our 30+ years serving Nova Scotia, our team has seen exactly how harsh our maritime climate impacts both the mechanical and electrical components of heat pump systems. During Nova Scotia late autumn and pre-winter cold snaps, we receive countless calls from homeowners concerned about outdoor unit vibrations. The good news is that by learning a few descriptive cues, you can better understand what your equipment is doing and make informed decisions about your home comfort.
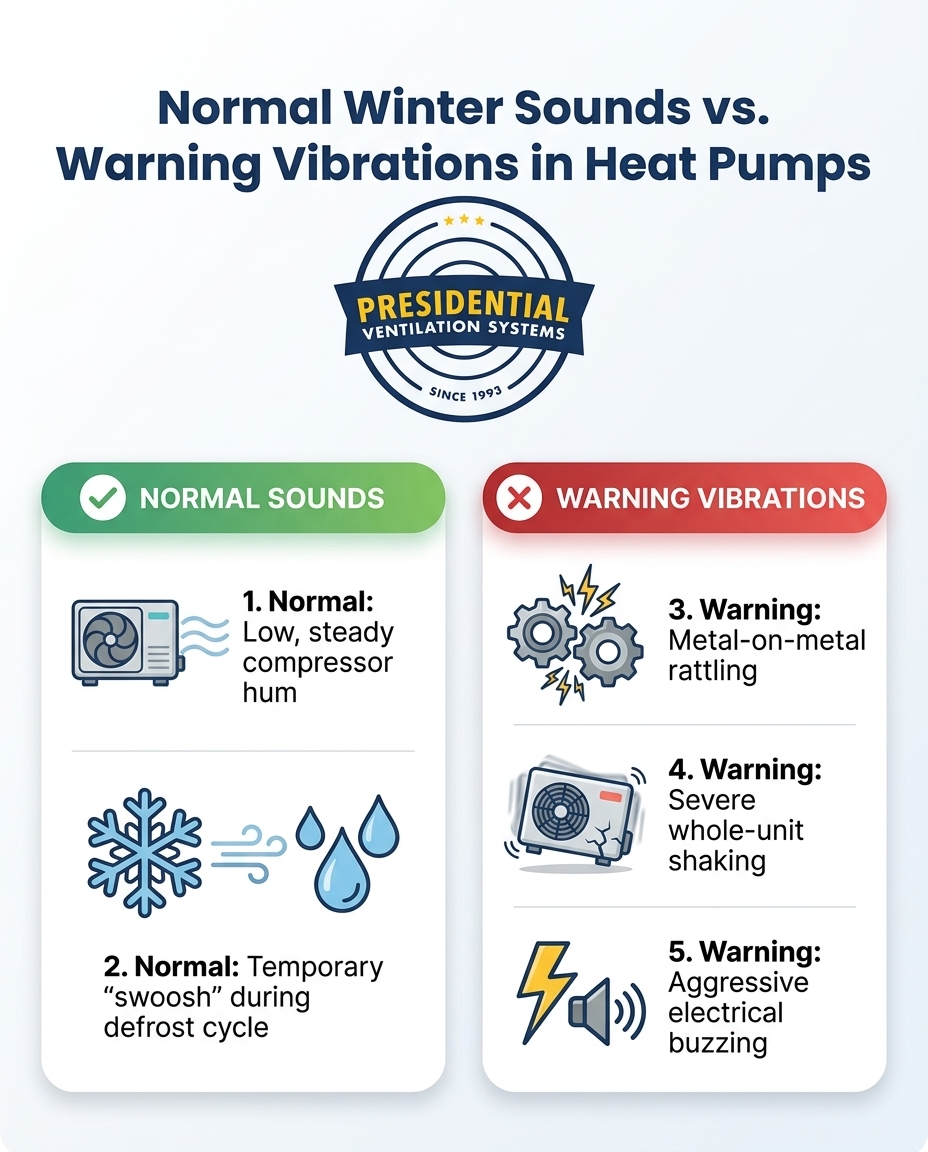
Before assuming your equipment is failing, it helps to understand how modern cold-climate heat pumps, such as Daikin and Lennox cold-climate systems, actually operate. These units utilize advanced variable-speed compressors. Unlike older, single-stage units that simply turn on and off, variable-speed compressors ramp up and down based on heating demand. When the temperature plummets, the compressor naturally changes pitch, running at a higher capacity and producing a louder, steady hum. This is entirely normal.
Another common sound that startles homeowners is the defrost cycle. As your unit extracts heat from cold air, frost naturally builds up on the outdoor coils. To clear this frost, the system temporarily reverses the flow of refrigerant. You might hear a sudden "swoosh" or a loud whooshing noise, followed by a deeper humming sound and even see steam rising from the outdoor unit. This cycle usually lasts only a few minutes before the system returns to normal heating mode.
However, because the system runs at a higher capacity in cold weather, it often exposes underlying mechanical wear that simply wasn't audible during the summer cooling season. To help you tell the difference, here is a breakdown of normal sounds versus warning signs:
• Low, steady compressor hum — Likely Cause: Variable-speed compressor ramping up in cold weather. — Action Required: None. This is normal operation.
• Temporary "swoosh" or whoosh — Likely Cause: System entering the defrost cycle to melt coil frost. — Action Required: None. Wait 5-15 minutes for the cycle to end.
• Metal-on-metal rattling — Likely Cause: Loose access panels, screws, or failing internal components. — Action Required: Requires professional inspection.
• Severe whole-unit shaking — Likely Cause: Unbalanced fan blade (often ice-related) or failing motor. — Action Required: Turn off unit and call a technician.
• Aggressive electrical buzzing — Likely Cause: Failing contactor or struggling capacitor. — Action Required: Requires professional electrical/HVAC diagnostic.
If you hear the warning signs listed above, relying on a proactive heat pump maintenance plan ensures a professional catches these issues before they escalate into costly mid-winter breakdowns.
One of the most common causes of severe vibration in our region is directly tied to the weather. Weave in Nova Scotia's wet, freezing maritime climate, and you have the perfect recipe for rapid ice accumulation. Our rapid temperature drops and high humidity levels increase the frequency of defrost cycles, but they also bring freezing rain and sleet that can coat the outdoor unit.
When freezing rain or heavy, wet snow enters the top of the outdoor chassis, it can freeze directly onto the fan blades. The physics of an unbalanced fan blade are unforgiving: even a small, uneven amount of ice throws the entire assembly out of balance. Because the fan spins at high speeds, this slight imbalance translates into violent shaking and loud, aggressive vibration noises that can echo throughout the house. If left running, this violent shaking can quickly destroy the motor bearings or cause the fan to strike the protective metal grate.
It is important to differentiate between an ice-induced imbalance and an internal motor bearing failure. Ice buildup is usually visible from the outside, whereas a failing motor will vibrate even when the blades are completely clear. Whether you have a central system or ductless heat pumps, observing the unit safely is your best first step during Nova Scotia late autumn and pre-winter cold snaps.
1. Perform a visual inspection: Look through the top grate of the outdoor unit with a flashlight. Check for uneven chunks of ice clinging to the fan blades or heavy buildup around the internal coils.
2. Check for clearance: Ensure there is no snow drift or debris blocking the sides or base of the unit, which can prevent proper drainage during the defrost cycle.
3. Never chip or hack at ice: Do not use screwdrivers, shovels, or hot water to remove ice from the fan or coils. You risk puncturing the fragile refrigerant lines or bending the aluminum fins, causing severe permanent damage.
4. Turn off the unit if shaking is severe: If the unit is visibly rocking or shaking violently, turn it off at the thermostat to prevent mechanical damage and call for professional service.
Not all vibrations are caused by external factors like ice. Purely mechanical wear and tear is a major culprit for loud noises, especially as systems age. Inside the outdoor unit, the fan motor relies on sealed bearings to spin smoothly. Over time, these motor bearings wear out. What starts as a faint, almost unnoticeable hum in the summer can escalate to a loud, vibrating grind in cold weather as the metal contracts and the motor works harder.
Furthermore, seasonal temperature fluctuations cause the metal chassis of the unit to expand and contract continually. Over several seasons, this movement can cause access panels, internal mounting screws, and rubber anti-vibration pads to loosen or degrade. When the variable-speed compressor ramps up to meet the heating demand of Daikin and Lennox cold-climate systems, these loose components rattle against each other, creating a harsh, metallic vibration.
The resonance effect: One thing we see often is that these vibrations don't just stay outside. The outdoor unit is connected to your indoor air handler via copper refrigerant lines. When the outdoor chassis vibrates heavily, that physical shaking travels down the copper lines, causing the walls or floors inside your home to hum or buzz loudly.
Getting a rapid, accurate diagnosis is critical before a minor vibration turns into a seized motor. One Nova Scotia homeowner reached out to us in the fall when their mini splits were vibrating and not heating properly, having been previously misdiagnosed by another company. Our technician diagnosed the actual mechanical issue within minutes, arranged for the necessary warranty parts, and resolved the problem entirely. Addressing common heat pump issues early prevents a domino effect of mechanical failures.
A common knowledge gap for many homeowners is the intersection of electrical and mechanical systems. Not all vibrations are mechanical in nature; electrical components can create loud, aggressive buzzing or vibrating sounds that easily mimic a failing motor or loose panel.
Inside the electrical panel of your outdoor unit sits a component called a contactor. The contactor acts as a heavy-duty switch that controls the flow of high-voltage electricity to the compressor and fan. It uses a magnetic coil to pull the switch closed. As the contactor ages, dirt, bugs, or pitting on the electrical contacts can prevent it from closing smoothly. When this happens, the magnetic coil struggles, creating a loud, aggressive electrical chattering or buzzing sound that vibrates the entire access panel.
Similarly, a failing run capacitor—which stores electricity to help start and run the motors—can cause serious acoustic symptoms. If the capacitor is weak, the compressor motor will struggle to start, drawing excessive amperage and producing a deep, vibrating hum before the system eventually trips an internal overload and shuts down.
The danger of ignoring electrical hums: Ignoring these electrical vibrations is incredibly risky. A failing contactor can weld itself shut, causing the system to run continuously until it burns out. A weak capacitor forces the compressor to work dangerously hard, which can lead to blown fuses, damaged wiring, or a completely destroyed compressor.
During a routine fall visit, another local customer had us out because their heat pump required a thorough inspection and deep cleaning. The service technician performed a comprehensive check, tested both the electrical and mechanical systems, and provided detailed care information. Catching a weak electrical component during routine maintenance on ducted heat pump systems is far better than dealing with a burned-out compressor in January. This is exactly why having Red Seal HVAC and electrical tradespeople who understand both the mechanical and electrical sides of the system is so vital.
When a homeowner hears a rattling panel or a buzzing component, the temptation to grab a screwdriver and fix it themselves is strong. However, while checking for visible ice or clearing away exterior debris is perfectly safe, opening the unit to tighten screws, inspect motors, or test electrical parts is incredibly dangerous.
The mechanical risks: Tightening random internal components without understanding the system layout can lead to disastrous results. The internal cabinet houses delicate aluminum fins and highly pressurized copper refrigerant coils. A slipped screwdriver or an over-tightened mounting bracket can easily puncture a coil, instantly venting all your refrigerant and turning a minor vibration fix into a major, expensive repair. Furthermore, misaligning fan assemblies by improperly tightening motor mounts will cause the fan to strike the housing the next time it turns on.
The electrical risks: The electrical dangers are even more severe. The outdoor unit runs on 240-volt high-voltage electricity. Even if you turn the power off at the main breaker, components like the capacitor hold lethal electrical charges for a significant amount of time. Touching the wrong terminal can result in a severe or fatal shock.
As a multi-trade contractor with 30+ years of experience, Presidential Ventilation Systems brings a unique diagnostic perspective to every service call. Our Red Seal HVAC and electrical tradespeople prioritize professional safety over DIY guesswork. Diagnosing the root cause of a vibration requires specialized multimeters, acoustic knowledge, and multi-trade expertise to ensure your system operates safely, efficiently, and quietly throughout its lifespan.
Yes, a low, steady hum or slight vibration is completely normal as the variable-speed compressor works harder in freezing temperatures. Because the system has to extract heat from very cold air, it runs at a higher capacity than it does in the summer. However, aggressive shaking, loud metal-on-metal rattling, or violent vibrations are not normal and indicate a mechanical or electrical problem.
Loud vibrations are typically caused by an unbalanced fan blade (often due to ice buildup), worn motor bearings, loose internal access panels, or failing electrical contactors. As components age and experience seasonal temperature fluctuations, anti-vibration pads can degrade, causing the entire metal chassis to rattle. A professional diagnostic is required to pinpoint the exact source of the noise.
Never attempt to stop internal vibrations yourself by opening the cabinet or tightening internal screws. You can safely clear away any external snow, ice, or debris from the outside of the unit to ensure proper airflow. For any internal mechanical or electrical faults, rely on a licensed technician to diagnose and repair the system safely.
A failing compressor often produces a loud, metal-on-metal grinding noise, a high-pitched screech, or a hard clunking sound when starting up or shutting down. You might also hear a deep, struggling hum if the compressor is trying to start but is being held back by a weak electrical capacitor. If you hear these sounds, turn the unit off to prevent further damage.
Yes, absolutely. Uneven ice accumulation on the fan blades throws the entire fan assembly out of balance, leading to severe shaking that mimics a failing motor. This is especially common in maritime climates where freezing rain and high humidity frequently coat the outdoor unit before or during a cold snap.
Call a professional if the vibration is new, excessively loud, sounds like metal grinding, or is accompanied by a loss of heating performance inside the home. It is always better to have a strange noise investigated early rather than waiting for the system to completely break down during a winter freeze.
Knowing the difference between a normal operational hum and a dangerous mechanical rattle saves homeowners from stressful, freezing winter breakdowns. While a steady hum simply means your system is working hard to keep you warm, severe shaking, grinding, or buzzing requires immediate professional attention. Identifying the source of vibration noises in your heat pump before winter ensures your equipment is ready to handle whatever the maritime climate throws at it.
Don't wait until the first major snowstorm to find out if that rattling noise is a failing motor bearing or a weak capacitor. Enjoy the peace of having a quiet, reliable system when the deep freeze hits. If you are concerned about unusual noises coming from your outdoor unit during Nova Scotia late autumn and pre-winter cold snaps, reach out to Presidential Ventilation Systems to schedule a professional diagnostic inspection or maintenance visit with our local experts.