


Furnace replacement can seem like a daunting task, but it doesn’t have to significantly disrupt your daily life. Proper planning and coordination are key to ensuring that the process is completed smoothly and efficiently. Understanding the necessary steps can help you minimize downtime and maintain comfort in your home throughout the replacement period.
Getting ready for a furnace replacement involves several critical steps to ensure the process runs smoothly and with minimal disruption to your daily life. Initially, it’s important to clear the workspace where the furnace will be installed. This involves moving any furniture, rugs, or items that could obstruct easy access to the site. Adequate space allows technicians to maneuver safely and efficiently, reducing the chances of accidental damage.
Next, safeguard your belongings from dust and debris that may arise during installation. Cover furniture and household items with plastic sheeting or drop cloths to prevent them from getting dirty. Additionally, consider sealing off nearby rooms to contain any mess within the work area.
Plan for the noise and activity that installation might entail. It’s wise to inform family members, particularly those working from home or studying, about the schedule, so they can plan their activities accordingly. Be prepared for potential disruptions, including noise from tools and movement around the house.
Finally, consider having a temporary heating solution in place. Depending on the time of year, the home may get cooler during the installation process. Tactics such as portable heaters or extra blankets can ensure comfort remains a priority.
Coordinating with our technicians is vital for a seamless furnace replacement experience. The process begins with establishing a mutually agreeable schedule that accommodates your timetable while allocating sufficient time for all installation stages. This structured approach minimizes disruption and ensures that the work is completed swiftly and accurately.
Working with our technicians offers numerous advantages. They bring expertise in assessing the unique needs of your home, recommending the most suitable furnace models, and mapping out an efficient installation process tailored to your requirements. Effective communication with our professionals helps in anticipating potential challenges and troubleshooting them before complications arise.
During the planning stage, discuss any special considerations regarding the installation, such as handling specific types of flooring or navigating tight spaces. A detailed understanding of your home’s layout enables our technicians to prepare accurate strategies that enhance productivity.
Finally, maintaining flexibility is crucial. While the schedule serves as a guideline, unforeseen circumstances can occasionally cause adjustments. Staying adaptable ensures that minor changes do not derail the overall process, allowing for a timely and well-executed installation. Entrusting the planning phase to our professionals guarantees a stress-free and effective furnace replacement experience.
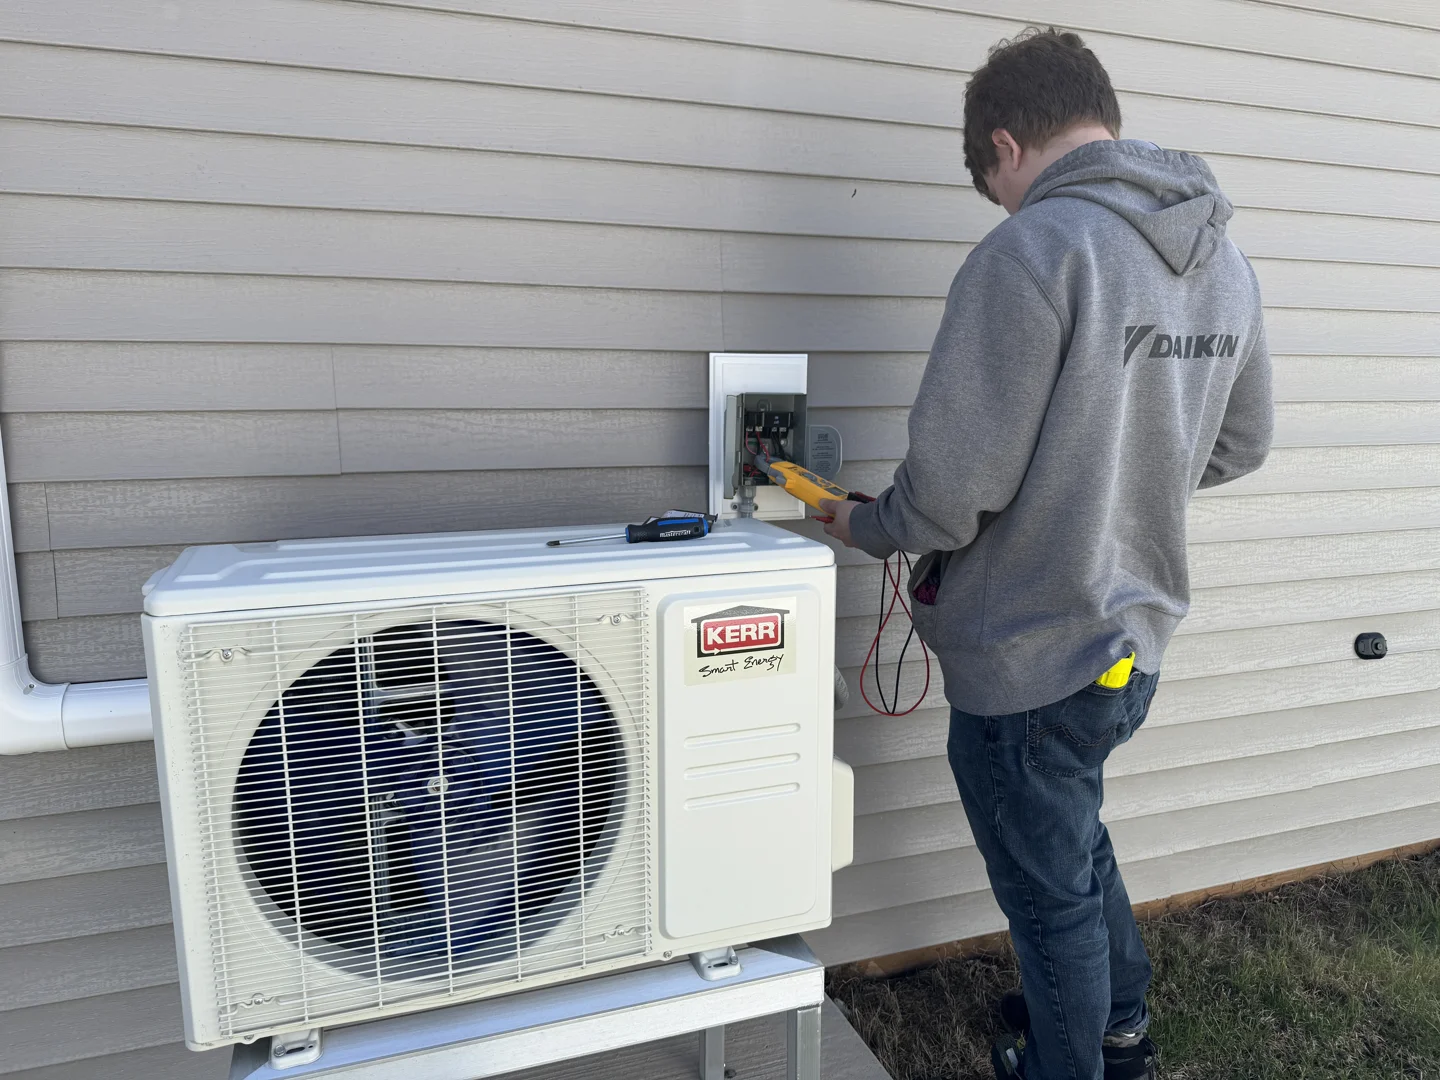
The furnace installation process involves several crucial stages that ensure the new system operates efficiently and safely. Initially, our technicians handle the removal of the old furnace. This step is performed carefully to ensure there’s no damage to the surrounding areas. Once the old unit is removed, our professionals assess the installation site to confirm that everything is ready for the new system.
The next phase involves the preparation for the new furnace installation. This includes verifying the condition of the ductwork, ensuring proper ventilation, and confirming that electrical and gas connections are up to date and safe. Adjustments might be necessary to accommodate the new furnace’s specifications, and our technicians are adept at making these modifications swiftly and effectively.
After preparation comes the actual installation of the new furnace. This step is managed with precision to ensure that the unit fits properly and all components are securely connected. Our experts follow industry standards and protocols to guarantee the reliability and safety of the new system.
Finally, comprehensive testing is conducted to ensure the furnace operates as expected. This includes checking for leaks, verifying that the thermostat interacts correctly with the system, and running the furnace for a short period to monitor its performance. Our technicians make any necessary adjustments to optimize functionality before declaring the job complete.
Following the installation of a new furnace, certain steps can help maintain its efficiency and ensure your comfort. Begin by adjusting thermostats to suit individual room needs. This not only maximizes comfort but also promotes energy savings, as the system doesn’t work harder than necessary.
Scheduling follow-up maintenance is another key component of post-installation care. Regular check-ups by our professionals help keep the furnace in top condition, identify potential issues early, and extend the system’s lifespan. This maintenance can also provide peace of mind by ensuring that your new investment continues operating at peak efficiency.
Registering your furnace's warranty is equally important. Warranties can offer protection against possible future repairs or parts replacement, making sure that you enjoy a worry-free tenure with your heating system. Keep documentation organized and easily accessible to make claiming benefits hassle-free.
Additionally, it's beneficial to familiarize yourself with the basic operations and settings of your new system. Understanding these elements empowers you to make minor adjustments when necessary and recognize when to seek professional assistance.
Replacing a furnace is a significant undertaking that requires meticulous planning and execution. By preparing your home, coordinating with our technicians, understanding the installation process, and following strategic post-installation practices, you can ensure that your new furnace provides optimal comfort and efficiency for years to come.
Is it time for a furnace replacement to improve your home's comfort and efficiency? Trust the experts at Presidential Ventilation Systems Ltd to guide you through every step of the process. Contact us today to schedule an appointment and take the first step towards a more comfortable home environment!
Proper home ventilation is essential for maintaining a healthy, comfortable living environment. When upgrading your home's air handling systems, ensuring professional installation and precise duct design is critical for system efficiency and longevity.
Here is why professional ventilation design and installation matters:
Whether you are looking to install a new HRV or optimize your existing ductwork, working with experienced ventilation specialists ensures your system is tailored to your home's unique layout.

When you decide to transition your home to a highly efficient ventilation and air handling system, the technical details can feel overwhelming. You are not just buying a piece of equipment; you are integrating a sophisticated air distribution network into your home's existing infrastructure. This is where professional duct design and air balancing become incredibly important.
A high-performing ventilation system relies on a continuous, balanced supply of fresh air to maintain indoor air quality. If the ductwork is subpar, the system will not perform efficiently, and in the worst-case scenario, it could lead to stale air pockets or moisture buildup. To ensure your system works flawlessly from day one, you need a professional who understands local building codes and airflow dynamics.
For detailed regional guides on what a proper installation looks like, you can check out our home ventilation and climate systems guide or our central climate control guide. These resources highlight how professional installation protects your investment from the unpredictable maritime weather.
Proper ventilation is the standard for trade excellence. When a system is designed by experienced professionals, it means they have successfully calculated the exact airflow requirements for your home's layout.
For homeowners, this expertise is your guarantee that the system working in your home is qualified to handle complex air distribution tasks. Whether you are seeking ventilation and climate control systems or managing system modernization services, the quality of the duct connections determines how safely and effectively your new system will operate.
An HRV or ERV is a sophisticated machine. Unlike a simple exhaust fan, it uses variable-speed motors, advanced core heat exchangers, and sensitive sensors to optimize energy use.
If an amateur handles the installation, they might use incorrect duct sizing or fail to balance the airflow properly. This can cause pressure imbalances that stress the fan motors, leading to premature failure. Professional ventilation specialists understand how to calculate the exact static pressure required to protect your system's sensitive components.
Additionally, optimizing your setup with a certified professional ensures you can confidently access ventilation efficiency resources and discover how proper planning is key to making home upgrades more accessible.
National building codes have very strict rules regarding how ventilation systems must be integrated into your home. These standards are designed to keep homes safe from moisture damage, mold growth, and poor indoor air quality.
When a non-certified individual attempts to install or modify ventilation ductwork, they often overlook critical airflow requirements. They might connect the unit to undersized ducts, causing excessive noise and restricted airflow. Or they might fail to install proper exhaust hoods, which can lead to moisture being recirculated back into the home.
To handle the demands of a modern ventilation system, some homes require system capacity upgrades or general infrastructure improvements to support the new equipment safely. A professional will perform a precise static pressure calculation of your home before any work begins to determine if your existing ductwork can handle the new system.
One of the most common mistakes made by uncertified installers is matching the wrong duct size with the wrong fan capacity.
Professional ventilation technicians are experts in duct design and air balancing. They ensure that every run of ductwork, every register, and every grille is sized perfectly to match the manufacturer's specifications and local building codes. Our team utilizes custom fabrication capabilities to design bespoke ductwork that fits your home's unique layout perfectly.
Most major ventilation manufacturers have strict warranty policies. If a component like an HRV motor fails within the warranty period, the manufacturer will ask for proof of professional installation before shipping a replacement part.
If they discover that the installation was performed by someone without valid professional credentials, they may void your warranty. You could be left paying out of pocket for a replacement part that should have been covered. Hiring a professional is the only way to keep your home, your family, and your investment fully protected.
Before you let anyone modify your home's ductwork or install a new ventilation system, you have every right to verify their credentials. A qualified contractor will always be happy to provide proof of licensing, liability insurance, and professional training in residential ventilation design.
To learn more about professional standards, explore our commercial ventilation services page or our dedicated portal for ventilation services in Halifax.
We are proud to serve communities across the region with top-tier ventilation and air handling services. If you are looking for certified professionals near you, we provide localized support in several key areas:
Our local teams ensure that every installation complies perfectly with the specific municipal building codes and regional climate demands of your community.
To help you make an informed decision for your home, we have compiled a comparison of what you can expect when hiring a professional ventilation specialist versus an uncertified alternative.
| Feature | Professional Ventilation Specialist | Uncertified / DIY Alternative |
|---|---|---|
| Code Compliance | Guaranteed compliance with local building codes | High risk of code violations and poor airflow |
| Manufacturer Warranty | Fully protected; documentation provided | Often voided due to lack of professional installation |
| Home Comfort | Balanced airflow and optimal humidity control | Risk of draftiness, stale air, and moisture issues |
| System Performance | Optimized static pressure and energy recovery | Risk of noisy operation and premature motor wear |
Standard ventilation (like bathroom exhaust fans) only removes air, creating negative pressure. Balanced ventilation (using an HRV or ERV) simultaneously exhausts stale air and introduces fresh air in equal amounts, maintaining neutral pressure and optimizing indoor air quality.
While some systems can integrate with existing forced-air heating ducts, dedicated ductwork is highly recommended for maximum efficiency. This ensures fresh air is delivered directly to living spaces and stale air is drawn directly from high-moisture areas like kitchens and bathrooms.
While some DIY enthusiasts attempt this, professional installation is highly recommended. Proper installation requires precise duct design, air balancing equipment, and knowledge of local building codes to ensure the system operates safely and efficiently.
Investing in a high-efficiency ventilation system is a fantastic way to improve your home's indoor air quality and reduce your energy footprint. However, the system is only as reliable as the ductwork and design supporting it.
By ensuring your system is designed and installed by a professional ventilation specialist, you gain peace of mind knowing that the work meets the highest safety standards, complies fully with local building codes, and keeps your manufacturer warranty completely intact.
At Presidential Ventilation Systems Ltd., our experienced team is dedicated to providing safe, reliable, and professional installations. Ready to ensure your home's air quality is optimized? Contact us today to learn more about our professional ventilation services and schedule a consultation with one of our experts.
What does an electrical safety inspection include in nova scotia? Here's a quick breakdown before we dive deeper:
| Inspection Phase | What Gets Checked |
|---|---|
| Service Entrance | Meterbase height (1.4m–1.8m), grounding electrode, panelboard clearance, point of attachment |
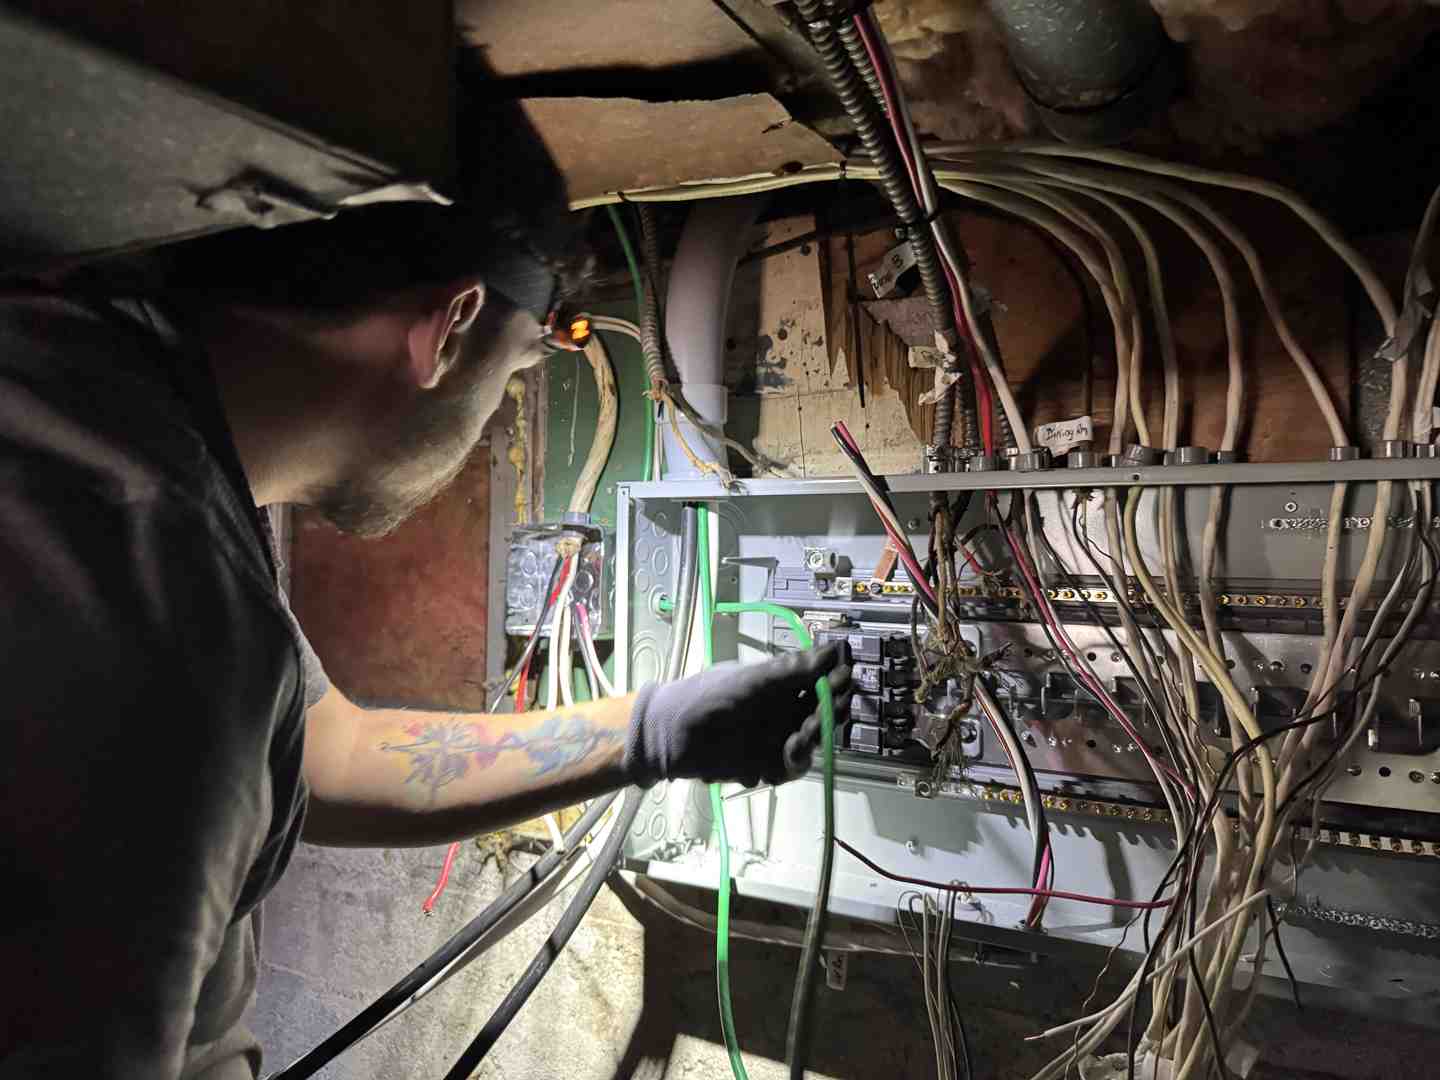
| Rough-In | Branch circuit wiring, wire support and stapling, junction boxes, conduit routing, GFCI/AFCI placement, smoke and CO alarm wiring |
| Final Inspection | Device installation, panel labeling, GFCI and AFCI function, smoke alarms, heating systems, megger test readings |
These three phases are conducted by a certified electrical inspector before wiring is concealed and again once the installation is complete. All work must conform to the Canadian Electrical Code (CEC) and Nova Scotia's Electrical Code Regulations under the Electrical Installation and Inspection Act.
Electrical problems are more common — and more dangerous — than most people realize. Roughly one in five property fires across Canada traces back to an electrical cause. In Nova Scotia, the combination of aging housing stock, coastal humidity, and salt air creates conditions where electrical systems can degrade faster than in other parts of the country.
Getting a proper electrical safety inspection isn't just about ticking a regulatory box. It's about knowing your home or business is genuinely safe — and that the wiring behind your walls won't become a liability.

Electrical safety isn't something to take lightly. Unseen wiring degradation, overloaded circuits, and poor grounding can lead to devastating consequences. When we talk about property protection and fire prevention, having a robust electrical infrastructure is your first line of defense.
Across Canada, structural fires caused by electrical failures disrupt thousands of lives every year. Beyond the immediate threat of fire, hidden faults can cause intermittent power outages, ruin expensive appliances, and create shocking hazards for your family.
This is where the Canadian Electrical Code (CEC) comes in. Adopted as the legal benchmark across Canada, the CEC is updated regularly to address modern electrical loads and safety technologies. In our province, these rules are enforced strictly through the Nova Scotia Electrical Code Regulations. Adhering to these standards ensures that your home can safely handle the demands of 2026 technology—from charging electric vehicles to running modern ventilation systems.
If you are planning renovations, buying an older home, or simply want peace of mind, scheduling professional Electrical Safety Services Canada is the most reliable way to identify hidden hazards before they turn into emergencies.
When you hire a professional or prepare for a utility inspector to visit, it helps to understand what they are actually evaluating. An inspection is not a single, rushed walkthrough; it is a meticulous, multi-phase process designed to verify compliance at every step of a project.

So, what does an electrical safety inspection include in nova scotia? It is structured around three primary phases:
To ensure your wiring project is set up for success from the very beginning, refer to our comprehensive Electrical Wiring Guide 2025 for a deeper look at proper wiring techniques.
The service entrance is the gateway of electricity into your home. Because it handles high-voltage utility power, inspectors pay incredibly close attention to its structural and mechanical integrity.
During a service entrance walkthrough, inspectors check the following specific criteria:
If your current panel is outdated, crowded, or still uses fuses, you may need to consider an Electrical Service Upgrade to meet these modern safety benchmarks.
The rough-in phase is arguably the most critical step for catching wiring errors. Once the drywall goes up, correcting an error becomes significantly more difficult and destructive.
To pass a rough-in inspection, the installation must show excellent workmanship and strict compliance with the following:
For homeowners dealing with older properties, this phase is also when legacy wiring issues are evaluated. If your home has outdated wiring, you can read about safe modernization strategies in our guide on Aluminum Wiring Remediation.
Once the walls are closed and painted, it is time for the final inspection. This phase verifies that your home's electrical system is completely safe for daily use.
An inspector's final checklist includes:
If you have an older, Max-filled panel that can no longer safely support these modern safety breakers, you can explore options for upgrading by reading our guide on Breaker Panel Upgrades to understand how this investment protects your property.
Living on the East Coast is beautiful, but our climate presents unique challenges for electrical systems. Our homes are regularly exposed to coastal salt air, high humidity, freezing rain, and severe windstorms.
Salt air is highly corrosive. It accelerates the oxidation of copper and aluminum, which can lead to loose connections, high resistance, and eventual electrical arcing. High humidity in coastal basements can also lead to moisture buildup inside electrical enclosures.
To combat this, the Department of Labour, Skills and Immigration, along with Nova Scotia Power (NSPI), issues specific electrical bulletins. These bulletins adapt the Canadian Electrical Code to address local environmental factors, such as requiring weatherproof covers on all exterior receptacles and specifying corrosion-resistant materials for outdoor equipment.
If you live in coastal communities, working with local experts who understand these regional challenges is essential. For reliable support tailored to our local environment, check out our dedicated services for Electrical Services Halifax NS and Electrical Services Dartmouth NS.
A quick note on compliance: Safety regulations exist for a reason. In April 2024, a major retail location in Halifax was fined $125,000 for safety violations following a tragic accident in a poorly lit area. This serves as a reminder to businesses and homeowners alike that maintaining safe, code-compliant electrical and lighting systems is a legal and moral obligation.
In Nova Scotia, only authorized inspection departments—such as those operated by Nova Scotia Power or municipal inspection offices—have the authority to perform official electrical inspections. Furthermore, only a certified construction electrician holding a valid Nova Scotia trade certificate can apply for and obtain an electrical wiring permit.
However, the province does allow minor exemptions where a permit and formal inspection are not required. These exemptions include:
For anything beyond these minor repairs—such as adding new circuits, upgrading panels, or wiring an addition—a permit is legally required.
If you are planning an upgrade in the surrounding Halifax areas, our professional teams are ready to help. You can easily connect with our licensed technicians through our local pages for Electrical Services Bedford NS and Electrical Services Lower Sackville NS.
As a general rule of thumb, if your home’s electrical system was last inspected more than 40 years ago, an inspection is overdue. If the wiring is between 10 and 40 years old, an inspection is highly advisable, especially if you have added modern loads (like hot tubs, workshops, or heavy appliances). For homes under 10 years old, an inspection is usually unnecessary unless you notice warning signs such as flickering lights, frequently tripping breakers, or warm outlet covers.
If an inspector finds a deficiency, they will issue a correction notice detailing the violations. The electrical contractor must resolve these issues within a specified timeframe (often 10 days for minor issues, or immediately if there is an imminent shock or fire hazard). Once corrected, a re-inspection is scheduled to verify compliance before the system is officially passed and energized.
In Nova Scotia, homeowners are not permitted to pull their own electrical wiring permits for major installations. Because of the high risks associated with electrical fire and shock, provincial regulations require that permitted electrical work be performed by a certified construction electrician. This ensures that the work complies strictly with the Canadian Electrical Code and passes municipal safety standards.
Understanding what does an electrical safety inspection include in nova scotia is key to keeping your property safe, compliant, and structurally sound. From the heights of your outdoor meterbase to the arc-fault breakers protecting your bedrooms, every step of the inspection process is designed to prevent fires and protect lives.
At Presidential Ventilation Systems, we bring over 30 years of local experience to every project. Whether you are upgrading your electrical panel, modernizing older wiring, or ensuring your home ventilation systems are safely powered, our team of licensed professionals is here to guide you through a stress-free permitting and inspection process.
For reliable, professional electrical support in your area, contact us today through our service page for Electrical Services Mount Uniacke NS to get started on your next home improvement project.