


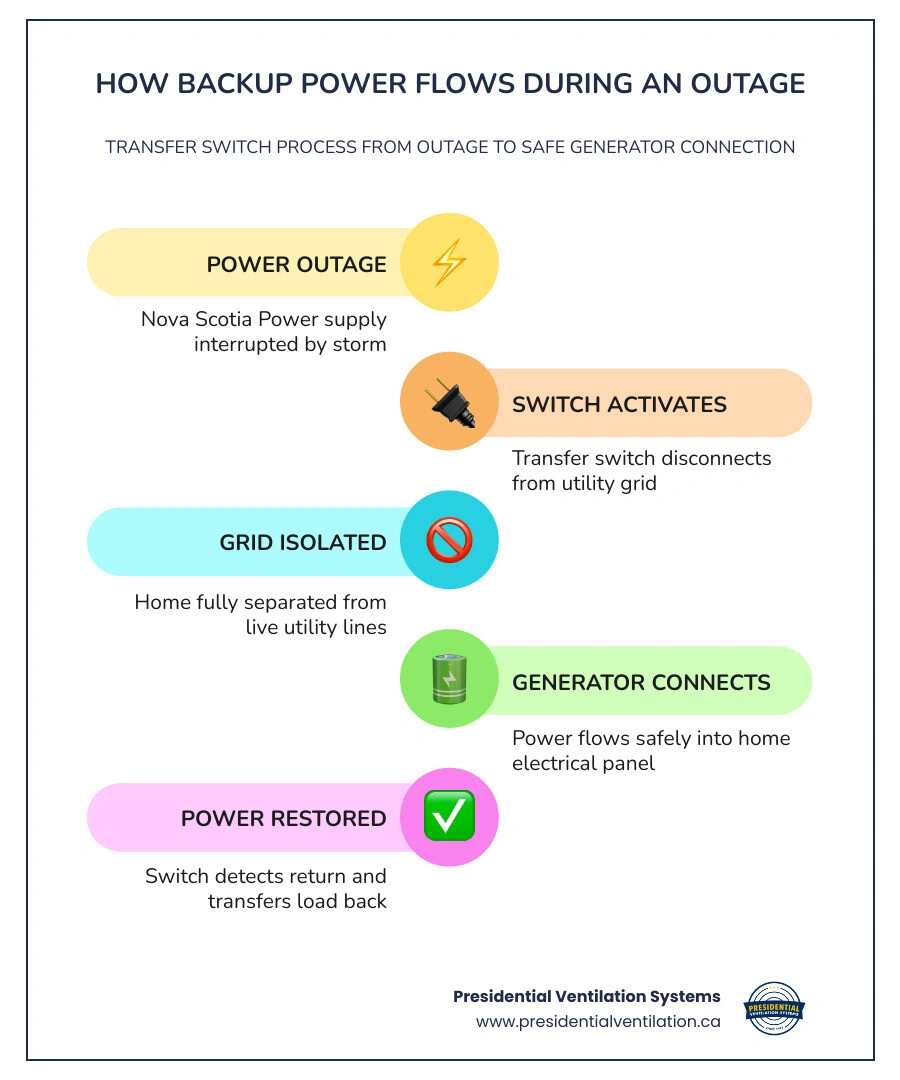
How backup generator transfer switch installation works in a nova scotia home comes down to one core idea: a transfer switch safely disconnects your home from the utility grid before connecting it to your generator, so power flows only in one direction at a time.
Here is a quick overview of how it works:
1. Power outage occurs - Nova Scotia Power supply is interrupted
2. Transfer switch activates - Either manually by you, or automatically by the system
3. Grid connection is broken - Your home is fully isolated from utility lines
4. Generator connects - Power flows from your generator into your home's panel
5. Utility power returns - The switch detects restoration and transfers load back to the grid
6. Generator shuts down - Safely and automatically (on standby systems) or manually (on portable setups)
This process is what separates a safe backup power setup from a dangerous one. Without a proper transfer switch, connecting a generator to your home can backfeed live electricity onto utility lines — putting repair crews and neighbours at serious risk.
Nova Scotia homeowners know all too well how quickly a storm can knock out power for hours or even days. When that happens, having the right generator and transfer switch setup means the difference between a minor inconvenience and a serious problem — especially if you rely on a sump pump, well pump, medical equipment, or heating system to keep your home safe.
When preparing your home in Halifax, Dartmouth, or Bedford for storm season, you will quickly find that backup power systems generally fall into two categories: portable generators and standby generators. However, a generator on its own is only half the equation. To safely deliver that electricity to your home’s lighting, appliances, and heating systems, you need a transfer switch.
A transfer switch acts as a traffic controller for electricity. It ensures that your home cannot be connected to your generator and Nova Scotia Power's grid at the same time.
• Portable Generators: These are mobile units typically powered by gasoline or propane. They require you to wheel them outside, start them up, and manually connect them to your home via a heavy-duty cord.
• Standby Generators: These are permanent fixtures installed on a concrete pad outside your home. They are permanently wired into your electrical system and run on fuel lines (like propane).
• Manual Transfer Switches: Used primarily with portable generators. You must physically flip a switch to cut off utility power and open the line for generator power.
• Automatic Transfer Switches (ATS): Used with standby systems. They monitor utility power and automatically switch your home over to generator power within seconds of an outage.
Deciding between a portable and standby setup depends on your household's power needs, your budget, and how much hands-on work you want to do during a storm.
Portable generators are popular because they are highly flexible. However, they run on gasoline or propane tanks, which means you must store fuel safely and brace the elements to refill them mid-storm. They also have a lower power capacity, meaning you will have to prioritize which appliances to run. For instance, you might run your refrigerator and lights, but you will have to leave larger appliances off.
Standby generators offer hands-free convenience. Because they connect directly to large propane tanks, they can run continuously for days without refueling. They also provide much higher power capacities, which is crucial if you want to maintain your normal daily routine during an extended outage. When considering your home's heating needs during a freezing winter storm, it is helpful to understand how different heating systems behave when the power goes out. You can learn more about this in our guide on Do I Need a Backup Source of Heat.
For homeowners using a portable generator, a manual transfer switch is the standard, code-compliant way to power your home’s existing electrical circuits.
The installation involves mounting a dedicated generator panel (or subpanel) next to your main breaker panel. Our team installs a weatherproof outdoor inlet receptacle on the exterior of your home, usually in a convenient spot near where you plan to run your portable generator. This inlet is hardwired directly to the manual transfer switch inside.
When the power goes out, you roll your generator outside (at least 10 feet away from windows and doors to prevent carbon monoxide poisoning), plug it into the outdoor inlet using a heavy-duty, four-wire utility cord, and start the engine. Once the generator is running smoothly, you go inside to your electrical panel and flip the manual transfer switch. This action mechanically disconnects your main panel from the utility grid and connects it to the generator panel, allowing you to safely power up to 16 pre-selected critical circuits. For a deeper dive into residential electrical safety and standards, check out our Electrical Wiring Guide 2025.
If you want the convenience of powering any circuit in your home without installing a bulky subpanel next to your main breaker, the GenerLink transfer switch is an incredibly popular alternative in Nova Scotia.
The GenerLink is a collar-like device that is installed directly between your home's electric meter and the meter base on the outside of your house. It acts as an automatic-sensing manual transfer switch. Because it sits on the utility side of your electrical system, it allows your portable generator to feed power directly into your main breaker panel.
When using a GenerLink, there are no interior wiring changes required. You simply plug your portable generator directly into the GenerLink device on your exterior wall. When the generator is running, you can walk to your main breaker panel and choose which circuits to turn on, up to the maximum wattage capacity of your generator.
While both systems allow you to safely run a portable generator, they operate differently:
• No Interior Subpanels: Traditional manual transfer switches require us to install a secondary breaker panel inside your home and physically reroute your essential circuits to it. GenerLink completely eliminates the need for an interior subpanel, keeping your basement or utility room uncluttered.
• Circuit Flexibility: With a traditional transfer panel, you are locked into the specific circuits (usually 6 to 16) that the electrician wired into the subpanel during installation. With GenerLink, you can power any circuit in your home by simply turning breakers on and off at your main panel, provided you do not exceed your generator's total capacity.
• Service Limits: GenerLink is designed for standard residential electrical systems and is limited to homes with a maximum electrical service of 200 amps. If your home has a larger service, or if your existing panel is outdated, you might require an Electrical Service Upgrade or a Breaker Panel Upgrade consultation before proceeding with any generator connection.
For ultimate peace of mind, a whole-home standby generator paired with an Automatic Transfer Switch (ATS) is the gold standard. This system monitors your utility power 24/7. Whether you are sleeping, at work in Burnside, or vacationing away from home, the system handles everything without any human intervention.
• Generator Type — Manual Transfer Switch / Panel: Portable / Inverter — GenerLink Meter Switch: Portable / Inverter — Standby with Automatic Transfer Switch (ATS): Standby (Permanent)
• Activation — Manual Transfer Switch / Panel: Manual physical switch — GenerLink Meter Switch: Manual plug-in / Auto-sensing — Standby with Automatic Transfer Switch (ATS): Fully Automatic
• Installation Location — Manual Transfer Switch / Panel: Next to main breaker panel — GenerLink Meter Switch: Exterior utility meter base — Standby with Automatic Transfer Switch (ATS): Next to main panel / Service entrance
• Circuit Control — Manual Transfer Switch / Panel: Hardwired fixed circuits — GenerLink Meter Switch: Any circuit (manually managed) — Standby with Automatic Transfer Switch (ATS): Whole-home or managed essential loads
• Refueling Required — Manual Transfer Switch / Panel: Yes (Gasoline/Propane tanks) — GenerLink Meter Switch: Yes (Gasoline/Propane tanks) — Standby with Automatic Transfer Switch (ATS): No (Connected to continuous propane)
The beauty of how backup generator transfer switch installation works in a nova scotia home with an ATS is its seamless, step-by-step sequence of operation during a storm:
1. Utility Power Loss: The ATS constantly monitors the voltage coming from Nova Scotia Power. The moment the voltage drops below a safe threshold, the ATS notes the interruption.
2. Generator Startup Delay: To prevent the generator from starting up during momentary power flickers, the ATS waits a few seconds. If the power remains out, it sends a signal to start the standby generator's engine.
3. Warm-Up and Load Transfer: Once the generator engine starts, the ATS allows it to run for a short warm-up period to stabilize voltage. It then automatically flips its internal switch, disconnecting your home from the utility grid and connecting it to the generator. This entire process usually takes less than 10 seconds.
4. Utility Restoration Sensing: While your home is running comfortably on generator power, the ATS continues to monitor the utility lines. When Nova Scotia Power restores grid electricity, the ATS monitors it for a continuous, stable period (usually a few minutes) to ensure the grid is reliable.
5. Safe Return and Cool-Down: The ATS safely transfers your home's electrical load back to the utility grid. It then allows the generator to run for a brief cool-down period before shutting it down, resetting the system for the next outage.
In Nova Scotia, electrical safety is strictly regulated to protect both homeowners and utility workers. Under the Nova Scotia Electrical Installation and Inspection Act, installing any generator transfer switch is considered a major electrical modification.
This means you cannot simply buy a transfer switch online and wire it in yourself. The installation must be performed by a licensed electrical contractor who will obtain a mandatory provincial wiring permit. Once the work is completed, it must pass a formal inspection by an authorized electrical inspector to ensure it complies fully with the Canadian Electrical Code (CEC).
Furthermore, because devices like the GenerLink attach directly to the utility meter, the installation requires strict coordination with Nova Scotia Power. Only authorized personnel are permitted to break the utility seal and pull the meter. If you are looking for trusted professionals to handle your home's electrical and ventilation systems safely, working with a Licensed Electrician in Truro NS or our certified teams in the Halifax Regional Municipality ensures everything is fully code-compliant.
One of the most complex technical aspects of generator installation is proper grounding and bonding. The Canadian Electrical Code has strict rules to prevent electrical shocks and ensure that ground-fault protection devices function correctly.
The grounding method depends entirely on whether your generator has a bonded neutral or a floating neutral:
• Bonded Neutral Generators: In these units, the neutral conductor is connected directly to the generator's metal frame. If you connect a bonded neutral generator to your home, you must use a three-pole transfer switch that switches the neutral conductor along with the hot lines. This ensures there is only one point of grounding at any given time.
• Floating Neutral Generators: In these units, the neutral is isolated from the frame. For these systems, a two-pole transfer switch is used, keeping the neutral solidly connected to your home’s main service ground.
Our experienced electricians carefully analyze your generator's internal wiring schematics during installation to ensure the transfer switch is grounded perfectly, eliminating any risk of stray currents or safety hazards.
When we install a backup generator transfer switch in your home, we follow a meticulous process to ensure safety, reliability, and neatness.
Here is what you can expect during a typical installation:
Our journey begins with a thorough evaluation of your home’s electrical panel, your backup power goals, and your generator's specifications. We calculate the electrical loads of the appliances you want to run to ensure your generator and transfer switch are perfectly sized.
We securely mount the transfer switch enclosure. For a traditional manual system, this is located right next to your main electrical panel. For an automatic standby system, the ATS is mounted either indoors near the panel or outdoors near the utility meter, depending on your home's layout.
Our electricians carefully route the conductors between your main breaker panel and the transfer switch. We install the outdoor power inlet box on your home's exterior wall, running heavy-duty, outdoor-rated wiring through protective conduit back to the switch.
Once all connections are secure, we perform comprehensive testing. We simulate a utility power outage to verify that the transfer switch operates flawlessly, checking voltage levels, phase rotation, and grounding pathways.
If you choose a GenerLink or a system that requires service interruption, utility coordination is a critical phase of the installation day.
We coordinate directly with Nova Scotia Power to schedule a brief power disconnection. On the day of installation, the utility team or our authorized technician will disconnect the power at the meter. For a GenerLink installation, the device is mounted directly onto the meter base, and the utility meter is plugged into the front of the GenerLink unit.
This physical installation usually takes under two hours. Once the device is securely in place, the power is restored, and we walk you through a complete system demonstration. We show you exactly how to connect your generator cord, start the system safely, and manage your household electrical loads. Finally, we provide you with a recommended maintenance schedule, including exercising your generator regularly to keep the battery charged and the engine lubricated.
No. In Nova Scotia, installing a transfer switch requires a provincial wiring permit and must be performed by a licensed electrical contractor. Attempting a DIY installation is highly dangerous, carries severe risk of electrical shock or house fire, and can void your home insurance. Furthermore, utility-interactive devices like the GenerLink cannot be installed without breaking the utility seal, which is illegal for unlicensed individuals.
A standard GenerLink installation is highly efficient and typically takes under two hours, including the coordinated utility power disconnect and reconnect. A traditional manual transfer panel installation usually takes between three to six hours of electrical work inside your home. A whole-home standby generator with an automatic transfer switch is a larger project, typically requiring one to two days to complete the electrical wiring, gas line connections, and concrete pad placement.
With an automatic standby system, the ATS detects that utility power is back and stable. It automatically switches your home's electrical load back to the grid and initiates a cool-down cycle for the generator before shutting it off. If you are using a manual transfer switch or a GenerLink, you will see your neighbours' lights turn back on, or you can check the indicator lights on the GenerLink unit. You will then manually flip the transfer switch back to "Utility" power, turn off your portable generator, unplug the utility cord, and store it safely away for the next storm.
Preparing your home for Nova Scotia’s unpredictable weather is one of the smartest investments you can make. Whether you choose a highly flexible portable generator with a GenerLink switch or the seamless, hands-free comfort of a standby generator with an automatic transfer switch, professional installation is key to keeping your family safe and your home protected.
At Presidential Ventilation, we bring over 30 years of residential service experience to homeowners across Halifax, Dartmouth, Sackville, Bedford, and surrounding communities. Our certified electrical teams handle everything from permit acquisition and utility coordination to final testing and safety walkthroughs.
Don't wait until the next major storm leaves you in the dark. Secure your home backup power today by connecting with our expert team to plan your transfer switch installation!

How backup generator transfer switch installation works in a nova scotia home comes down to one core idea: a transfer switch safely disconnects your home from the utility grid before connecting it to your generator, so power flows only in one direction at a time.
Here is a quick overview of how it works:
1. Power outage occurs - Nova Scotia Power supply is interrupted
2. Transfer switch activates - Either manually by you, or automatically by the system
3. Grid connection is broken - Your home is fully isolated from utility lines
4. Generator connects - Power flows from your generator into your home's panel
5. Utility power returns - The switch detects restoration and transfers load back to the grid
6. Generator shuts down - Safely and automatically (on standby systems) or manually (on portable setups)
This process is what separates a safe backup power setup from a dangerous one. Without a proper transfer switch, connecting a generator to your home can backfeed live electricity onto utility lines — putting repair crews and neighbours at serious risk.
Nova Scotia homeowners know all too well how quickly a storm can knock out power for hours or even days. When that happens, having the right generator and transfer switch setup means the difference between a minor inconvenience and a serious problem — especially if you rely on a sump pump, well pump, medical equipment, or heating system to keep your home safe.
When preparing your home in Halifax, Dartmouth, or Bedford for storm season, you will quickly find that backup power systems generally fall into two categories: portable generators and standby generators. However, a generator on its own is only half the equation. To safely deliver that electricity to your home’s lighting, appliances, and heating systems, you need a transfer switch.
A transfer switch acts as a traffic controller for electricity. It ensures that your home cannot be connected to your generator and Nova Scotia Power's grid at the same time.
• Portable Generators: These are mobile units typically powered by gasoline or propane. They require you to wheel them outside, start them up, and manually connect them to your home via a heavy-duty cord.
• Standby Generators: These are permanent fixtures installed on a concrete pad outside your home. They are permanently wired into your electrical system and run on fuel lines (like propane).
• Manual Transfer Switches: Used primarily with portable generators. You must physically flip a switch to cut off utility power and open the line for generator power.
• Automatic Transfer Switches (ATS): Used with standby systems. They monitor utility power and automatically switch your home over to generator power within seconds of an outage.
Deciding between a portable and standby setup depends on your household's power needs, your budget, and how much hands-on work you want to do during a storm.
Portable generators are popular because they are highly flexible. However, they run on gasoline or propane tanks, which means you must store fuel safely and brace the elements to refill them mid-storm. They also have a lower power capacity, meaning you will have to prioritize which appliances to run. For instance, you might run your refrigerator and lights, but you will have to leave larger appliances off.
Standby generators offer hands-free convenience. Because they connect directly to large propane tanks, they can run continuously for days without refueling. They also provide much higher power capacities, which is crucial if you want to maintain your normal daily routine during an extended outage. When considering your home's heating needs during a freezing winter storm, it is helpful to understand how different heating systems behave when the power goes out. You can learn more about this in our guide on Do I Need a Backup Source of Heat.
For homeowners using a portable generator, a manual transfer switch is the standard, code-compliant way to power your home’s existing electrical circuits.
The installation involves mounting a dedicated generator panel (or subpanel) next to your main breaker panel. Our team installs a weatherproof outdoor inlet receptacle on the exterior of your home, usually in a convenient spot near where you plan to run your portable generator. This inlet is hardwired directly to the manual transfer switch inside.
When the power goes out, you roll your generator outside (at least 10 feet away from windows and doors to prevent carbon monoxide poisoning), plug it into the outdoor inlet using a heavy-duty, four-wire utility cord, and start the engine. Once the generator is running smoothly, you go inside to your electrical panel and flip the manual transfer switch. This action mechanically disconnects your main panel from the utility grid and connects it to the generator panel, allowing you to safely power up to 16 pre-selected critical circuits. For a deeper dive into residential electrical safety and standards, check out our Electrical Wiring Guide 2025.
If you want the convenience of powering any circuit in your home without installing a bulky subpanel next to your main breaker, the GenerLink transfer switch is an incredibly popular alternative in Nova Scotia.
The GenerLink is a collar-like device that is installed directly between your home's electric meter and the meter base on the outside of your house. It acts as an automatic-sensing manual transfer switch. Because it sits on the utility side of your electrical system, it allows your portable generator to feed power directly into your main breaker panel.
When using a GenerLink, there are no interior wiring changes required. You simply plug your portable generator directly into the GenerLink device on your exterior wall. When the generator is running, you can walk to your main breaker panel and choose which circuits to turn on, up to the maximum wattage capacity of your generator.
While both systems allow you to safely run a portable generator, they operate differently:
• No Interior Subpanels: Traditional manual transfer switches require us to install a secondary breaker panel inside your home and physically reroute your essential circuits to it. GenerLink completely eliminates the need for an interior subpanel, keeping your basement or utility room uncluttered.
• Circuit Flexibility: With a traditional transfer panel, you are locked into the specific circuits (usually 6 to 16) that the electrician wired into the subpanel during installation. With GenerLink, you can power any circuit in your home by simply turning breakers on and off at your main panel, provided you do not exceed your generator's total capacity.
• Service Limits: GenerLink is designed for standard residential electrical systems and is limited to homes with a maximum electrical service of 200 amps. If your home has a larger service, or if your existing panel is outdated, you might require an Electrical Service Upgrade or a Breaker Panel Upgrade consultation before proceeding with any generator connection.
For ultimate peace of mind, a whole-home standby generator paired with an Automatic Transfer Switch (ATS) is the gold standard. This system monitors your utility power 24/7. Whether you are sleeping, at work in Burnside, or vacationing away from home, the system handles everything without any human intervention.
• Generator Type — Manual Transfer Switch / Panel: Portable / Inverter — GenerLink Meter Switch: Portable / Inverter — Standby with Automatic Transfer Switch (ATS): Standby (Permanent)
• Activation — Manual Transfer Switch / Panel: Manual physical switch — GenerLink Meter Switch: Manual plug-in / Auto-sensing — Standby with Automatic Transfer Switch (ATS): Fully Automatic
• Installation Location — Manual Transfer Switch / Panel: Next to main breaker panel — GenerLink Meter Switch: Exterior utility meter base — Standby with Automatic Transfer Switch (ATS): Next to main panel / Service entrance
• Circuit Control — Manual Transfer Switch / Panel: Hardwired fixed circuits — GenerLink Meter Switch: Any circuit (manually managed) — Standby with Automatic Transfer Switch (ATS): Whole-home or managed essential loads
• Refueling Required — Manual Transfer Switch / Panel: Yes (Gasoline/Propane tanks) — GenerLink Meter Switch: Yes (Gasoline/Propane tanks) — Standby with Automatic Transfer Switch (ATS): No (Connected to continuous propane)
The beauty of how backup generator transfer switch installation works in a nova scotia home with an ATS is its seamless, step-by-step sequence of operation during a storm:
1. Utility Power Loss: The ATS constantly monitors the voltage coming from Nova Scotia Power. The moment the voltage drops below a safe threshold, the ATS notes the interruption.
2. Generator Startup Delay: To prevent the generator from starting up during momentary power flickers, the ATS waits a few seconds. If the power remains out, it sends a signal to start the standby generator's engine.
3. Warm-Up and Load Transfer: Once the generator engine starts, the ATS allows it to run for a short warm-up period to stabilize voltage. It then automatically flips its internal switch, disconnecting your home from the utility grid and connecting it to the generator. This entire process usually takes less than 10 seconds.
4. Utility Restoration Sensing: While your home is running comfortably on generator power, the ATS continues to monitor the utility lines. When Nova Scotia Power restores grid electricity, the ATS monitors it for a continuous, stable period (usually a few minutes) to ensure the grid is reliable.
5. Safe Return and Cool-Down: The ATS safely transfers your home's electrical load back to the utility grid. It then allows the generator to run for a brief cool-down period before shutting it down, resetting the system for the next outage.
In Nova Scotia, electrical safety is strictly regulated to protect both homeowners and utility workers. Under the Nova Scotia Electrical Installation and Inspection Act, installing any generator transfer switch is considered a major electrical modification.
This means you cannot simply buy a transfer switch online and wire it in yourself. The installation must be performed by a licensed electrical contractor who will obtain a mandatory provincial wiring permit. Once the work is completed, it must pass a formal inspection by an authorized electrical inspector to ensure it complies fully with the Canadian Electrical Code (CEC).
Furthermore, because devices like the GenerLink attach directly to the utility meter, the installation requires strict coordination with Nova Scotia Power. Only authorized personnel are permitted to break the utility seal and pull the meter. If you are looking for trusted professionals to handle your home's electrical and ventilation systems safely, working with a Licensed Electrician in Truro NS or our certified teams in the Halifax Regional Municipality ensures everything is fully code-compliant.
One of the most complex technical aspects of generator installation is proper grounding and bonding. The Canadian Electrical Code has strict rules to prevent electrical shocks and ensure that ground-fault protection devices function correctly.
The grounding method depends entirely on whether your generator has a bonded neutral or a floating neutral:
• Bonded Neutral Generators: In these units, the neutral conductor is connected directly to the generator's metal frame. If you connect a bonded neutral generator to your home, you must use a three-pole transfer switch that switches the neutral conductor along with the hot lines. This ensures there is only one point of grounding at any given time.
• Floating Neutral Generators: In these units, the neutral is isolated from the frame. For these systems, a two-pole transfer switch is used, keeping the neutral solidly connected to your home’s main service ground.
Our experienced electricians carefully analyze your generator's internal wiring schematics during installation to ensure the transfer switch is grounded perfectly, eliminating any risk of stray currents or safety hazards.
When we install a backup generator transfer switch in your home, we follow a meticulous process to ensure safety, reliability, and neatness.
Here is what you can expect during a typical installation:
Our journey begins with a thorough evaluation of your home’s electrical panel, your backup power goals, and your generator's specifications. We calculate the electrical loads of the appliances you want to run to ensure your generator and transfer switch are perfectly sized.
We securely mount the transfer switch enclosure. For a traditional manual system, this is located right next to your main electrical panel. For an automatic standby system, the ATS is mounted either indoors near the panel or outdoors near the utility meter, depending on your home's layout.
Our electricians carefully route the conductors between your main breaker panel and the transfer switch. We install the outdoor power inlet box on your home's exterior wall, running heavy-duty, outdoor-rated wiring through protective conduit back to the switch.
Once all connections are secure, we perform comprehensive testing. We simulate a utility power outage to verify that the transfer switch operates flawlessly, checking voltage levels, phase rotation, and grounding pathways.
If you choose a GenerLink or a system that requires service interruption, utility coordination is a critical phase of the installation day.
We coordinate directly with Nova Scotia Power to schedule a brief power disconnection. On the day of installation, the utility team or our authorized technician will disconnect the power at the meter. For a GenerLink installation, the device is mounted directly onto the meter base, and the utility meter is plugged into the front of the GenerLink unit.
This physical installation usually takes under two hours. Once the device is securely in place, the power is restored, and we walk you through a complete system demonstration. We show you exactly how to connect your generator cord, start the system safely, and manage your household electrical loads. Finally, we provide you with a recommended maintenance schedule, including exercising your generator regularly to keep the battery charged and the engine lubricated.
No. In Nova Scotia, installing a transfer switch requires a provincial wiring permit and must be performed by a licensed electrical contractor. Attempting a DIY installation is highly dangerous, carries severe risk of electrical shock or house fire, and can void your home insurance. Furthermore, utility-interactive devices like the GenerLink cannot be installed without breaking the utility seal, which is illegal for unlicensed individuals.
A standard GenerLink installation is highly efficient and typically takes under two hours, including the coordinated utility power disconnect and reconnect. A traditional manual transfer panel installation usually takes between three to six hours of electrical work inside your home. A whole-home standby generator with an automatic transfer switch is a larger project, typically requiring one to two days to complete the electrical wiring, gas line connections, and concrete pad placement.
With an automatic standby system, the ATS detects that utility power is back and stable. It automatically switches your home's electrical load back to the grid and initiates a cool-down cycle for the generator before shutting it off. If you are using a manual transfer switch or a GenerLink, you will see your neighbours' lights turn back on, or you can check the indicator lights on the GenerLink unit. You will then manually flip the transfer switch back to "Utility" power, turn off your portable generator, unplug the utility cord, and store it safely away for the next storm.
Preparing your home for Nova Scotia’s unpredictable weather is one of the smartest investments you can make. Whether you choose a highly flexible portable generator with a GenerLink switch or the seamless, hands-free comfort of a standby generator with an automatic transfer switch, professional installation is key to keeping your family safe and your home protected.
At Presidential Ventilation, we bring over 30 years of residential service experience to homeowners across Halifax, Dartmouth, Sackville, Bedford, and surrounding communities. Our certified electrical teams handle everything from permit acquisition and utility coordination to final testing and safety walkthroughs.
Don't wait until the next major storm leaves you in the dark. Secure your home backup power today by connecting with our expert team to plan your transfer switch installation!

Verifying Red Seal certification when hiring HVAC technicians in Nova Scotia is the single most important step you can take to protect your home, your safety, and your financial investment. You are looking at a competitive quote for your new heating system, but there is a crucial detail that might be missing from the paperwork. Many homeowners assume that any general contractor offering installation services is fully qualified to handle the complex requirements of modern HVAC systems. Unfortunately, a pattern we see often in our service calls is that this assumption frequently leads to unsafe installations, voided warranties, and systems that fail long before their time.
When you are planning a major home upgrade and need professional heating services, the critical moment occurs when you are reviewing estimates. This is the exact point when verifying credentials becomes your strongest defense against sub-par workmanship. Whether you are looking into a ductless mini-split or a comprehensive central heat pump installation, ensuring the team has the legal authority and technical training to perform the work is non-negotiable.
A proper installation is not simply a matter of bolting a piece of equipment to a wall and plugging it in. Modern heat pumps are highly sophisticated machines that require specialized knowledge of refrigerant pressures, precise airflow dynamics, and high-voltage electrical systems. Drawing on our 30+ years of experience across residential retrofits, new construction, and commercial projects in Mount Uniacke and beyond, we frequently see the costly downstream consequences of uncertified installations. When an unqualified individual attempts to balance refrigerant lines or wire a high-draw compressor, the results range from poor energy efficiency to severe fire hazards.
Homeowners often trust a general contractor because that individual has done excellent carpentry, plumbing, or renovation work for them in the past. However, HVAC is a distinct, highly regulated field. Without the proper training, even the most well-intentioned handyman cannot properly commission a heat pump to manufacturer specifications. By understanding what to look for on an estimate, you can ensure your system is installed safely and optimized for long-term performance.
To make an informed decision, it is essential to understand the vast difference between a general contractor and a certified refrigeration mechanic. A general contractor manages broad construction projects, coordinating various trades to build or renovate a space. While they are highly skilled in project management and general carpentry, they rarely hold the specialized licensing required for handling regulated refrigerants.
The Refrigeration and Air Conditioning Mechanic designation is a highly regulated trade in Canada. Earning a Red Seal refrigeration mechanic certification requires thousands of hours of hands-on apprenticeship, rigorous classroom instruction, and passing a comprehensive interprovincial examination. Only professionals who have earned this specific credential possess the legal authority and technical expertise to handle refrigerants safely.
At Presidential Ventilation Systems, we maintain a roster of approximately 70 employees, which allows us to deploy dedicated, skilled Red Seal tradespeople for every phase of a project. Hiring a multi-trade team—encompassing HVAC, electrical, ventilation, and sheet-metal experts—ensures that the specific complexities of your heating system are managed by dedicated specialists rather than generalists. When you work with certified HVAC technicians, you are paying for an uncompromising standard of technical proficiency.
• Refrigerant Handling — General Contractor: Legally prohibited without specific certification. — Red Seal Refrigeration Mechanic: Fully licensed and trained to handle, recover, and charge refrigerants safely.
• System Commissioning — General Contractor: Relies on basic manufacturer manuals, often missing technical nuances. — Red Seal Refrigeration Mechanic: Uses specialized gauges to calculate superheat and subcooling for exact performance.
• Warranty Authorization — General Contractor: Installations often result in immediate warranty denial by major brands. — Red Seal Refrigeration Mechanic: Recognized by premium manufacturers to validate and register full warranties.
• Environmental Compliance — General Contractor: High risk of accidental venting due to lack of specialized recovery equipment. — Red Seal Refrigeration Mechanic: Strict adherence to provincial and federal environmental protection laws.
Handling refrigerants without proper certification is a direct violation of environmental regulations and poses severe safety risks to your property. Beyond the legal implications, the physical behavior of refrigerant inside your heat pump dictates how well the system will heat and cool your home. Inaccurate refrigerant charges lead to immediate efficiency losses, causing the system to overwork, consume excess electricity, and eventually fail prematurely.
Nova Scotia's freezing Maritime winters and humid summers demand absolute precision in refrigerant charging to prevent system failure during extreme temperature swings. When a heat pump is extracting ambient heat from sub-zero winter air, the refrigerant must be balanced perfectly. If the system is undercharged, the compressor will overheat trying to meet the thermostat's demand. If it is overcharged, liquid refrigerant can flood back into the compressor, destroying the internal valves.
Certified technicians use specialized digital gauges, temperature probes, and mathematical formulas to achieve the exact charge required by the manufacturer. A pattern we see often across the province is systems completely breaking down because the initial installer lacked the training to correctly balance the refrigerant lines. Last summer, one Nova Scotia homeowner reached out to our team during a heat wave after going without a working heat pump since the previous August. Previous uncertified technicians had failed to diagnose and fix the broken system. A skilled technician from our team properly diagnosed the issue—which was completely different from what was previously claimed—and accurately repaired the system.
Installing a modern heating system is not just a plumbing or refrigeration job; it requires integrating high-voltage electrical components safely into your home's existing infrastructure. A heat pump requires dedicated circuits, properly sized breakers, and specific wire gauges to handle the significant electrical draw of the compressor and auxiliary heating elements.
Because our team handles comprehensive electrical panel upgrades and installations daily, we know firsthand that improperly sized wiring or incorrect breaker installations by uncertified workers pose severe fire hazards. If an installer uses a wire gauge that is too small for the circuit's amperage, the wire will generate extreme heat inside your walls, potentially melting the insulation and sparking an electrical fire. Furthermore, failing to install the required outdoor disconnect switches violates local building codes and puts future service technicians at risk of electrocution.
A true HVAC contractor provides a seamless integration of both refrigeration and electrical expertise to ensure the system operates safely. Because the installation spans multiple disciplines, homeowners must ensure that the electrical portion of the hookup is performed by appropriately licensed professionals to meet provincial building codes. Understanding the Red Seal electrician requirements for heat pump hookups is just as critical as verifying the refrigeration credentials. When a multi-trade company handles the installation, both the mechanical and electrical permits are pulled and executed by specialized tradespeople, leaving no room for dangerous guesswork.
Premium equipment manufacturers, such as Daikin and Lennox, strictly mandate that their systems be installed by licensed professionals. These companies invest heavily in engineering highly efficient equipment, and they know that the lifespan of that equipment is entirely dependent on the quality of the installation. If a system fails and the manufacturer discovers it was installed by an uncertified general contractor, the warranty claim is instantly denied.
Working with recognized, certified dealers ensures that your investment is protected for the full duration of the warranty period. For example, maintaining our Daikin Comfort Pro status requires strict adherence to manufacturer installation guidelines, continuous factory training, and a proven track record of technical excellence. When an installation is completed by a contractor holding this status, the manufacturer registers the equipment with full confidence.
Last fall, a homeowner contacted us because their mini-split heat pumps were not working properly after a poor initial service by a different company. The previous company had failed to identify the root problem. One of our certified technicians quickly diagnosed the issue and confirmed warranty coverage for the necessary parts, completely solving the problem and restoring the system to proper operation. Proper diagnostics by a certified technician can often salvage a system and restore its warranty standing after a poor initial installation, but we always recommend preventing the issue entirely by hiring a certified professional from day one.
Government and provincial rebate programs are designed to make energy-efficient upgrades more accessible to homeowners. Programs like Efficiency Nova Scotia offer significant incentives for upgrading to modern heating systems, particularly for oil-to-heat-pump conversions. However, these programs almost universally require that the installation be completed by an approved, certified contractor.
Submitting an invoice from an uncertified handyman or general contractor will result in a rejected rebate application. The administrative bodies governing these funds require strict proof of compliance, including the contractor's credentials, the exact AHRI (Air-Conditioning, Heating, and Refrigeration Institute) matching numbers of the equipment, and detailed commissioning reports. An uncertified installer simply cannot provide the necessary documentation to satisfy the auditors.
Because rebate programs, funding caps, and eligibility criteria can change frequently, we strongly recommend confirming current programs with Presidential Ventilation Systems before starting work. A reputable HVAC company will not only hold the necessary Red Seal certifications to keep you eligible, but their administrative team will also be familiar with the latest program updates. They can guide you through the required pre-approval steps, ensure the equipment selected qualifies for the highest possible incentive, and provide the exact invoicing format the provincial programs demand.
Protecting yourself during the estimate phase requires asking direct questions and requesting physical proof of credentials. Do not wait until the equipment is sitting in your driveway to confirm the installer's qualifications. Follow these actionable steps to verify a contractor's Red Seal certification before signing any agreements:
1. Ask for the Nova Scotia Apprenticeship Agency certification number: During the initial consultation, request the lead technician's certification number. Legitimate contractors are proud of their credentials and will provide this information without hesitation.
2. Request proof of dedicated Red Seal refrigeration mechanics: Ensure the company actually employs technicians with a Red Seal refrigeration mechanic certification on staff, rather than sub-contracting the work to unverified third parties.
3. Verify specialized liability insurance: Check that the contractor carries appropriate liability insurance and workers' compensation coverage specifically rated for HVAC and electrical work, not just general carpentry or landscaping.
4. Review the written estimate for trade specifics: Ensure the written quote clearly outlines who will be handling the electrical integration, who will be pulling the electrical permits, and who is responsible for the refrigerant charging.
5. Plan for ongoing professional care: Once verified and installed, ongoing care by these same certified professionals ensures the system maintains its efficiency. Securing preventative HVAC maintenance from a credentialed team extends the lifespan of your investment.

Yes, Refrigeration and Air Conditioning Mechanic is a designated Red Seal trade across Canada. It requires extensive apprenticeship hours and passing a rigorous interprovincial examination. This designation ensures the technician has mastered the complex thermodynamics, electrical troubleshooting, and environmental safety protocols required to work on modern heating and cooling systems.
Homeowners can ask the contractor directly for their certification card before the project begins. Credentials can also be cross-referenced with the Nova Scotia Apprenticeship Agency to ensure they are current and valid. A reputable HVAC company will always be transparent about the qualifications of the technicians they send to your home.
Yes, handling the refrigerants within a heat pump requires a certified refrigeration mechanic by law. Additionally, the electrical connections required to power the unit demand appropriate electrical licensing and permits. Attempting to bypass these licensing requirements can result in severe fines, voided warranties, and dangerous operating conditions.
It can lead to unsafe operation, voided manufacturer warranties, and rejected provincial rebate applications. Improper refrigerant handling can also cause premature system failure, meaning you may have to replace the entire unit years before its expected lifespan. Furthermore, uncertified electrical work poses a significant fire hazard to your property.
No, unless the general contractor personally holds a valid Red Seal refrigeration certification or directly employs someone who does. Environmental regulations strictly prohibit uncertified individuals from handling, recovering, or charging regulated refrigerants due to the severe environmental impact of accidental venting and the technical precision required for safe operation.
Protecting your home, your warranty, and your investment starts with asking the right questions during the estimate process. In our 30+ years of experience serving Mount Uniacke and greater Nova Scotia, we have found that transparency regarding credentials is the foundation of a trustworthy contractor relationship. You deserve the peace of mind that comes from knowing your equipment is being handled by professionals who respect the trade and adhere to all provincial safety standards.
Choosing a multi-trade team with verified tradespeople ensures your system is installed safely, efficiently, and in full compliance with warranty and rebate requirements. If you are planning an upgrade, explore your options with a team that prioritizes certification and ongoing education. Contact Presidential Ventilation Systems today to request a free estimate for your heat pump installation.
