


The cost of repairing old heat pump vs buying new system comes down to a few key factors: your unit's age, the size of the repair bill, and how efficiently your current system is running.
Here is a quick breakdown to help you decide:
• Repair if: Your system is under 10 years old, the fix is minor, and the repair cost is well below half the price of a new unit
• Replace if: Your system is 12 or more years old, you are facing a major repair, or you have needed multiple fixes in the past year or two
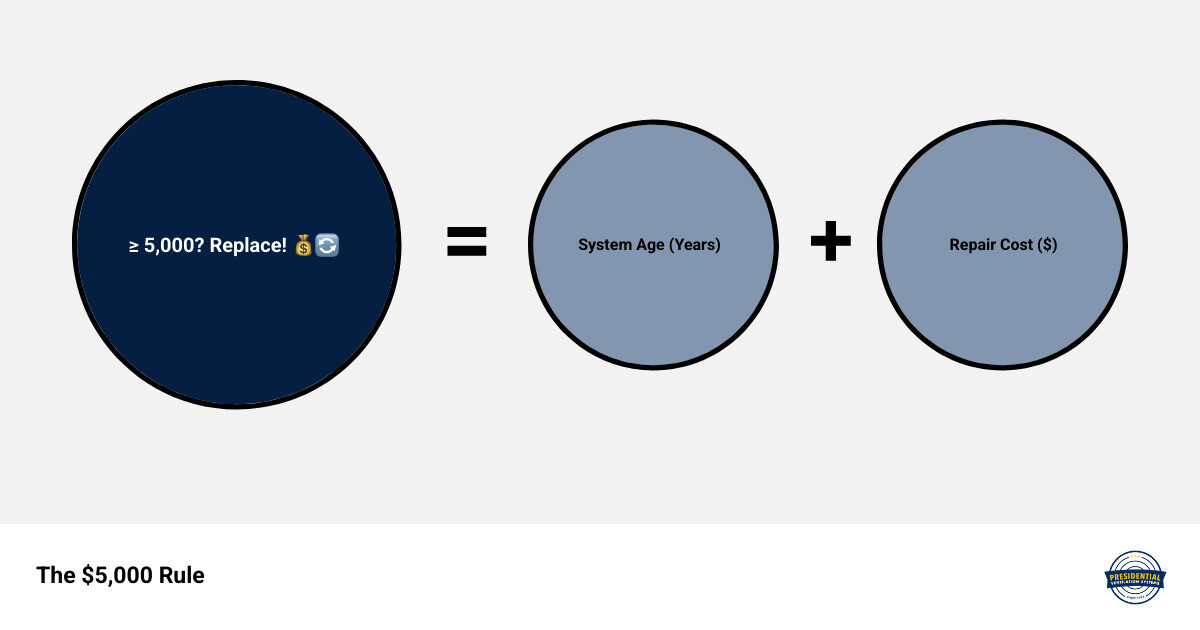
• Use the $5,000 Rule: Multiply your system's age (in years) by the repair cost (in dollars) — if the result is 5,000 or higher, replacement is usually the smarter financial move
• Watch for red flags: R-22 refrigerant, compressor failure, or a pattern of repeated breakdowns are strong signs a new system will save you more in the long run
Most homeowners are surprised to learn that a well-timed replacement often costs less over five to ten years than continuing to repair an aging, inefficient unit. Energy savings from a modern system can be significant, and new systems come with warranties that older repaired units simply cannot match.
The sections below walk you through how to apply these rules to your own situation, what common repairs are actually worth doing, and when it makes clear financial sense to move on.
When we visit homes in Halifax or Dartmouth, one of the most common questions we hear is: "How do I know if I'm just throwing good money after bad?" It is a fair question. No one wants to pay for a significant repair only to have a different component fail three months later. To provide a data-driven answer, we often point to the "$5,000 Rule."
This rule is a simple mathematical formula used by HVAC professionals to determine the economic viability of a repair. You take the age of your system in years and multiply it by the quoted repair cost. If the total exceeds 5,000, the investment in a repair is likely not worth it. For example, if you have a 12-year-old unit and the repair is significant, you are well over that threshold.
Why 5,000? This number represents a tipping point where the system's remaining longevity no longer justifies the expenditure. As systems age, their reliability drops while the likelihood of "cascading failures" increases. By following this rule, you can avoid the "repair spiral"—that frustrating cycle where you fix one thing, then another, until you've spent nearly as much as a new installation would have cost, all while still owning an old, inefficient machine.
Understanding Time to Replace Your Heat Pump is about looking at the big picture. Beyond the immediate repair, you have to consider the system's efficiency. Even if you fix a 15-year-old unit, it will still consume significantly more energy every month than a modern replacement. In our Nova Scotia climate, where heating demands are high for much of the year, those monthly savings add up quickly.
Not all failures are created equal. Some parts are like the spark plugs in your car—inexpensive and expected to wear out—while others are more like the engine itself. Knowing which is which helps you navigate the cost of repairing old heat pump vs buying new system.
Minor failures often involve electrical components. Capacitors and contactors are the most frequent culprits. These parts are responsible for starting the motors and managing the flow of electricity. If your system is otherwise in good health and under 10 or 12 years old, replacing these is a "no-brainer." It is a quick fix that restores your comfort without breaking the bank.
However, once we get into major mechanical components, the decision becomes more complex. Common issues include:
• Reversing Valves: This is the part that allows your system to switch between heating and cooling. It is a complex mechanical component. If this fails on an older unit, it is often a sign that the system has seen significant wear and tear.
• Blower Motors: While replaceable, a failed blower motor in an old system often suggests that the system has been working too hard, perhaps due to restricted airflow or neglected maintenance.
• Refrigerant Leaks: This is a major red flag. If your system is leaking refrigerant, it isn't just a matter of "topping it up." We have to find the leak, seal it, and then recharge the system. If your unit is older, the metal in the coils may be thinning or corroding, meaning more leaks are likely on the horizon.
For a deeper dive into these issues, you can explore our guide on Common Heat Pump Issues. Generally, if the system is well-maintained and the failure is isolated to a single, non-critical part, a repair is a solid choice. But when multiple components start failing or the system shows signs of systemic wear, it’s time to look at replacement.
The compressor is the heart of your heating and cooling system. When the compressor fails, you are facing the most significant repair possible. If your system is more than 10 years old and the compressor goes, we almost always recommend a full replacement.
One of the biggest reasons for this is the type of refrigerant your old unit uses. Many systems installed before 2010 use R-22 refrigerant. Because R-22 has been phased out due to environmental regulations, it has become incredibly difficult and expensive to source. If your R-22 compressor fails, you aren't just paying for a part; you are paying for a chemical that is becoming a relic of the past.
Investing in a new compressor for an R-22 system is a high-risk move. You are putting a brand-new "heart" into an old "body" that uses outdated technology. It is far more cost-effective in the long run to transition to a modern system that uses current, environmentally friendly refrigerants. For more details on local repair considerations, see our Heat Pump Repair Halifax Ultimate Guide.
Efficiency standards changed significantly in early 2023 with the introduction of SEER2 and HSPF2 ratings. These new standards are more rigorous and better reflect how a system performs in real-world conditions. When you are weighing a repair, you have to realize that your old unit likely operates at a much lower efficiency than the current minimum standards.
An older unit might have a SEER rating of 10 or 12. Modern entry-level systems start much higher, and high-efficiency models can double that. This means that for every dollar you spend on electricity to run your old unit, a new system might only need 60 or 70 cents to provide the same amount of comfort. Over a decade of Nova Scotia winters, that difference is massive. Choosing to repair an inefficient unit means committing to higher utility bills for several more years.
Modern heating technology has come a long way in the last decade. The biggest jump in savings comes from inverter technology and variable-speed compressors.
Traditional systems are either "on" or "off." They blast at 100% capacity until the thermostat is satisfied, then shut down. This is like driving your car by flooring the gas and then slamming on the brakes. It is inefficient and creates temperature swings. Modern systems, however, can adjust their output precisely. They can run at 25%, 50%, or 70% capacity to maintain a perfectly steady temperature.
• Old Standard Unit — Efficiency Rating: 10 SEER — Estimated Annual Energy Usage: High — Comfort Level: Moderate (Fluctuating)
• Modern Entry-Level — Efficiency Rating: 14.3 SEER2 — Estimated Annual Energy Usage: Medium-Low — Comfort Level: Good
• High-Efficiency Inverter — Efficiency Rating: 18+ SEER2 — Estimated Annual Energy Usage: Lowest — Comfort Level: Excellent (Steady)
This variable-speed operation doesn't just save money; it improves indoor comfort by better managing humidity and eliminating those "cold spots" in your home. It also reduces wear and tear on the system because it isn't constantly starting and stopping.
To keep these modern systems running at peak performance, Heat Pump Annual Maintenance is essential. While they are more reliable than older units, the precision technology benefits from a professional tune-up once a year to ensure everything is calibrated correctly for our local climate.
Sometimes your system sends you "cries for help" before it completely stops working. Recognizing these signs early can save you from a mid-winter emergency.
1. Icing Up: While some frost is normal during a defrost cycle, heavy ice buildup that doesn't go away is a sign of a problem. It could be a refrigerant leak, a failing defrost board, or a bad reversing valve.
2. Short Cycling: If your unit turns on and off every few minutes, it is "short cycling." This puts immense strain on the compressor and is usually a sign that the system is struggling to maintain the correct pressure or temperature.
3. Excessive Noise: Grinding, squealing, or loud banging sounds are never a good sign. They usually indicate mechanical failure in the motors or the compressor.
4. Uneven Temperatures: If the living room is boiling while the bedrooms are freezing, your system may no longer have the "muscle" to move air effectively through your home's ductwork.
5. Rising Utility Bills: If your energy usage is climbing even though the weather hasn't changed significantly, your system is losing its efficiency. It's working harder and longer to do the same job.
If you notice these issues, it is important to act quickly. Ignoring Signs Heat Pump Needs Immediate Attention often leads to a more expensive repair or a total system failure at the worst possible time.
In our region, you can generally expect a system to last between 10 and 15 years. While some well-maintained units can stretch to 20, their efficiency usually drops so significantly after year 12 that replacement becomes the more economical choice. Systems in coastal areas like Eastern Passage or Sambro may face additional wear from salt air, making regular maintenance even more critical.
The 50% rule is simple: if the cost of a single repair is more than half the cost of a brand-new system, you should almost always replace it. This is because a major repair doesn't reset the clock on the rest of the aging components. You could spend half the price of a new unit today and still have the blower motor fail next month.
As mentioned earlier, older units using R-22 are increasingly expensive to maintain. Furthermore, modern refrigerants like R-410A (and the newer R-32) are much more efficient at transferring heat. Upgrading to a system with modern refrigerant isn't just about being "green"—it's about using a system that is cheaper to run and easier to service.
Deciding between a repair and a replacement is a big financial choice, but you don't have to make it alone. At Presidential Ventilation Systems, we have over 30 years of experience helping homeowners in Sackville, Bedford, and across the HRM navigate these exact decisions. Whether you need a simple fix for a capacitor or a full system design for a new high-efficiency unit, our team is here to provide honest, professional advice.
We believe in doing what is right for the customer. Sometimes that means a quick repair to get you through the season; other times, it means showing you how a new installation will pay for itself in energy savings over the coming years. As a Daikin Comfort Pro Dealer, we stand behind our work with industry-leading warranties and a commitment to your long-term comfort.
If you are struggling with an aging system in Dartmouth or Halifax, check out our Heat Pump Replacements Dartmouth NS Guide for more localized tips. Ready for a professional opinion? Contact our experts for a professional system assessment today, and let’s make sure your home stays comfortable and efficient for years to come.

The cost of repairing old heat pump vs buying new system comes down to a few key factors: your unit's age, the size of the repair bill, and how efficiently your current system is running.
Here is a quick breakdown to help you decide:
• Repair if: Your system is under 10 years old, the fix is minor, and the repair cost is well below half the price of a new unit
• Replace if: Your system is 12 or more years old, you are facing a major repair, or you have needed multiple fixes in the past year or two
• Use the $5,000 Rule: Multiply your system's age (in years) by the repair cost (in dollars) — if the result is 5,000 or higher, replacement is usually the smarter financial move
• Watch for red flags: R-22 refrigerant, compressor failure, or a pattern of repeated breakdowns are strong signs a new system will save you more in the long run
Most homeowners are surprised to learn that a well-timed replacement often costs less over five to ten years than continuing to repair an aging, inefficient unit. Energy savings from a modern system can be significant, and new systems come with warranties that older repaired units simply cannot match.
The sections below walk you through how to apply these rules to your own situation, what common repairs are actually worth doing, and when it makes clear financial sense to move on.
When we visit homes in Halifax or Dartmouth, one of the most common questions we hear is: "How do I know if I'm just throwing good money after bad?" It is a fair question. No one wants to pay for a significant repair only to have a different component fail three months later. To provide a data-driven answer, we often point to the "$5,000 Rule."
This rule is a simple mathematical formula used by HVAC professionals to determine the economic viability of a repair. You take the age of your system in years and multiply it by the quoted repair cost. If the total exceeds 5,000, the investment in a repair is likely not worth it. For example, if you have a 12-year-old unit and the repair is significant, you are well over that threshold.
Why 5,000? This number represents a tipping point where the system's remaining longevity no longer justifies the expenditure. As systems age, their reliability drops while the likelihood of "cascading failures" increases. By following this rule, you can avoid the "repair spiral"—that frustrating cycle where you fix one thing, then another, until you've spent nearly as much as a new installation would have cost, all while still owning an old, inefficient machine.
Understanding Time to Replace Your Heat Pump is about looking at the big picture. Beyond the immediate repair, you have to consider the system's efficiency. Even if you fix a 15-year-old unit, it will still consume significantly more energy every month than a modern replacement. In our Nova Scotia climate, where heating demands are high for much of the year, those monthly savings add up quickly.
Not all failures are created equal. Some parts are like the spark plugs in your car—inexpensive and expected to wear out—while others are more like the engine itself. Knowing which is which helps you navigate the cost of repairing old heat pump vs buying new system.
Minor failures often involve electrical components. Capacitors and contactors are the most frequent culprits. These parts are responsible for starting the motors and managing the flow of electricity. If your system is otherwise in good health and under 10 or 12 years old, replacing these is a "no-brainer." It is a quick fix that restores your comfort without breaking the bank.
However, once we get into major mechanical components, the decision becomes more complex. Common issues include:
• Reversing Valves: This is the part that allows your system to switch between heating and cooling. It is a complex mechanical component. If this fails on an older unit, it is often a sign that the system has seen significant wear and tear.
• Blower Motors: While replaceable, a failed blower motor in an old system often suggests that the system has been working too hard, perhaps due to restricted airflow or neglected maintenance.
• Refrigerant Leaks: This is a major red flag. If your system is leaking refrigerant, it isn't just a matter of "topping it up." We have to find the leak, seal it, and then recharge the system. If your unit is older, the metal in the coils may be thinning or corroding, meaning more leaks are likely on the horizon.
For a deeper dive into these issues, you can explore our guide on Common Heat Pump Issues. Generally, if the system is well-maintained and the failure is isolated to a single, non-critical part, a repair is a solid choice. But when multiple components start failing or the system shows signs of systemic wear, it’s time to look at replacement.
The compressor is the heart of your heating and cooling system. When the compressor fails, you are facing the most significant repair possible. If your system is more than 10 years old and the compressor goes, we almost always recommend a full replacement.
One of the biggest reasons for this is the type of refrigerant your old unit uses. Many systems installed before 2010 use R-22 refrigerant. Because R-22 has been phased out due to environmental regulations, it has become incredibly difficult and expensive to source. If your R-22 compressor fails, you aren't just paying for a part; you are paying for a chemical that is becoming a relic of the past.
Investing in a new compressor for an R-22 system is a high-risk move. You are putting a brand-new "heart" into an old "body" that uses outdated technology. It is far more cost-effective in the long run to transition to a modern system that uses current, environmentally friendly refrigerants. For more details on local repair considerations, see our Heat Pump Repair Halifax Ultimate Guide.
Efficiency standards changed significantly in early 2023 with the introduction of SEER2 and HSPF2 ratings. These new standards are more rigorous and better reflect how a system performs in real-world conditions. When you are weighing a repair, you have to realize that your old unit likely operates at a much lower efficiency than the current minimum standards.
An older unit might have a SEER rating of 10 or 12. Modern entry-level systems start much higher, and high-efficiency models can double that. This means that for every dollar you spend on electricity to run your old unit, a new system might only need 60 or 70 cents to provide the same amount of comfort. Over a decade of Nova Scotia winters, that difference is massive. Choosing to repair an inefficient unit means committing to higher utility bills for several more years.
Modern heating technology has come a long way in the last decade. The biggest jump in savings comes from inverter technology and variable-speed compressors.
Traditional systems are either "on" or "off." They blast at 100% capacity until the thermostat is satisfied, then shut down. This is like driving your car by flooring the gas and then slamming on the brakes. It is inefficient and creates temperature swings. Modern systems, however, can adjust their output precisely. They can run at 25%, 50%, or 70% capacity to maintain a perfectly steady temperature.
• Old Standard Unit — Efficiency Rating: 10 SEER — Estimated Annual Energy Usage: High — Comfort Level: Moderate (Fluctuating)
• Modern Entry-Level — Efficiency Rating: 14.3 SEER2 — Estimated Annual Energy Usage: Medium-Low — Comfort Level: Good
• High-Efficiency Inverter — Efficiency Rating: 18+ SEER2 — Estimated Annual Energy Usage: Lowest — Comfort Level: Excellent (Steady)
This variable-speed operation doesn't just save money; it improves indoor comfort by better managing humidity and eliminating those "cold spots" in your home. It also reduces wear and tear on the system because it isn't constantly starting and stopping.
To keep these modern systems running at peak performance, Heat Pump Annual Maintenance is essential. While they are more reliable than older units, the precision technology benefits from a professional tune-up once a year to ensure everything is calibrated correctly for our local climate.
Sometimes your system sends you "cries for help" before it completely stops working. Recognizing these signs early can save you from a mid-winter emergency.
1. Icing Up: While some frost is normal during a defrost cycle, heavy ice buildup that doesn't go away is a sign of a problem. It could be a refrigerant leak, a failing defrost board, or a bad reversing valve.
2. Short Cycling: If your unit turns on and off every few minutes, it is "short cycling." This puts immense strain on the compressor and is usually a sign that the system is struggling to maintain the correct pressure or temperature.
3. Excessive Noise: Grinding, squealing, or loud banging sounds are never a good sign. They usually indicate mechanical failure in the motors or the compressor.
4. Uneven Temperatures: If the living room is boiling while the bedrooms are freezing, your system may no longer have the "muscle" to move air effectively through your home's ductwork.
5. Rising Utility Bills: If your energy usage is climbing even though the weather hasn't changed significantly, your system is losing its efficiency. It's working harder and longer to do the same job.
If you notice these issues, it is important to act quickly. Ignoring Signs Heat Pump Needs Immediate Attention often leads to a more expensive repair or a total system failure at the worst possible time.
In our region, you can generally expect a system to last between 10 and 15 years. While some well-maintained units can stretch to 20, their efficiency usually drops so significantly after year 12 that replacement becomes the more economical choice. Systems in coastal areas like Eastern Passage or Sambro may face additional wear from salt air, making regular maintenance even more critical.
The 50% rule is simple: if the cost of a single repair is more than half the cost of a brand-new system, you should almost always replace it. This is because a major repair doesn't reset the clock on the rest of the aging components. You could spend half the price of a new unit today and still have the blower motor fail next month.
As mentioned earlier, older units using R-22 are increasingly expensive to maintain. Furthermore, modern refrigerants like R-410A (and the newer R-32) are much more efficient at transferring heat. Upgrading to a system with modern refrigerant isn't just about being "green"—it's about using a system that is cheaper to run and easier to service.
Deciding between a repair and a replacement is a big financial choice, but you don't have to make it alone. At Presidential Ventilation Systems, we have over 30 years of experience helping homeowners in Sackville, Bedford, and across the HRM navigate these exact decisions. Whether you need a simple fix for a capacitor or a full system design for a new high-efficiency unit, our team is here to provide honest, professional advice.
We believe in doing what is right for the customer. Sometimes that means a quick repair to get you through the season; other times, it means showing you how a new installation will pay for itself in energy savings over the coming years. As a Daikin Comfort Pro Dealer, we stand behind our work with industry-leading warranties and a commitment to your long-term comfort.
If you are struggling with an aging system in Dartmouth or Halifax, check out our Heat Pump Replacements Dartmouth NS Guide for more localized tips. Ready for a professional opinion? Contact our experts for a professional system assessment today, and let’s make sure your home stays comfortable and efficient for years to come.

Verifying Red Seal certification when hiring HVAC technicians in Nova Scotia is the single most important step you can take to protect your home, your safety, and your financial investment. You are looking at a competitive quote for your new heating system, but there is a crucial detail that might be missing from the paperwork. Many homeowners assume that any general contractor offering installation services is fully qualified to handle the complex requirements of modern HVAC systems. Unfortunately, a pattern we see often in our service calls is that this assumption frequently leads to unsafe installations, voided warranties, and systems that fail long before their time.
When you are planning a major home upgrade and need professional heating services, the critical moment occurs when you are reviewing estimates. This is the exact point when verifying credentials becomes your strongest defense against sub-par workmanship. Whether you are looking into a ductless mini-split or a comprehensive central heat pump installation, ensuring the team has the legal authority and technical training to perform the work is non-negotiable.
A proper installation is not simply a matter of bolting a piece of equipment to a wall and plugging it in. Modern heat pumps are highly sophisticated machines that require specialized knowledge of refrigerant pressures, precise airflow dynamics, and high-voltage electrical systems. Drawing on our 30+ years of experience across residential retrofits, new construction, and commercial projects in Mount Uniacke and beyond, we frequently see the costly downstream consequences of uncertified installations. When an unqualified individual attempts to balance refrigerant lines or wire a high-draw compressor, the results range from poor energy efficiency to severe fire hazards.
Homeowners often trust a general contractor because that individual has done excellent carpentry, plumbing, or renovation work for them in the past. However, HVAC is a distinct, highly regulated field. Without the proper training, even the most well-intentioned handyman cannot properly commission a heat pump to manufacturer specifications. By understanding what to look for on an estimate, you can ensure your system is installed safely and optimized for long-term performance.
To make an informed decision, it is essential to understand the vast difference between a general contractor and a certified refrigeration mechanic. A general contractor manages broad construction projects, coordinating various trades to build or renovate a space. While they are highly skilled in project management and general carpentry, they rarely hold the specialized licensing required for handling regulated refrigerants.
The Refrigeration and Air Conditioning Mechanic designation is a highly regulated trade in Canada. Earning a Red Seal refrigeration mechanic certification requires thousands of hours of hands-on apprenticeship, rigorous classroom instruction, and passing a comprehensive interprovincial examination. Only professionals who have earned this specific credential possess the legal authority and technical expertise to handle refrigerants safely.
At Presidential Ventilation Systems, we maintain a roster of approximately 70 employees, which allows us to deploy dedicated, skilled Red Seal tradespeople for every phase of a project. Hiring a multi-trade team—encompassing HVAC, electrical, ventilation, and sheet-metal experts—ensures that the specific complexities of your heating system are managed by dedicated specialists rather than generalists. When you work with certified HVAC technicians, you are paying for an uncompromising standard of technical proficiency.
• Refrigerant Handling — General Contractor: Legally prohibited without specific certification. — Red Seal Refrigeration Mechanic: Fully licensed and trained to handle, recover, and charge refrigerants safely.
• System Commissioning — General Contractor: Relies on basic manufacturer manuals, often missing technical nuances. — Red Seal Refrigeration Mechanic: Uses specialized gauges to calculate superheat and subcooling for exact performance.
• Warranty Authorization — General Contractor: Installations often result in immediate warranty denial by major brands. — Red Seal Refrigeration Mechanic: Recognized by premium manufacturers to validate and register full warranties.
• Environmental Compliance — General Contractor: High risk of accidental venting due to lack of specialized recovery equipment. — Red Seal Refrigeration Mechanic: Strict adherence to provincial and federal environmental protection laws.
Handling refrigerants without proper certification is a direct violation of environmental regulations and poses severe safety risks to your property. Beyond the legal implications, the physical behavior of refrigerant inside your heat pump dictates how well the system will heat and cool your home. Inaccurate refrigerant charges lead to immediate efficiency losses, causing the system to overwork, consume excess electricity, and eventually fail prematurely.
Nova Scotia's freezing Maritime winters and humid summers demand absolute precision in refrigerant charging to prevent system failure during extreme temperature swings. When a heat pump is extracting ambient heat from sub-zero winter air, the refrigerant must be balanced perfectly. If the system is undercharged, the compressor will overheat trying to meet the thermostat's demand. If it is overcharged, liquid refrigerant can flood back into the compressor, destroying the internal valves.
Certified technicians use specialized digital gauges, temperature probes, and mathematical formulas to achieve the exact charge required by the manufacturer. A pattern we see often across the province is systems completely breaking down because the initial installer lacked the training to correctly balance the refrigerant lines. Last summer, one Nova Scotia homeowner reached out to our team during a heat wave after going without a working heat pump since the previous August. Previous uncertified technicians had failed to diagnose and fix the broken system. A skilled technician from our team properly diagnosed the issue—which was completely different from what was previously claimed—and accurately repaired the system.
Installing a modern heating system is not just a plumbing or refrigeration job; it requires integrating high-voltage electrical components safely into your home's existing infrastructure. A heat pump requires dedicated circuits, properly sized breakers, and specific wire gauges to handle the significant electrical draw of the compressor and auxiliary heating elements.
Because our team handles comprehensive electrical panel upgrades and installations daily, we know firsthand that improperly sized wiring or incorrect breaker installations by uncertified workers pose severe fire hazards. If an installer uses a wire gauge that is too small for the circuit's amperage, the wire will generate extreme heat inside your walls, potentially melting the insulation and sparking an electrical fire. Furthermore, failing to install the required outdoor disconnect switches violates local building codes and puts future service technicians at risk of electrocution.
A true HVAC contractor provides a seamless integration of both refrigeration and electrical expertise to ensure the system operates safely. Because the installation spans multiple disciplines, homeowners must ensure that the electrical portion of the hookup is performed by appropriately licensed professionals to meet provincial building codes. Understanding the Red Seal electrician requirements for heat pump hookups is just as critical as verifying the refrigeration credentials. When a multi-trade company handles the installation, both the mechanical and electrical permits are pulled and executed by specialized tradespeople, leaving no room for dangerous guesswork.
Premium equipment manufacturers, such as Daikin and Lennox, strictly mandate that their systems be installed by licensed professionals. These companies invest heavily in engineering highly efficient equipment, and they know that the lifespan of that equipment is entirely dependent on the quality of the installation. If a system fails and the manufacturer discovers it was installed by an uncertified general contractor, the warranty claim is instantly denied.
Working with recognized, certified dealers ensures that your investment is protected for the full duration of the warranty period. For example, maintaining our Daikin Comfort Pro status requires strict adherence to manufacturer installation guidelines, continuous factory training, and a proven track record of technical excellence. When an installation is completed by a contractor holding this status, the manufacturer registers the equipment with full confidence.
Last fall, a homeowner contacted us because their mini-split heat pumps were not working properly after a poor initial service by a different company. The previous company had failed to identify the root problem. One of our certified technicians quickly diagnosed the issue and confirmed warranty coverage for the necessary parts, completely solving the problem and restoring the system to proper operation. Proper diagnostics by a certified technician can often salvage a system and restore its warranty standing after a poor initial installation, but we always recommend preventing the issue entirely by hiring a certified professional from day one.
Government and provincial rebate programs are designed to make energy-efficient upgrades more accessible to homeowners. Programs like Efficiency Nova Scotia offer significant incentives for upgrading to modern heating systems, particularly for oil-to-heat-pump conversions. However, these programs almost universally require that the installation be completed by an approved, certified contractor.
Submitting an invoice from an uncertified handyman or general contractor will result in a rejected rebate application. The administrative bodies governing these funds require strict proof of compliance, including the contractor's credentials, the exact AHRI (Air-Conditioning, Heating, and Refrigeration Institute) matching numbers of the equipment, and detailed commissioning reports. An uncertified installer simply cannot provide the necessary documentation to satisfy the auditors.
Because rebate programs, funding caps, and eligibility criteria can change frequently, we strongly recommend confirming current programs with Presidential Ventilation Systems before starting work. A reputable HVAC company will not only hold the necessary Red Seal certifications to keep you eligible, but their administrative team will also be familiar with the latest program updates. They can guide you through the required pre-approval steps, ensure the equipment selected qualifies for the highest possible incentive, and provide the exact invoicing format the provincial programs demand.
Protecting yourself during the estimate phase requires asking direct questions and requesting physical proof of credentials. Do not wait until the equipment is sitting in your driveway to confirm the installer's qualifications. Follow these actionable steps to verify a contractor's Red Seal certification before signing any agreements:
1. Ask for the Nova Scotia Apprenticeship Agency certification number: During the initial consultation, request the lead technician's certification number. Legitimate contractors are proud of their credentials and will provide this information without hesitation.
2. Request proof of dedicated Red Seal refrigeration mechanics: Ensure the company actually employs technicians with a Red Seal refrigeration mechanic certification on staff, rather than sub-contracting the work to unverified third parties.
3. Verify specialized liability insurance: Check that the contractor carries appropriate liability insurance and workers' compensation coverage specifically rated for HVAC and electrical work, not just general carpentry or landscaping.
4. Review the written estimate for trade specifics: Ensure the written quote clearly outlines who will be handling the electrical integration, who will be pulling the electrical permits, and who is responsible for the refrigerant charging.
5. Plan for ongoing professional care: Once verified and installed, ongoing care by these same certified professionals ensures the system maintains its efficiency. Securing preventative HVAC maintenance from a credentialed team extends the lifespan of your investment.

Yes, Refrigeration and Air Conditioning Mechanic is a designated Red Seal trade across Canada. It requires extensive apprenticeship hours and passing a rigorous interprovincial examination. This designation ensures the technician has mastered the complex thermodynamics, electrical troubleshooting, and environmental safety protocols required to work on modern heating and cooling systems.
Homeowners can ask the contractor directly for their certification card before the project begins. Credentials can also be cross-referenced with the Nova Scotia Apprenticeship Agency to ensure they are current and valid. A reputable HVAC company will always be transparent about the qualifications of the technicians they send to your home.
Yes, handling the refrigerants within a heat pump requires a certified refrigeration mechanic by law. Additionally, the electrical connections required to power the unit demand appropriate electrical licensing and permits. Attempting to bypass these licensing requirements can result in severe fines, voided warranties, and dangerous operating conditions.
It can lead to unsafe operation, voided manufacturer warranties, and rejected provincial rebate applications. Improper refrigerant handling can also cause premature system failure, meaning you may have to replace the entire unit years before its expected lifespan. Furthermore, uncertified electrical work poses a significant fire hazard to your property.
No, unless the general contractor personally holds a valid Red Seal refrigeration certification or directly employs someone who does. Environmental regulations strictly prohibit uncertified individuals from handling, recovering, or charging regulated refrigerants due to the severe environmental impact of accidental venting and the technical precision required for safe operation.
Protecting your home, your warranty, and your investment starts with asking the right questions during the estimate process. In our 30+ years of experience serving Mount Uniacke and greater Nova Scotia, we have found that transparency regarding credentials is the foundation of a trustworthy contractor relationship. You deserve the peace of mind that comes from knowing your equipment is being handled by professionals who respect the trade and adhere to all provincial safety standards.
Choosing a multi-trade team with verified tradespeople ensures your system is installed safely, efficiently, and in full compliance with warranty and rebate requirements. If you are planning an upgrade, explore your options with a team that prioritizes certification and ongoing education. Contact Presidential Ventilation Systems today to request a free estimate for your heat pump installation.
