


Your indoor temperatures are climbing, but the thought of heavy equipment tearing up your prized flower beds makes you hesitate to upgrade. At Presidential Ventilation Systems Ltd., this is a concern we hear often, which is exactly why landscaping matters when placing outdoor AC units in Mount Uniacke. Balancing mandatory technical clearance requirements for outdoor AC units with the preservation of established gardens is a concrete problem many homeowners face. The decision point ultimately comes down to determining the precise placement and orientation of the outdoor unit to ensure required airflow without destroying existing landscaping. Upgrading your home comfort should never mean sacrificing the curb appeal you have worked so hard to cultivate.
To learn more about optimizing your home's comfort without sacrificing your yard, explore our comprehensive guide to Heat Pumps.
Most homeowners don't realize that a successful installation requires a delicate balance between thermodynamics and landscape architecture. An outdoor cooling unit is essentially a heavy, vibrating metal box that needs ample breathing room to function correctly. When our technicians arrive on site, we understand the immediate anxiety property owners feel watching heavy boots and bulky machinery navigate near delicate perennials. By prioritizing property respect right from the start, our professional site evaluation ensures that both the technical specifications of the equipment and the aesthetic concerns of the homeowner are fully met. The goal is a seamless integration where your garden continues to thrive, and your home stays perfectly cool.
Here's the thing: you cannot just drop a condenser unit wherever it looks best. The location must serve the mechanical needs of the system first. However, strategic placement means finding the optimal intersection between the shortest run for refrigerant lines, the most stable ground, and the least intrusive spot for your garden's layout. A meticulous approach to placement prevents future headaches, ensuring that your beautiful landscaping does not inadvertently choke your new cooling system.
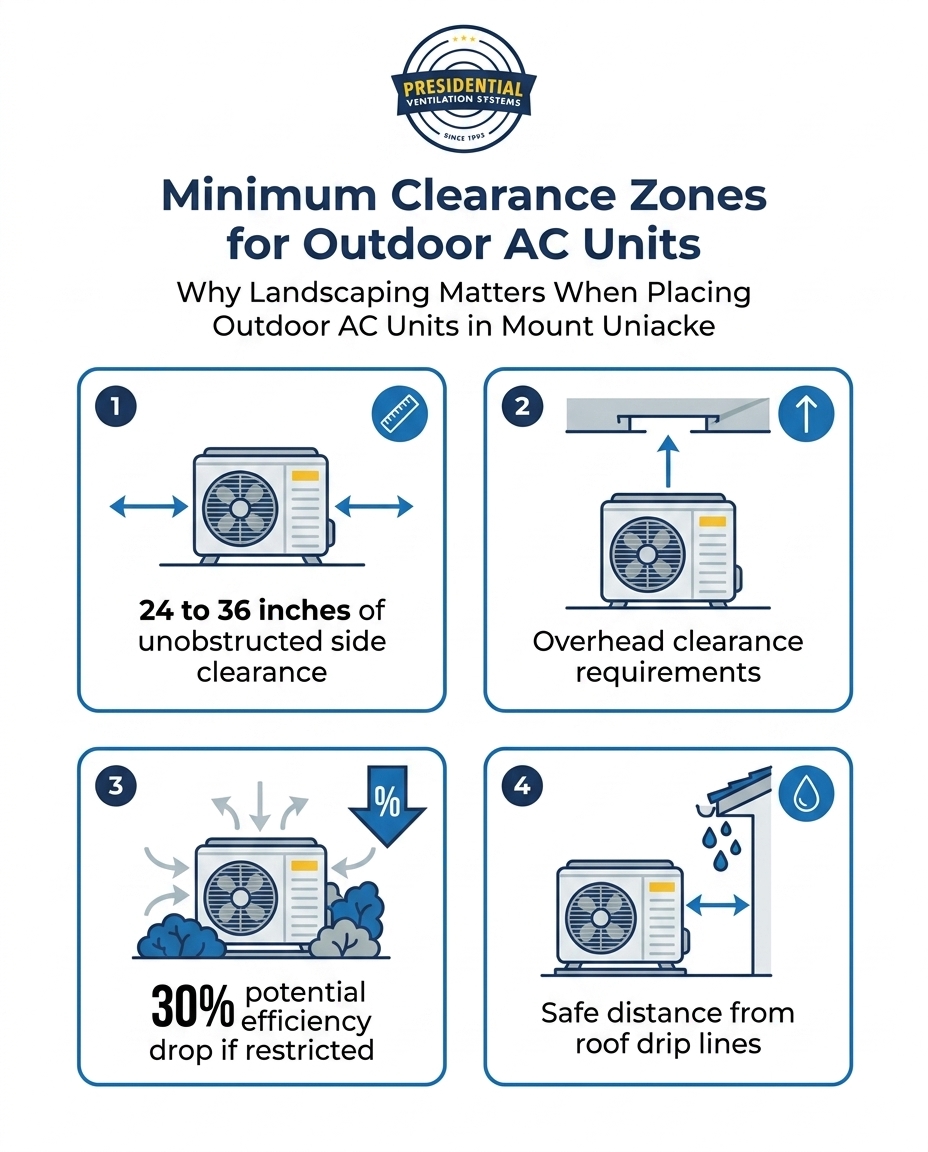
In our years of installing systems throughout the area, we've found that understanding the physics behind your cooling system is the first step in planning your landscaping. The outdoor unit's primary job is to release the heat that has been absorbed from inside your home. To do this efficiently, the system requires a massive volume of air to be pulled through its fins and exhausted out the top or front. This is why manufacturer minimum clearance requirements for airflow typically mandate 24 to 36 inches of unobstructed space around the entire perimeter of the unit. Ignoring these specifications is a surefire way to compromise your system's performance.
Restricted airflow from encroaching shrubs, low-hanging branches, or dense ground cover can reduce system efficiency by up to 30%. When the unit cannot properly dissipate heat, the compressor is forced to work overtime. This constant strain not only drives up your monthly energy bills but also significantly increases the risk of premature compressor failure. If you have ever wondered why your air conditioner is not working during a heatwave, suffocating landscaping is often a primary culprit.
The outdoor condenser coil is designed to reject heat into the surrounding air. If dense foliage surrounds the unit, that rejected heat becomes trapped in a localized bubble. Instead of pulling in fresh, ambient air, the system ends up recycling its own heated exhaust. This forces the system to operate at much higher internal pressures and temperatures than it was designed for. Mount Uniacke's humid summers demand optimal airflow to effectively reject heat from the home, as humidity already makes heat transfer more difficult.
• Optimal Clearance (24-36 inches) — System Efficiency: Maximum rated efficiency — Compressor Lifespan: Normal expected lifespan — Cooling Performance: Rapid, consistent cooling
• Partial Restriction (12-20 inches) — System Efficiency: Drops by 10-15% — Compressor Lifespan: Accelerated wear and tear — Cooling Performance: Longer run times, higher bills
• Severe Restriction (Under 12 inches) — System Efficiency: Drops by up to 30% — Compressor Lifespan: High risk of premature failure — Cooling Performance: System struggles to cool the home
A common pitfall in landscape planning is designing around the current size of a plant rather than its mature size. A small, decorative shrub planted 24 inches away from your outdoor unit might seem perfectly safe in May, but by August, it could be suffocating your condenser. During the peak summer growing season, plants can quickly encroach on mandatory clearance zones, turning a technically perfect installation into an airflow nightmare.
To avoid this, you must plan your garden with the mature spread and height of each plant in mind. Fast-growing perennials and aggressive vines should be kept far away from the HVAC zone. Instead, opt for slow-growing, low-debris plants that maintain a compact profile. If you are considering an upgrade and want to ensure your new system fits perfectly within your garden's future growth, scheduling a Ductless Heat Pump Installation consultation can help map out the safest zones for equipment placement.
1. Research mature dimensions: Always check the maximum width a shrub or plant will reach, and measure your 36-inch clearance from that future boundary, not the current root ball.
2. Avoid high-debris trees: Trees that drop excessive leaves, pine needles, or seed pods can quickly clog the narrow fins of your condenser coil.
3. Select low-growth ground cover: Choose ground covers that stay under a few inches tall and do not send out aggressive runners that could climb the unit's base.
4. Maintain an access path: Technicians need a clear, safe path to reach the unit for maintenance and repairs without trampling your surrounding beds.
While summer foliage is a primary concern, our team at Presidential Ventilation Systems Ltd. knows firsthand that Mount Uniacke's significant winter snowfall presents an equally critical challenge for outdoor unit placement. Snowbanks and ice accumulation can restrict vital airflow just as badly as overgrown summer shrubs. When planning the location of your unit, we always contrast summer landscaping concerns with the realities of heavy winter weather.
One major consideration is the roof drip line. Placing an outdoor unit directly beneath a roof valley or an area without gutters is a recipe for disaster. Melting snow from the roof will drip directly onto the unit, and when temperatures drop overnight, that water freezes solid. This can encase the fan blades in ice, leading to catastrophic motor failure the next time the system tries to turn on. Manufacturer minimum clearance requirements for airflow also apply to snow clearance; the unit must be able to breathe even after a heavy blizzard.
To combat snowdrifts, professional installers often elevate outdoor units on specially designed snow stands or wall-mounted brackets. This keeps the base of the unit above the average snow line, ensuring that the defrost cycle can drain properly and that the lower intake vents remain unobstructed. Elevating the unit also protects it from localized flooding during rapid spring thaws, ensuring your system remains safe and operational year-round.
The hallmark of a premium installation is a proactive site-evaluation process that prioritizes property respect before a single piece of equipment is moved. Your garden represents hours of hard work, and a careless installation crew can undo years of landscaping in a single afternoon. Our professional team understands that technical manufacturer specifications and beautiful flower beds can coexist with proper design and careful planning.
For instance, we recently had a Mount Uniacke homeowner reach out to us during a severe summer heat wave when they needed multiple air conditioning units installed. Despite the crazy heat, our crew worked hard to map out a safe path that actively respected the property and even minimized disruption near the baby's room during the heavy lifting phases. We navigated the heavy equipment without trampling the surrounding garden beds, and provided a thorough system rundown once the job was done. The outcome was a perfectly cooled house and an untouched yard, proving that meticulous care makes all the difference.
Pathfinding: Before bringing in the condenser, our technicians will walk the property with you to agree on the safest route for heavy dollies and equipment, avoiding soft earth and delicate root systems.
Protective Measures: When working near established beds, professionals use protective mats and plywood pathways to distribute weight and prevent soil compaction.
Strategic Staging: Tools, refrigerant tanks, and old equipment are staged in designated safe zones, typically on driveways or patios, rather than being dropped onto the lawn.
Beyond airflow and aesthetics, the structural and electrical foundations of your outdoor unit require careful integration into your landscape. The unit must sit on a stable, perfectly level foundation—usually a composite pad or a concrete base. If the pad is not level, the compressor oils can pool unevenly, leading to mechanical failure. Preparing this base requires minor excavation, which must be done carefully to avoid disturbing the major root systems of nearby trees or large shrubs.
Routing the electrical lines and refrigerant piping (the line set) is another area where professional care shines. These lines must be run from the indoor equipment to the outdoor unit. Our professionals route these neatly, often tucking them along existing architectural lines or burying them in protective conduits where local codes allow, minimizing visual disruption to your garden. Whether the project is a standard residential home or follows heavier construction/commercial standards, the neatness of the routing is a clear indicator of quality.
It is critical to note that electrical panel upgrades and high-voltage wiring must be handled by licensed professionals to meet local building and safety codes. An outdoor HVAC unit draws significant amperage, and improper wiring poses a severe fire hazard. Never attempt DIY electrical or refrigerant work. A licensed technician ensures that the disconnect box is mounted safely, legally, and as unobtrusively as possible, blending into the background of your landscaping while remaining fully accessible during the peak summer growing season.
Achieving the perfect balance between your garden and your cooling system during installation is only half the battle; maintaining that balance requires ongoing attention. As the peak summer growing season accelerates, your landscaping will inevitably creep closer to the mandatory clearance zones. Setting a regular maintenance schedule ensures that your unit continues to operate at peak efficiency without sudden breakdowns.
You should establish a routine for checking plant encroachment at least once a month during the spring and summer. Trim back any shrubs or branches that have grown within that 24 to 36-inch buffer zone. Additionally, be mindful of organic debris. Wind and rain can blow leaves, twigs, and grass clippings against the condenser fins. When clearing this debris, use a soft brush or a gentle stream from a garden hose—never use a pressure washer or stiff tools, as the aluminum fins are delicate and easily crushed.
• Spring: Clear away winter debris, check for frost heave under the unit pad, and prune early-blooming shrubs away from the clearance zone.
• Summer: Monitor rapid plant growth, gently wash pollen and dust off the exterior fins, and ensure grass clippings are directed away from the unit when mowing.
• Fall: Rake leaves frequently to prevent them from piling up against the base of the unit, which traps moisture and causes rust.
• Annual Professional Check: Schedule a comprehensive inspection to ensure the unit hasn't ingested organic material deep into the coil. Staying on top of this is easy when you are enrolled in a professional HVAC Maintenance Plan.
Manufacturer minimum clearance requirements for airflow typically dictate 24 to 36 inches of completely unobstructed space around the sides of the unit. Above the unit, you generally need 4 to 6 feet of vertical clearance to prevent hot exhaust air from being trapped by overhangs or low branches. Maintaining this space is critical for system efficiency and longevity.
Yes, you can place plants around your unit, provided you strictly respect the minimum clearance zones. Choose low-growth, slow-spreading plants that do not shed excessive leaves or seed pods. Always plan your planting based on the mature size of the shrub, not its size on the day you plant it.
While shading the unit from direct afternoon sun can theoretically provide a minor boost to efficiency, the benefits are quickly negated if the shade source (like a dense bush or low tree canopy) restricts airflow. The system relies far more on a massive volume of free-flowing air to reject heat than it does on ambient shade.
Shrubs should be planted at least 3 feet away from the heat pump to ensure adequate airflow and provide technicians with enough room to access the access panels for maintenance. During the peak summer growing season, you may need to trim them back regularly to maintain this mandatory buffer.
Professional installers, like our team at Presidential Ventilation Systems Ltd., conduct a meticulous site evaluation to map out safe pathways for heavy equipment. We use protective ground mats, stage tools in safe zones like driveways, and carefully route refrigerant lines to minimize soil disruption, ensuring your garden remains pristine.
The outdoor unit contains a condenser coil designed to release heat absorbed from your home into the outside air. If airflow is restricted by encroaching landscaping, the heat cannot dissipate, causing the compressor to overwork, reducing efficiency by up to 30%, and potentially leading to a total system breakdown.
You truly do not have to choose between a comfortable, perfectly cooled home and a beautifully manicured yard. Understanding why landscaping matters when placing outdoor AC units in Mount Uniacke empowers you to make informed decisions about your property. With strategic placement, rigorous adherence to manufacturer minimum clearance requirements for airflow, and a team dedicated to property respect, your home upgrade can be completely seamless.
If you are ready to enhance your indoor comfort, be sure to ask about any available rebates that might make your upgrade even more cost-effective. A professional site evaluation is the first step toward a flawless installation. Reach out today to ensure your new system is placed perfectly, protecting both your investment and your beloved gardens.


Your indoor temperatures are climbing, but the thought of heavy equipment tearing up your prized flower beds makes you hesitate to upgrade. At Presidential Ventilation Systems Ltd., this is a concern we hear often, which is exactly why landscaping matters when placing outdoor AC units in Mount Uniacke. Balancing mandatory technical clearance requirements for outdoor AC units with the preservation of established gardens is a concrete problem many homeowners face. The decision point ultimately comes down to determining the precise placement and orientation of the outdoor unit to ensure required airflow without destroying existing landscaping. Upgrading your home comfort should never mean sacrificing the curb appeal you have worked so hard to cultivate.
To learn more about optimizing your home's comfort without sacrificing your yard, explore our comprehensive guide to Heat Pumps.
Most homeowners don't realize that a successful installation requires a delicate balance between thermodynamics and landscape architecture. An outdoor cooling unit is essentially a heavy, vibrating metal box that needs ample breathing room to function correctly. When our technicians arrive on site, we understand the immediate anxiety property owners feel watching heavy boots and bulky machinery navigate near delicate perennials. By prioritizing property respect right from the start, our professional site evaluation ensures that both the technical specifications of the equipment and the aesthetic concerns of the homeowner are fully met. The goal is a seamless integration where your garden continues to thrive, and your home stays perfectly cool.
Here's the thing: you cannot just drop a condenser unit wherever it looks best. The location must serve the mechanical needs of the system first. However, strategic placement means finding the optimal intersection between the shortest run for refrigerant lines, the most stable ground, and the least intrusive spot for your garden's layout. A meticulous approach to placement prevents future headaches, ensuring that your beautiful landscaping does not inadvertently choke your new cooling system.
In our years of installing systems throughout the area, we've found that understanding the physics behind your cooling system is the first step in planning your landscaping. The outdoor unit's primary job is to release the heat that has been absorbed from inside your home. To do this efficiently, the system requires a massive volume of air to be pulled through its fins and exhausted out the top or front. This is why manufacturer minimum clearance requirements for airflow typically mandate 24 to 36 inches of unobstructed space around the entire perimeter of the unit. Ignoring these specifications is a surefire way to compromise your system's performance.
Restricted airflow from encroaching shrubs, low-hanging branches, or dense ground cover can reduce system efficiency by up to 30%. When the unit cannot properly dissipate heat, the compressor is forced to work overtime. This constant strain not only drives up your monthly energy bills but also significantly increases the risk of premature compressor failure. If you have ever wondered why your air conditioner is not working during a heatwave, suffocating landscaping is often a primary culprit.
The outdoor condenser coil is designed to reject heat into the surrounding air. If dense foliage surrounds the unit, that rejected heat becomes trapped in a localized bubble. Instead of pulling in fresh, ambient air, the system ends up recycling its own heated exhaust. This forces the system to operate at much higher internal pressures and temperatures than it was designed for. Mount Uniacke's humid summers demand optimal airflow to effectively reject heat from the home, as humidity already makes heat transfer more difficult.
• Optimal Clearance (24-36 inches) — System Efficiency: Maximum rated efficiency — Compressor Lifespan: Normal expected lifespan — Cooling Performance: Rapid, consistent cooling
• Partial Restriction (12-20 inches) — System Efficiency: Drops by 10-15% — Compressor Lifespan: Accelerated wear and tear — Cooling Performance: Longer run times, higher bills
• Severe Restriction (Under 12 inches) — System Efficiency: Drops by up to 30% — Compressor Lifespan: High risk of premature failure — Cooling Performance: System struggles to cool the home
A common pitfall in landscape planning is designing around the current size of a plant rather than its mature size. A small, decorative shrub planted 24 inches away from your outdoor unit might seem perfectly safe in May, but by August, it could be suffocating your condenser. During the peak summer growing season, plants can quickly encroach on mandatory clearance zones, turning a technically perfect installation into an airflow nightmare.
To avoid this, you must plan your garden with the mature spread and height of each plant in mind. Fast-growing perennials and aggressive vines should be kept far away from the HVAC zone. Instead, opt for slow-growing, low-debris plants that maintain a compact profile. If you are considering an upgrade and want to ensure your new system fits perfectly within your garden's future growth, scheduling a Ductless Heat Pump Installation consultation can help map out the safest zones for equipment placement.
1. Research mature dimensions: Always check the maximum width a shrub or plant will reach, and measure your 36-inch clearance from that future boundary, not the current root ball.
2. Avoid high-debris trees: Trees that drop excessive leaves, pine needles, or seed pods can quickly clog the narrow fins of your condenser coil.
3. Select low-growth ground cover: Choose ground covers that stay under a few inches tall and do not send out aggressive runners that could climb the unit's base.
4. Maintain an access path: Technicians need a clear, safe path to reach the unit for maintenance and repairs without trampling your surrounding beds.
While summer foliage is a primary concern, our team at Presidential Ventilation Systems Ltd. knows firsthand that Mount Uniacke's significant winter snowfall presents an equally critical challenge for outdoor unit placement. Snowbanks and ice accumulation can restrict vital airflow just as badly as overgrown summer shrubs. When planning the location of your unit, we always contrast summer landscaping concerns with the realities of heavy winter weather.
One major consideration is the roof drip line. Placing an outdoor unit directly beneath a roof valley or an area without gutters is a recipe for disaster. Melting snow from the roof will drip directly onto the unit, and when temperatures drop overnight, that water freezes solid. This can encase the fan blades in ice, leading to catastrophic motor failure the next time the system tries to turn on. Manufacturer minimum clearance requirements for airflow also apply to snow clearance; the unit must be able to breathe even after a heavy blizzard.
To combat snowdrifts, professional installers often elevate outdoor units on specially designed snow stands or wall-mounted brackets. This keeps the base of the unit above the average snow line, ensuring that the defrost cycle can drain properly and that the lower intake vents remain unobstructed. Elevating the unit also protects it from localized flooding during rapid spring thaws, ensuring your system remains safe and operational year-round.
The hallmark of a premium installation is a proactive site-evaluation process that prioritizes property respect before a single piece of equipment is moved. Your garden represents hours of hard work, and a careless installation crew can undo years of landscaping in a single afternoon. Our professional team understands that technical manufacturer specifications and beautiful flower beds can coexist with proper design and careful planning.
For instance, we recently had a Mount Uniacke homeowner reach out to us during a severe summer heat wave when they needed multiple air conditioning units installed. Despite the crazy heat, our crew worked hard to map out a safe path that actively respected the property and even minimized disruption near the baby's room during the heavy lifting phases. We navigated the heavy equipment without trampling the surrounding garden beds, and provided a thorough system rundown once the job was done. The outcome was a perfectly cooled house and an untouched yard, proving that meticulous care makes all the difference.
Pathfinding: Before bringing in the condenser, our technicians will walk the property with you to agree on the safest route for heavy dollies and equipment, avoiding soft earth and delicate root systems.
Protective Measures: When working near established beds, professionals use protective mats and plywood pathways to distribute weight and prevent soil compaction.
Strategic Staging: Tools, refrigerant tanks, and old equipment are staged in designated safe zones, typically on driveways or patios, rather than being dropped onto the lawn.
Beyond airflow and aesthetics, the structural and electrical foundations of your outdoor unit require careful integration into your landscape. The unit must sit on a stable, perfectly level foundation—usually a composite pad or a concrete base. If the pad is not level, the compressor oils can pool unevenly, leading to mechanical failure. Preparing this base requires minor excavation, which must be done carefully to avoid disturbing the major root systems of nearby trees or large shrubs.
Routing the electrical lines and refrigerant piping (the line set) is another area where professional care shines. These lines must be run from the indoor equipment to the outdoor unit. Our professionals route these neatly, often tucking them along existing architectural lines or burying them in protective conduits where local codes allow, minimizing visual disruption to your garden. Whether the project is a standard residential home or follows heavier construction/commercial standards, the neatness of the routing is a clear indicator of quality.
It is critical to note that electrical panel upgrades and high-voltage wiring must be handled by licensed professionals to meet local building and safety codes. An outdoor HVAC unit draws significant amperage, and improper wiring poses a severe fire hazard. Never attempt DIY electrical or refrigerant work. A licensed technician ensures that the disconnect box is mounted safely, legally, and as unobtrusively as possible, blending into the background of your landscaping while remaining fully accessible during the peak summer growing season.
Achieving the perfect balance between your garden and your cooling system during installation is only half the battle; maintaining that balance requires ongoing attention. As the peak summer growing season accelerates, your landscaping will inevitably creep closer to the mandatory clearance zones. Setting a regular maintenance schedule ensures that your unit continues to operate at peak efficiency without sudden breakdowns.
You should establish a routine for checking plant encroachment at least once a month during the spring and summer. Trim back any shrubs or branches that have grown within that 24 to 36-inch buffer zone. Additionally, be mindful of organic debris. Wind and rain can blow leaves, twigs, and grass clippings against the condenser fins. When clearing this debris, use a soft brush or a gentle stream from a garden hose—never use a pressure washer or stiff tools, as the aluminum fins are delicate and easily crushed.
• Spring: Clear away winter debris, check for frost heave under the unit pad, and prune early-blooming shrubs away from the clearance zone.
• Summer: Monitor rapid plant growth, gently wash pollen and dust off the exterior fins, and ensure grass clippings are directed away from the unit when mowing.
• Fall: Rake leaves frequently to prevent them from piling up against the base of the unit, which traps moisture and causes rust.
• Annual Professional Check: Schedule a comprehensive inspection to ensure the unit hasn't ingested organic material deep into the coil. Staying on top of this is easy when you are enrolled in a professional HVAC Maintenance Plan.
Manufacturer minimum clearance requirements for airflow typically dictate 24 to 36 inches of completely unobstructed space around the sides of the unit. Above the unit, you generally need 4 to 6 feet of vertical clearance to prevent hot exhaust air from being trapped by overhangs or low branches. Maintaining this space is critical for system efficiency and longevity.
Yes, you can place plants around your unit, provided you strictly respect the minimum clearance zones. Choose low-growth, slow-spreading plants that do not shed excessive leaves or seed pods. Always plan your planting based on the mature size of the shrub, not its size on the day you plant it.
While shading the unit from direct afternoon sun can theoretically provide a minor boost to efficiency, the benefits are quickly negated if the shade source (like a dense bush or low tree canopy) restricts airflow. The system relies far more on a massive volume of free-flowing air to reject heat than it does on ambient shade.
Shrubs should be planted at least 3 feet away from the heat pump to ensure adequate airflow and provide technicians with enough room to access the access panels for maintenance. During the peak summer growing season, you may need to trim them back regularly to maintain this mandatory buffer.
Professional installers, like our team at Presidential Ventilation Systems Ltd., conduct a meticulous site evaluation to map out safe pathways for heavy equipment. We use protective ground mats, stage tools in safe zones like driveways, and carefully route refrigerant lines to minimize soil disruption, ensuring your garden remains pristine.
The outdoor unit contains a condenser coil designed to release heat absorbed from your home into the outside air. If airflow is restricted by encroaching landscaping, the heat cannot dissipate, causing the compressor to overwork, reducing efficiency by up to 30%, and potentially leading to a total system breakdown.
You truly do not have to choose between a comfortable, perfectly cooled home and a beautifully manicured yard. Understanding why landscaping matters when placing outdoor AC units in Mount Uniacke empowers you to make informed decisions about your property. With strategic placement, rigorous adherence to manufacturer minimum clearance requirements for airflow, and a team dedicated to property respect, your home upgrade can be completely seamless.
If you are ready to enhance your indoor comfort, be sure to ask about any available rebates that might make your upgrade even more cost-effective. A professional site evaluation is the first step toward a flawless installation. Reach out today to ensure your new system is placed perfectly, protecting both your investment and your beloved gardens.
Is it possible to keep a detached workshop comfortable when it completely lacks thermal retention? When comparing cold-climate mini splits for uninsulated garages in Nova Scotia, you are ultimately trying to solve a concrete problem: you want to use your outbuilding year-round, but standard heating methods waste massive amounts of energy while the space remains freezing. The core decision comes down to choosing between a premium hyper-heat system and a standard unit, while carefully factoring in the electrical reality of your detached space.
If you are ready to explore your options for garage comfort, reviewing our complete guide to Heat Pumps is the best place to start.
Heating an uninsulated space is an uphill battle against physics. A harsh Nova Scotia winter brings a specific kind of freezing coastal dampness that quickly penetrates uninsulated walls, turning a standard garage into an icebox. Relying on basic square-footage rules to size a heating system for this environment simply does not work. Instead, achieving true comfort requires a realistic, physics-based approach that balances thermal heat loss with the mechanical and electrical capabilities of modern HVAC equipment.
The problem: Standard residential HVAC sizing assumes your walls, roof, and windows have a baseline level of thermal retention. Uninsulated spaces, however, lose heat almost as fast as a system can produce it. The thermal envelope is virtually non-existent, meaning the air inside the garage offers no buffer against the outdoor elements.
The cause: A common but flawed strategy is to simply install an oversized standard unit, assuming the extra power will overcome the lack of insulation. In reality, oversizing leads to short-cycling. The oversized unit blasts a massive amount of heat, quickly satisfies the thermostat, and shuts off. Because the garage has no insulation, the temperature plummets within minutes, forcing the system to turn back on. This constant on-and-off cycling causes premature wear on the compressor and wastes a tremendous amount of electricity.
The solution: Instead of guessing with square footage, you need a professional heat-loss calculation. This evaluates the specific materials of your garage, the ceiling height, and the draft points to determine exactly how much heating capacity is required to maintain a set temperature.
For more details on how these systems operate, you can explore our resources on Ductless Heat Pumps.
In our 30+ years serving the region, what our Red Seal tradespeople see in the field is that temperature is only half the battle. High humidity combined with freezing temperatures creates a much heavier thermal load on your building. Wind chill on detached structures lacking proper vapor barriers strips heat away rapidly. The moist, freezing air of a coastal winter constantly pulls warmth through the thin garage walls, forcing any heating system to work continuously just to maintain a baseline temperature above freezing.
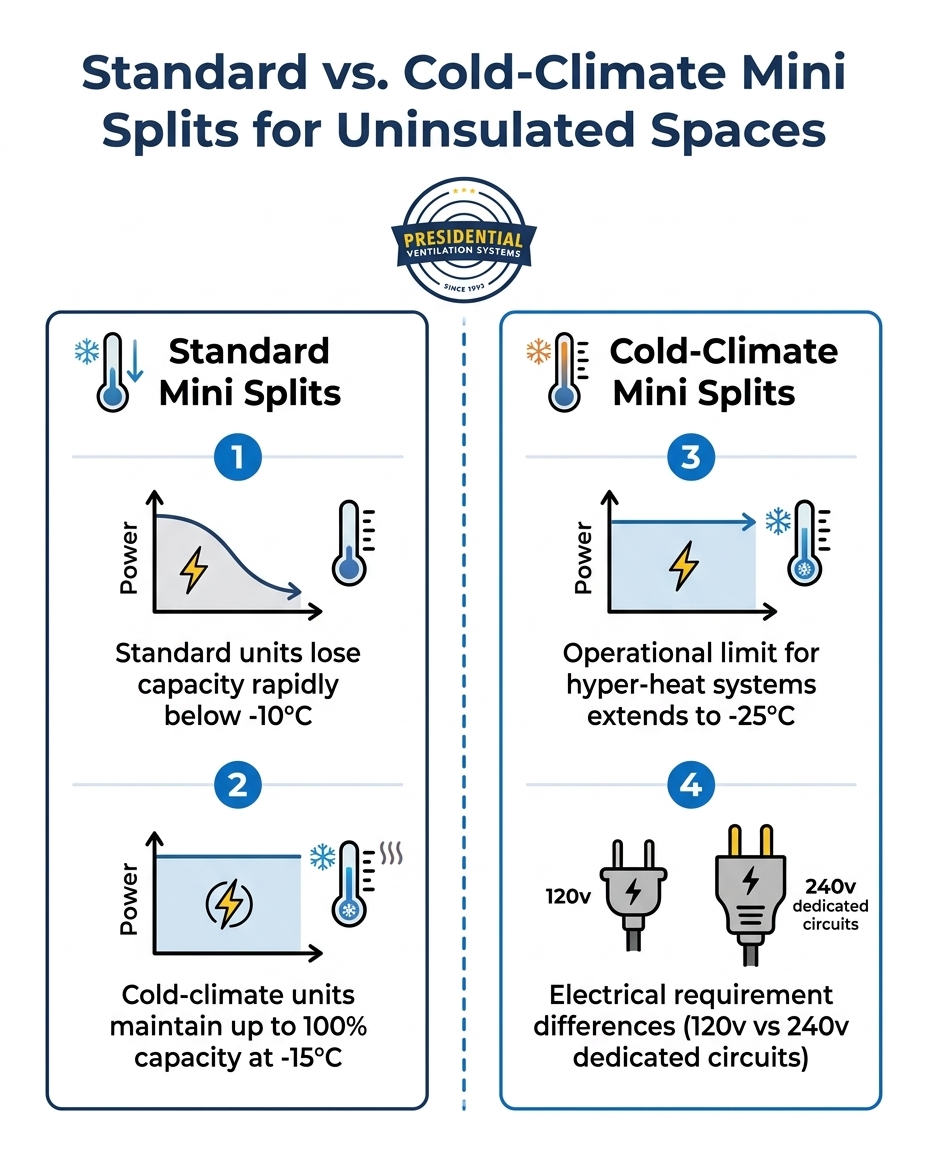
Standard heat pumps are highly efficient pieces of engineering, but they have distinct operational limits when deployed in poorly insulated environments. Most standard units begin to lose significant heating capacity once the outdoor temperature drops below -10 degrees Celsius. While this might be manageable in a well-insulated living room, it becomes a severe liability in an uninsulated garage.
The Coastal Defrost Dilemma: Nova Scotia's frequent temperature swings and coastal dampness trigger frequent, energy-draining defrost cycles. When a heat pump operates in heating mode, the outdoor coil gets extremely cold. Moisture from the humid coastal air condenses and freezes on this coil. To protect itself, the system periodically goes into a defrost cycle—temporarily reversing its operation to melt the ice on the outdoor unit.
During a defrost cycle, the indoor unit stops blowing warm air. In a well-insulated home, you barely notice this brief pause. However, uninsulated spaces exacerbate the defrost problem. Without insulation to hold the heat, the garage temperature plummets rapidly during the 10-to-15-minute defrost period. By the time the unit resumes heating, it has to work at maximum capacity just to recover the lost ground.
There are, however, specific scenarios where a standard system, such as standard Lennox Ductless Systems, might suffice for an outbuilding. If you only use your workshop during the mild shoulder seasons (spring and fall) and plan to winterize and abandon the space during the deep freezes of January and February, a standard unit can provide excellent, efficient comfort without the premium cost of a hyper-heat model.
For homeowners who need reliable warmth in their workshop every day of the winter, cold-climate (or hyper-heat) systems offer a robust engineering solution. These units are specifically designed to maintain their output in extreme conditions where standard units fail.
• Advanced Inverter Compressors: Unlike standard units that lose power as temperatures drop, premium cold-climate units utilize advanced inverter-driven compressors. These can maintain up to 100% of their rated heating capacity down to -15 degrees Celsius.
• Extreme Low-Temperature Operation: High-end models, such as Daikin Comfort Pro cold-climate systems, boast continuous operation capabilities even when the thermometer plunges to -25 degrees Celsius, ensuring your workshop pipes won't freeze during a severe cold snap.
• Optimized Defrost Logic: Hyper-heat systems manage defrost cycles more intelligently. They often feature redesigned outdoor base pans with built-in heaters that prevent ice accumulation, allowing the system to space out its defrost cycles and minimize the temperature drop inside the garage.
The long-term energy efficiency of a system designed to run continuously in harsh conditions is vastly superior to a standard unit that spends half the winter struggling to catch up. A hyper-heat unit modulates its power output, providing a steady, consistent stream of warmth that fights back against the rapid heat loss of bare garage walls.
One of the most critical, yet frequently overlooked, aspects of heating a detached structure is the electrical infrastructure required to support the equipment. Upgrading to a high-capacity heat pump is not just an HVAC decision; it is an electrical project. With our dual in-house expertise featuring Red Seal HVAC and electrical tradespeople, we consistently see homeowners caught off guard by their garage's power limitations.
1. Understanding the Voltage Difference: While some small, standard-efficiency heat pumps can run on a standard 120v circuit, high-capacity hyper-heat systems require a dedicated 240v circuit to generate the immense power needed during deep freezes.
2. Sub-Panel Limitations: Most standard detached garages are wired with a basic sub-panel intended only for lighting, a garage door opener, and a few standard outlets. These small panels rarely have the physical space or the amperage capacity to support a new 240v double-pole breaker.
3. Infrastructure Upgrades: If your garage sub-panel is undersized, safely powering a cold-climate unit may require a main panel upgrade at your house, followed by a dedicated underground trench run to bring heavy-gauge wiring out to the detached structure.
4. Safety First: Attempting to overload an existing, under-equipped circuit in a detached structure poses severe fire and safety risks. High-draw units must be hardwired to code by licensed electricians.
Before falling in love with a specific heat pump model, you must evaluate what your garage can handle. Look at the sub-panel in your garage: does it have empty breaker slots? What is the main breaker rating on that sub-panel? Because these variables are complex, a licensed electrician must evaluate the load calculation of both your main home panel and your garage sub-panel before an HVAC installation can safely proceed.
To help you weigh your options for your detached workspace, it helps to look at the operational differences side-by-side. If you want to dive deeper into specific models across the industry, you can read our guide on the best ductless heat pumps.
• Sub-Zero Capacity — Standard Mini Split: Loses significant heating capacity below -10°C. — Cold-Climate (Hyper-Heat) Mini Split: Maintains up to 100% capacity down to -15°C; operates at -25°C.
• Electrical Load — Standard Mini Split: Often available in 120v models for smaller capacities. — Cold-Climate (Hyper-Heat) Mini Split: Requires a dedicated 240v circuit and sufficient panel amperage.
• Defrost Frequency — Standard Mini Split: Frequent cycles in coastal dampness; slow recovery in uninsulated spaces. — Cold-Climate (Hyper-Heat) Mini Split: Advanced defrost logic and base pan heaters reduce cycle frequency.
• Best Use Case — Standard Mini Split: Weekend hobbyists; mild shoulder-season usage. — Cold-Climate (Hyper-Heat) Mini Split: Daily winter workspaces; protecting sensitive equipment from freezing.
Transitioning from theory to a functional, warm garage requires moving away from online calculators. Square-footage calculators assume your building has standard residential insulation, drywall, and double-pane windows. Using these tools for a detached, uninsulated structure will leave you with an undersized system that runs constantly but never actually warms the room.
A professional heat-loss assessment involves evaluating the specific wall materials, measuring the ceiling height, identifying major draft points (like unsealed overhead doors), and calculating the exact thermal load required to overcome the lack of insulation. Because of our comprehensive approach, a combined HVAC and electrical inspection prevents costly mid-project surprises. We evaluate the panel capacity at the same time we evaluate the thermal load, ensuring the system we recommend can actually be powered safely.
One homeowner reached out to our team last fall needing a complex multi-head ductless split heat pump system installed in a challenging space. By performing a proper, thorough assessment first, our technicians were able to install four mini-split heads that ultimately exceeded the customer's expectations for both comfort and efficient operation.
It is also important to note that while government and provincial rebates may be available for primary residences, outbuildings often have entirely different eligibility rules. Because rebate programs change frequently, you should always confirm current eligibility with our team during your assessment. Once your system is installed, protecting your investment is crucial, which is why we recommend reviewing our Heat Pump Maintenance Plan.
Yes, but it requires precise sizing and the right equipment. An uninsulated garage loses heat rapidly, so a standard unit will likely struggle during deep freezes. To effectively heat the space, you typically need a hyper-heat model sized specifically via a professional heat-loss calculation, rather than relying on square footage. Without insulation, the unit will run more frequently to maintain the temperature.
High-capacity heat pumps generally require a dedicated 240-volt circuit. Many basic garage sub-panels are only equipped to handle 120-volt lighting and standard outlets. Installing a hyper-heat system often requires upgrading the garage sub-panel or running a new, dedicated electrical trench from the home's main breaker panel to safely handle the increased load.
Heat pumps struggle in uninsulated spaces because there is no thermal envelope to trap the warm air they produce. As soon as the unit satisfies the thermostat and shuts down, the heat immediately escapes through the walls and roof. This rapid heat loss forces the system to run almost continuously, and makes the temperature drop severely during the unit's mandatory outdoor defrost cycles.
The outdoor unit of a mini split is designed to handle winter weather, but it will accumulate frost during operation in cold, humid climates. To combat this, the system runs an automatic defrost cycle to melt the ice off the outdoor coil. Premium cold-climate models often feature built-in base pan heaters to ensure ice drains away safely without damaging the fan blades or compressor.
If you plan to use the workshop daily throughout the deep winter, a hyper-heat mini split is absolutely worth the investment. It guarantees continuous warmth even when temperatures drop to -25 degrees Celsius, protecting your tools, materials, and comfort. However, if you only use the shop occasionally during mild spring and fall weather, a standard unit may be more cost-effective.
No, you cannot plug a cold-climate heat pump into a standard wall outlet. High-capacity hyper-heat systems draw significant amperage and require a hardwired, dedicated 240-volt circuit installed by a licensed electrician. Attempting to run heavy HVAC equipment on standard 120v garage wiring is a major fire hazard and violates electrical codes.
Satisfying garage comfort requires balancing thermal heat loss, equipment capability, and electrical safety. Comparing cold-climate mini splits for uninsulated garages in Nova Scotia isn't just about picking a brand; it is about understanding how coastal dampness and rapid heat loss affect equipment performance. A realistic comparison prevents wasted investments on undersized units that run constantly without ever making the room comfortable.
Because every outbuilding has unique thermal and electrical challenges, guessing on a system size is a risk you don't have to take. Our Red Seal tradespeople are here to provide a thorough, professional assessment of both your HVAC needs and your electrical panel capacity. Reach out to Presidential Ventilation Systems today to request a free estimate and find the right heating solution for your detached workspace.
You are planning an oil-to-heat-pump conversion, but you might be wondering why we require dedicated circuits for ductless mini splits in older homes instead of simply plugging the new unit into an existing wall outlet. It is a question our team at Presidential Ventilation Systems hears frequently during the estimate phase. Homeowners naturally want to save time and minimize disruptions to their drywall. Tying a new indoor air handler into a nearby bedroom or living room circuit seems like a fast, logical shortcut. However, the existing electrical infrastructure in aging properties was never designed to handle the continuous, heavy load of modern heating equipment.
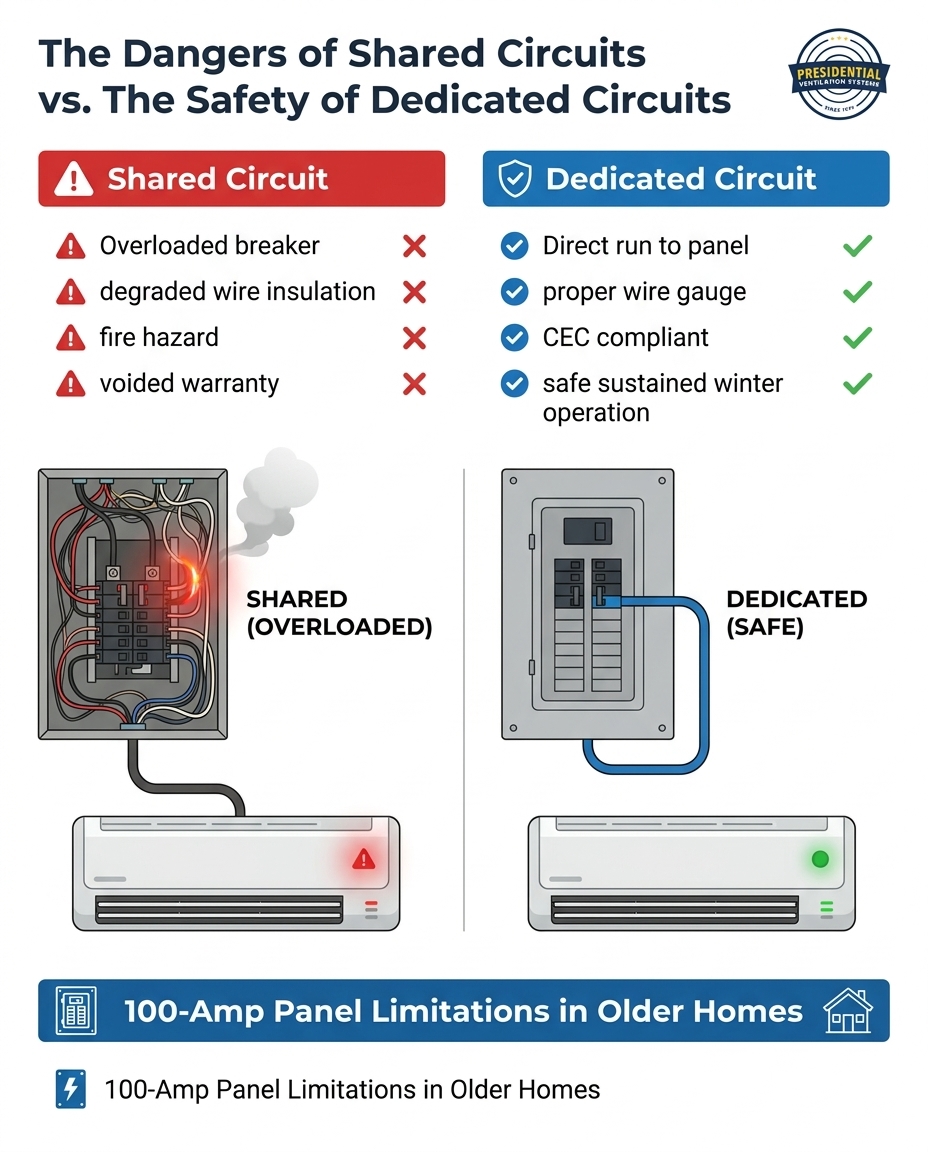
If you are exploring heat pump systems, understanding the electrical side of a ductless heat pump installation is just as critical as selecting the right hardware. The decision to run a dedicated electrical line straight back to your main electrical panel is not an arbitrary upsell. It is a strict safety standard. Without a dedicated circuit, you risk overloaded breakers, compromised wire insulation, and hidden fire hazards. In our 30+ years serving Mount Uniacke and the surrounding Nova Scotia communities, we have seen firsthand why taking shortcuts with existing wiring is a gamble no homeowner should take.
Common misconceptions about heat pump wiring:
• "It runs on electricity, so any outlet works." Standard wall outlets are wired for intermittent, low-draw devices, not continuous heating equipment.
• "My breaker hasn't tripped before, so it has room." A breaker that holds a television and a lamp will trip immediately when a compressor surges to life.
• "Smaller units do not need dedicated power." Even 110V mini splits require their own dedicated breaker to operate safely and meet code.
When our Red Seal electricians assess older Nova Scotia homes, it is very common to find properties still operating on 60-amp or 100-amp service panels. When these homes were built, the electrical demands of daily life were entirely different. A typical household ran a few incandescent lights, a refrigerator, and perhaps a small television. Today, we plug in computers, air fryers, electric vehicles, and high-efficiency heating systems. When you attempt to share a circuit, you are asking decades-old wiring to perform a job it was never engineered to do.
A shared circuit works by distributing available amperage across multiple outlets and fixtures on a single line. If you add a heat pump to a line that already powers your living room lights, a space heater, or a home entertainment center, you push the circuit far beyond its safe operational capacity. The immediate result is a frequently tripped breaker. While a tripped breaker is annoying, it is actually the safety mechanism doing its job. The real danger occurs when people ignore the tripping breaker, attempt to replace it with a larger one, or rely on degraded wiring that fails to trip the breaker in time.
• Microwave Oven — Typical Electrical Draw: High (Intermittent) — Duration of Load: 1 to 5 minutes — Circuit Requirement: Shared or Dedicated (Kitchen)
• Vacuum Cleaner — Typical Electrical Draw: Moderate — Duration of Load: 10 to 20 minutes — Circuit Requirement: Shared (General Lighting)
• Television / Electronics — Typical Electrical Draw: Low — Duration of Load: Hours — Circuit Requirement: Shared (General Lighting)
• Ductless Mini Split — Typical Electrical Draw: High (Continuous) — Duration of Load: Hours to Days — Circuit Requirement: Strictly Dedicated
Electrical safety comes down to matching the wire gauge and the breaker size to the specific draw of the appliance. If a heat pump draws 20 amps, it requires wiring thick enough to carry 20 amps without overheating, protected by a breaker designed to trip if the load exceeds that limit.
When you force a high-draw appliance onto an undersized, shared wire, the copper inside your walls gets hot. Over time, this sustained overheating degrades the plastic or rubber insulation surrounding the wire. Brittle, melted, or crumbling insulation exposes bare copper, creating a severe fire hazard hidden entirely behind your drywall. Taking shortcuts on electrical infrastructure compromises the safety of the entire household.
To truly understand why a dedicated circuit is necessary, we have to look at how a heat pump operates during freezing Maritime winters. Modern ductless mini splits are incredibly efficient, utilizing advanced inverter technology to modulate their output. However, efficiency does not mean they run on a trickle of electricity. When the temperature drops rapidly, these systems draw sustained amperage to keep your home comfortable.
During a deep freeze, your heat pump's compressor has to work at maximum capacity to extract ambient heat from the bitter outside air. This process requires a significant, continuous flow of electricity. Unlike a toaster or a hair dryer that runs for a few minutes and then shuts off, your heating system may run continuously for days during a severe winter storm. This sustained winter draw puts immense pressure on your electrical infrastructure.
How cold weather impacts electrical draw:
• Defrost cycles: The system periodically uses extra energy to melt ice buildup on the outdoor coil.
• Maximum compressor load: Extracting heat from -15°C air requires the compressor to run at its highest speed, drawing maximum running amps.
• Sustained operation: The system rarely cycles off during extreme cold, meaning the electrical wires have no time to cool down.
If your heat pump shares a circuit with other household items, the combined load during these extreme weather events will easily overwhelm older Nova Scotia homes. A dedicated circuit is the only way to ensure the system has the uninterrupted power it needs to keep your family warm when you need it most.
Beyond basic physics and safety, there is a legal and regulatory framework governing how heating equipment must be installed. The Canadian Electrical Code (CEC), also known as CSA C22.1, mandates specific standards for stationary heating appliances. Under these national regulations, hardwired heating equipment requires a dedicated circuit. Our in-house Red Seal tradespeople follow these codes strictly because they were written to prevent the exact circuit overloads and fire hazards we discussed earlier.
The electrical code also dictates how the system connects to the exterior of your home. A dedicated circuit is not just a wire running to the indoor unit; it involves an outdoor disconnect box mounted near the exterior compressor. This disconnect box provides a safe, immediate way for technicians to cut power to the unit during maintenance, repairs, or emergencies without having to run inside to the main breaker panel.
Ignoring these electrical codes during a major home upgrade carries significant consequences. If an unpermitted, non-compliant electrical installation causes a fire or property damage, your home insurance provider may deny your claim. Insurance companies expect major electrical modifications to be completed by licensed professionals following current CEC standards. Doing the job right the first time protects your property, your family, and your financial liability.
Improper electrical installation does not just pose a safety risk; it also threatens your long-term investment in the equipment itself. As a Daikin Comfort Pro, we know firsthand that major manufacturers like Daikin and Lennox explicitly require dedicated circuits in their official installation manuals. These engineering specifications are not suggestions—they are mandatory requirements for maintaining the validity of your manufacturer warranty.
The compressor is the heart of your heat pump and the most expensive component to replace. It is also highly vulnerable to electrical starvation. If a compressor operates on a shared circuit that experiences voltage drops or power fluctuations, it has to work much harder to maintain its internal magnetic fields. This causes the compressor motor to run hot, significantly reducing its lifespan.
Electrical issues that can void your warranty:
1. Voltage drops: Caused by undersized wiring or shared loads pulling power away from the heat pump.
2. Improper breaker sizing: Using a breaker that is too large for the wire, allowing the equipment to draw dangerous levels of current before tripping.
3. Lack of a disconnect box: Failing to install the required outdoor safety switch.
4. Non-compliant wiring methods: Splicing into existing room circuits instead of running a continuous line to the panel.
If your system fails prematurely and the manufacturer determines that voltage drops, power surges, or improper wiring caused the breakdown, they can—and often will—void the warranty. In our decades of experience, we have seen homeowners stuck with massive repair bills because a previous installer took an electrical shortcut. Doing the electrical work correctly the first time is the ultimate protection for your investment.
One of the most common homeowner headaches during a retrofit is dealing with multiple contractors. Often, an HVAC company will mount the indoor head, set the outdoor unit, run the refrigeration lines, and then tell the homeowner, "You will need to go hire a separate electrician to finish the wiring." This leaves you responsible for coordinating schedules, pulling separate permits, and managing communication between two different companies.
Because Presidential Ventilation Systems employs both HVAC and electrical professionals under one roof—with a team of approximately 70 skilled employees—we eliminate this frustration. Having both disciplines in-house ensures that your system is sized correctly from both a thermal and an electrical perspective. Our Red Seal tradespeople do not just view a heat pump as a refrigeration job; they view it as a comprehensive home infrastructure upgrade.
When you utilize our HVAC and electrical services, you experience a seamless process. One unified team handles the refrigeration lines, drills the necessary penetrations, runs the dedicated circuit back to the panel, and installs the outdoor disconnect box. This integrated approach provides peace of mind. There is a single point of accountability. If you ever have a question about how your system is running or how it is wired, you make one phone call to the team that built it, with no finger-pointing between separate contractors.
Understanding that you need a dedicated circuit is the first step, but what happens if your current electrical panel cannot support one? In older Nova Scotia homes, it is very common for our electricians to find a 100-amp panel that is completely full, lacking the physical space or the overall capacity for a new 220V breaker.
Before installing high-draw heating appliances, a professional must conduct a proper electrical load calculation. This calculation looks at the total square footage of your home, the existing major appliances (electric range, dryer, water heater), and the proposed new heating load. The goal is to determine if your current service can safely handle the additional demand without exceeding the main breaker's rating.
Solutions for a maxed-out electrical panel:
• Service Upgrades: Upgrading the entire home from a 100-amp service to a 200-amp service. This involves a new panel, a new meter base, and new service wires from the utility pole.
• Adding a Sub-Panel: If the main service has enough overall capacity but lacks physical breaker space, a smaller sub-panel can be installed next to the main panel to house the new circuits.
• Smart Load Management: In some cases, load-mizer devices can be installed to automatically manage power between high-draw appliances (like pausing the electric water heater while the heat pump runs at maximum capacity).
During this assessment, our team also looks for other aging infrastructure challenges. For example, if we encounter outdated wiring types during the upgrade, we can address the need for specialized aluminum wiring remediation to ensure the entire connection path is safe and code-compliant.
Yes, a mini split absolutely needs its own dedicated breaker. The Canadian Electrical Code (CEC) and all major equipment manufacturers require a dedicated circuit to prevent overloads. Sharing a breaker with other household items will lead to frequent tripping, potential fire hazards, and a voided equipment warranty.
No, you cannot plug a mini split into a regular household outlet. These systems require hardwiring directly to a dedicated circuit in your electrical panel. While most systems require a 220V connection, even smaller 110V units must be hardwired to their own dedicated line to operate safely.
It depends entirely on your current panel's capacity and your home's existing electrical load. A professional load calculation is required to determine if your current 100-amp or 200-amp service can handle the new equipment. If your panel is full or maxed out, a service upgrade or a sub-panel will be necessary.
If a heat pump is not on a dedicated circuit, you risk voiding your manufacturer warranty, constantly tripping breakers, and damaging the system's compressor due to voltage drops. More importantly, pulling continuous high amperage through shared, older wiring creates a severe fire hazard hidden behind your walls.
A licensed electrical professional must complete the high-voltage wiring, install the disconnect box, and make the final panel connections. Because Presidential Ventilation Systems employs in-house electrical and HVAC experts, our team handles the entire process from start to finish, ensuring total code compliance.
A dedicated circuit is a non-negotiable requirement for safety, code compliance, and the long-term longevity of your heating system. Proper electrical integration is just as important as choosing the right heat pump hardware. Taking shortcuts on the wiring in older properties puts your home at risk, voids warranties, and leads to premature equipment failure.
When you are planning a major home upgrade, it pays to seek a comprehensive assessment from a team that understands both the refrigeration and the electrical requirements. With 30+ years of local experience serving Mount Uniacke and beyond, we ensure that every aspect of your installation meets the highest safety standards. Rebates and incentive programs for these upgrades are frequently available, though programs and eligibility can change. We recommend confirming current programs with Presidential Ventilation Systems. Contact us today to request a free estimate and ensure your next heating upgrade is safe, reliable, and built to last.