

The repair vs replace your heat pump decision guide you need comes down to five key factors: your system's age, its repair history, the cost of the current fix, how well it's keeping your home comfortable, and its energy efficiency.
Quick Answer: Should You Repair or Replace?
• System is under 10 years old, minor issue — Recommended Action: Repair
• System is 10-15 years old, isolated failure — Recommended Action: Evaluate using the $5,000 Rule
• System is 15+ years old, repeated breakdowns — Recommended Action: Replace
• Repair cost exceeds 50% of new system price — Recommended Action: Replace
• Rising energy bills despite normal usage — Recommended Action: Replace
• Single component failure, good maintenance history — Recommended Action: Repair
Your heat pump is one of the hardest-working systems in your home. In Nova Scotia, it runs through humid summers, icy winters, and everything in between. So when it starts acting up, the pressure to make the right call fast is real.
Here's the thing: the wrong decision costs you either way. Repair a dying system and you're pouring money into a unit that will fail again soon. Replace a fixable one and you've spent far more than you needed to.
Most homeowners make this decision based on one repair quote alone. That's rarely the full picture. Age, efficiency, repair patterns, and total cost of ownership all need to factor in before you commit.
This guide walks you through every piece of that decision clearly and without the guesswork.


When we talk about how long a heat pump should last, we usually look at a window of 10 to 15 years. However, with the high-quality systems we install today and a consistent maintenance schedule, some units can stretch toward the 20-year mark. The reality for us here in Nova Scotia—from Halifax to Mount Uniacke—is that our systems work double duty. They provide cooling during our humid July afternoons and steady heat during the snowy depths of February.
Because they run year-round, they accumulate "mileage" faster than a furnace that sits idle all summer or an air conditioner that sleeps all winter. If your unit is approaching its tenth birthday, it is officially entering its "senior years." This is the point where we recommend homeowners start paying closer attention to performance. Knowing exactly time to replace your heat pump can save you from an emergency breakdown on the coldest night of the year.
Your heat pump rarely fails without sending out a few SOS signals first. One of the most common signs we see is "short cycling." This is when the unit turns on, runs for a few minutes, and shuts off before the house actually reaches the desired temperature, only to turn back on again moments later. This constant starting and stopping puts immense strain on the compressor.
You might also notice strange noises coming from the outdoor cabinet. While a gentle hum is normal, grinding, screeching, or loud rattling usually points to mechanical failure or loose components. If you start hearing these sounds, identifying early signs heat pump failure is the first step in deciding if a simple part replacement will do the trick or if the internal damage is too extensive.
Living near the Atlantic coastline in places like Eastern Passage, Cole Harbour, or Dartmouth means our heat pumps face a unique challenge: salt air. Salt is naturally corrosive, and over time, it can eat away at the delicate aluminum fins on your outdoor coils. Once these coils degrade, the system can’t exchange heat efficiently, forcing it to work harder and drive up your utility bills.
Furthermore, our extreme temperature swings and high humidity levels mean your system is constantly managing moisture. In the winter, a heat pump must go through "defrost cycles" to melt ice off the outdoor coils. If the system is old and struggling, these cycles might fail, leading to a block of ice that can damage the fan or the compressor. When we look at heat pump replacement halifax ns, we always consider how these local environmental factors have accelerated the wear and tear on your specific unit.
When we arrive at a home in Bedford or Sackville to look at a malfunctioning unit, we don't just look at the broken part. We look at the "medical history" of the machine. A repair vs replace your heat pump decision guide must weigh the immediate problem against the long-term reliability of the system.
If the unit has been a "lemon" for the last three years, requiring a service call every six months, the writing is likely on the wall. On the other hand, if this is the very first time the system has skipped a beat in seven years, a repair is almost certainly the way to go. We often point homeowners toward our heat pump repair halifax ultimate guide to help them understand which components are worth fixing and which are signs of a total system collapse.
To take the emotion out of the decision, many experts use a mathematical formula often called the "$5,000 Rule." Here’s how it works: you take the age of your heat pump and multiply it by the estimated cost of the repair. If the total is more than $5,000, it’s generally time to invest that money into a new system instead.
For example, if you have a 12-year-old unit and the repair is going to be significant, that calculation quickly exceeds the threshold. Another common benchmark is the "50% Rule"—if a single repair costs more than half the price of a brand-new system, it’s rarely a wise investment. timely heat pump replacement is crucial because a new unit comes with a fresh warranty, whereas a repair on an old unit only guarantees that one specific part.
Efficiency standards have changed dramatically over the last decade. In 2026, the gap between an old "standard" unit and a new high-efficiency model is wider than ever. We measure this using SEER (Seasonal Energy Efficiency Ratio) for cooling and HSPF (Heating Seasonal Performance Factor) for heating.
Older units might have a SEER rating of 10 or 12, while modern high-efficiency units can reach 20 or higher. This isn't just a number—it translates directly to how much electricity is used to keep your home comfortable. If you’re noticing that your power bills are creeping up every year even though you haven't changed your habits, your heat pump is likely losing its "muscle." Reviewing a heat pump replacements halifax ns guide can help you visualize how much you could save by switching to a unit that sips electricity rather than gulping it.
Replacement isn't always the answer. In fact, for many homeowners in Timberlea or Tantallon, a well-timed repair is the most sensible financial move. If your system is less than 10 years old and the issue is an isolated component failure—like a bad capacitor, a blown fuse, or a clogged condensate drain—repairing is the clear winner.
These are what we call "minor issues." They don't indicate that the system is dying; they just mean it needs a little professional attention. Additionally, if your unit is still under its manufacturer's warranty, you should almost always opt for the repair, as the cost of parts will likely be covered. We see many common heat pump issues that are easily fixed in a single visit, extending the life of your investment by several years.
Before you call us out to your home in Fall River or Waverley, there are a few things you can check yourself. Sometimes the "broken" heat pump is actually just a victim of a simple oversight.
• Check the Thermostat: Is it set to the correct mode (Heat or Cool)? Did someone accidentally change the schedule? Is the battery low?
• Inspect the Air Filter: A clogged filter is the number one cause of heat pump failure. It restricts airflow, causes the system to overheat, and can even lead to ice buildup.
• Look at the Breaker Panel: Did a power surge trip the circuit breaker for the outdoor unit?
• Clear the Outdoor Unit: Ensure there are no leaves, snow, or debris blocking the airflow around the outdoor cabinet.
If these steps don't fix the problem, you might need to solve common heat pump issues by calling in a professional to look at the deeper mechanics.
While we love a proactive homeowner, safety must come first. Heat pumps involve high-voltage electricity and pressurized refrigerant. You should never attempt to open the electrical cabinet or tamper with the refrigerant lines yourself.
If you smell something burning, see smoke, or hear a loud "bang," turn the system off at the thermostat and the breaker immediately. These are signs heat pump needs immediate attention from a licensed technician. Trying to DIY a major electrical or refrigerant issue can lead to personal injury or permanent damage to the system that might have otherwise been repairable.
There comes a point where the repairs just don't make sense anymore. If you find yourself on a first-name basis with your HVAC technician because they are at your house every few months, it’s time to look at a replacement.
• Efficiency (SEER) — Older Heat Pumps (10+ Years): 10 - 13 SEER — Modern Systems (2026 Models): 18 - 25+ SEER
• Refrigerant — Older Heat Pumps (10+ Years): R-22 (Phased out) — Modern Systems (2026 Models): R-32 or R-410A
• Compressor — Older Heat Pumps (10+ Years): Single-Stage (On/Off) — Modern Systems (2026 Models): Variable-Speed (Inverter)
• Humidity Control — Older Heat Pumps (10+ Years): Basic — Modern Systems (2026 Models): Advanced Dehumidification
• Smart Tech — Older Heat Pumps (10+ Years): Manual/Basic Programmable — Modern Systems (2026 Models): Full Smart Home Integration
If you are seeing uneven temperatures—where the living room is freezing but the bedroom is sweltering—your old system is likely struggling to distribute air properly. For our neighbors in Dartmouth, heat pump replacement dartmouth ns often becomes the best choice when the cost of keeping an old, inefficient unit running exceeds the monthly payment on a new, energy-saving model.
One mistake we often see homeowners make is trying to save money by replacing only the outdoor unit while keeping an ancient indoor air handler. This is called a "mismatched system," and it's a recipe for trouble. Modern outdoor units are designed to communicate perfectly with their indoor counterparts.
When you mix old and new tech, you lose out on the efficiency ratings you paid for. It can also lead to premature compressor failure because the two units aren't "speaking the same language." When we provide a heat pump replacements guide kentville ns, we always emphasize the importance of a matched system to ensure your warranty remains valid and your comfort remains consistent.
The technology inside a heat pump has leaped forward recently. The biggest game-changer is inverter technology (variable-speed compressors). Older units were either 100% on or 100% off. Imagine driving a car where you could only go 0 km/h or 100 km/h—it would be a jerky, inefficient ride.
Inverter systems work like a cruise control; they slow down or speed up to maintain the exact temperature you want. This uses significantly less energy and keeps the temperature in your home rock-steady. If you’re exploring a heat pump replacements truro ns guide, you’ll see that these modern units are also much quieter, meaning you won't have to turn up the TV every time the heat kicks on.
In our climate, 10 to 15 years is the standard expectation. Units located right on the coast (like in Prospect or Sambro) may lean toward the 10-year mark due to salt air, while units in more sheltered areas like Middle Sackville might last 15 years or more with excellent maintenance.
The compressor is generally the most expensive part of a heat pump. It is essentially the "heart" of the system. If your compressor fails and your unit is out of warranty and over 10 years old, we almost always recommend replacement over repair.
If your heat pump is part of a "hybrid" or "dual-fuel" system that uses a furnace as a backup, it’s a good idea to evaluate both. If the furnace is also over 15 years old, replacing them together can save you on labor and ensure the entire system is perfectly matched for efficiency. You can read more about this in our guide on whether to repair or replace your furnace.
At Presidential Ventilation Systems, we’ve spent over 30 years helping homeowners across Nova Scotia—from Halifax to Indigo Shores—navigate these tough decisions. We know that choosing between a repair and a replacement isn't just about the equipment; it's about your family's comfort and your long-term financial peace of mind.
Our goal is to help you evaluate the total cost of ownership. Sometimes that means a quick, expert repair to get you through the season. Other times, it means helping you select a new, high-efficiency system that will lower your bills and provide reliable comfort for the next decade.
If you’re feeling stressed about your heat pump’s performance, don't wait for it to fail completely. A professional assessment can give you the clarity you need to make the right choice for your home. Explore our full range of heat pump services and let us help you take the guesswork out of your home comfort.

The repair vs replace your heat pump decision guide you need comes down to five key factors: your system's age, its repair history, the cost of the current fix, how well it's keeping your home comfortable, and its energy efficiency.
Quick Answer: Should You Repair or Replace?
• System is under 10 years old, minor issue — Recommended Action: Repair
• System is 10-15 years old, isolated failure — Recommended Action: Evaluate using the $5,000 Rule
• System is 15+ years old, repeated breakdowns — Recommended Action: Replace
• Repair cost exceeds 50% of new system price — Recommended Action: Replace
• Rising energy bills despite normal usage — Recommended Action: Replace
• Single component failure, good maintenance history — Recommended Action: Repair
Your heat pump is one of the hardest-working systems in your home. In Nova Scotia, it runs through humid summers, icy winters, and everything in between. So when it starts acting up, the pressure to make the right call fast is real.
Here's the thing: the wrong decision costs you either way. Repair a dying system and you're pouring money into a unit that will fail again soon. Replace a fixable one and you've spent far more than you needed to.
Most homeowners make this decision based on one repair quote alone. That's rarely the full picture. Age, efficiency, repair patterns, and total cost of ownership all need to factor in before you commit.
This guide walks you through every piece of that decision clearly and without the guesswork.
When we talk about how long a heat pump should last, we usually look at a window of 10 to 15 years. However, with the high-quality systems we install today and a consistent maintenance schedule, some units can stretch toward the 20-year mark. The reality for us here in Nova Scotia—from Halifax to Mount Uniacke—is that our systems work double duty. They provide cooling during our humid July afternoons and steady heat during the snowy depths of February.
Because they run year-round, they accumulate "mileage" faster than a furnace that sits idle all summer or an air conditioner that sleeps all winter. If your unit is approaching its tenth birthday, it is officially entering its "senior years." This is the point where we recommend homeowners start paying closer attention to performance. Knowing exactly time to replace your heat pump can save you from an emergency breakdown on the coldest night of the year.
Your heat pump rarely fails without sending out a few SOS signals first. One of the most common signs we see is "short cycling." This is when the unit turns on, runs for a few minutes, and shuts off before the house actually reaches the desired temperature, only to turn back on again moments later. This constant starting and stopping puts immense strain on the compressor.
You might also notice strange noises coming from the outdoor cabinet. While a gentle hum is normal, grinding, screeching, or loud rattling usually points to mechanical failure or loose components. If you start hearing these sounds, identifying early signs heat pump failure is the first step in deciding if a simple part replacement will do the trick or if the internal damage is too extensive.
Living near the Atlantic coastline in places like Eastern Passage, Cole Harbour, or Dartmouth means our heat pumps face a unique challenge: salt air. Salt is naturally corrosive, and over time, it can eat away at the delicate aluminum fins on your outdoor coils. Once these coils degrade, the system can’t exchange heat efficiently, forcing it to work harder and drive up your utility bills.
Furthermore, our extreme temperature swings and high humidity levels mean your system is constantly managing moisture. In the winter, a heat pump must go through "defrost cycles" to melt ice off the outdoor coils. If the system is old and struggling, these cycles might fail, leading to a block of ice that can damage the fan or the compressor. When we look at heat pump replacement halifax ns, we always consider how these local environmental factors have accelerated the wear and tear on your specific unit.
When we arrive at a home in Bedford or Sackville to look at a malfunctioning unit, we don't just look at the broken part. We look at the "medical history" of the machine. A repair vs replace your heat pump decision guide must weigh the immediate problem against the long-term reliability of the system.
If the unit has been a "lemon" for the last three years, requiring a service call every six months, the writing is likely on the wall. On the other hand, if this is the very first time the system has skipped a beat in seven years, a repair is almost certainly the way to go. We often point homeowners toward our heat pump repair halifax ultimate guide to help them understand which components are worth fixing and which are signs of a total system collapse.
To take the emotion out of the decision, many experts use a mathematical formula often called the "$5,000 Rule." Here’s how it works: you take the age of your heat pump and multiply it by the estimated cost of the repair. If the total is more than $5,000, it’s generally time to invest that money into a new system instead.
For example, if you have a 12-year-old unit and the repair is going to be significant, that calculation quickly exceeds the threshold. Another common benchmark is the "50% Rule"—if a single repair costs more than half the price of a brand-new system, it’s rarely a wise investment. timely heat pump replacement is crucial because a new unit comes with a fresh warranty, whereas a repair on an old unit only guarantees that one specific part.
Efficiency standards have changed dramatically over the last decade. In 2026, the gap between an old "standard" unit and a new high-efficiency model is wider than ever. We measure this using SEER (Seasonal Energy Efficiency Ratio) for cooling and HSPF (Heating Seasonal Performance Factor) for heating.
Older units might have a SEER rating of 10 or 12, while modern high-efficiency units can reach 20 or higher. This isn't just a number—it translates directly to how much electricity is used to keep your home comfortable. If you’re noticing that your power bills are creeping up every year even though you haven't changed your habits, your heat pump is likely losing its "muscle." Reviewing a heat pump replacements halifax ns guide can help you visualize how much you could save by switching to a unit that sips electricity rather than gulping it.
Replacement isn't always the answer. In fact, for many homeowners in Timberlea or Tantallon, a well-timed repair is the most sensible financial move. If your system is less than 10 years old and the issue is an isolated component failure—like a bad capacitor, a blown fuse, or a clogged condensate drain—repairing is the clear winner.
These are what we call "minor issues." They don't indicate that the system is dying; they just mean it needs a little professional attention. Additionally, if your unit is still under its manufacturer's warranty, you should almost always opt for the repair, as the cost of parts will likely be covered. We see many common heat pump issues that are easily fixed in a single visit, extending the life of your investment by several years.
Before you call us out to your home in Fall River or Waverley, there are a few things you can check yourself. Sometimes the "broken" heat pump is actually just a victim of a simple oversight.
• Check the Thermostat: Is it set to the correct mode (Heat or Cool)? Did someone accidentally change the schedule? Is the battery low?
• Inspect the Air Filter: A clogged filter is the number one cause of heat pump failure. It restricts airflow, causes the system to overheat, and can even lead to ice buildup.
• Look at the Breaker Panel: Did a power surge trip the circuit breaker for the outdoor unit?
• Clear the Outdoor Unit: Ensure there are no leaves, snow, or debris blocking the airflow around the outdoor cabinet.
If these steps don't fix the problem, you might need to solve common heat pump issues by calling in a professional to look at the deeper mechanics.
While we love a proactive homeowner, safety must come first. Heat pumps involve high-voltage electricity and pressurized refrigerant. You should never attempt to open the electrical cabinet or tamper with the refrigerant lines yourself.
If you smell something burning, see smoke, or hear a loud "bang," turn the system off at the thermostat and the breaker immediately. These are signs heat pump needs immediate attention from a licensed technician. Trying to DIY a major electrical or refrigerant issue can lead to personal injury or permanent damage to the system that might have otherwise been repairable.
There comes a point where the repairs just don't make sense anymore. If you find yourself on a first-name basis with your HVAC technician because they are at your house every few months, it’s time to look at a replacement.
• Efficiency (SEER) — Older Heat Pumps (10+ Years): 10 - 13 SEER — Modern Systems (2026 Models): 18 - 25+ SEER
• Refrigerant — Older Heat Pumps (10+ Years): R-22 (Phased out) — Modern Systems (2026 Models): R-32 or R-410A
• Compressor — Older Heat Pumps (10+ Years): Single-Stage (On/Off) — Modern Systems (2026 Models): Variable-Speed (Inverter)
• Humidity Control — Older Heat Pumps (10+ Years): Basic — Modern Systems (2026 Models): Advanced Dehumidification
• Smart Tech — Older Heat Pumps (10+ Years): Manual/Basic Programmable — Modern Systems (2026 Models): Full Smart Home Integration
If you are seeing uneven temperatures—where the living room is freezing but the bedroom is sweltering—your old system is likely struggling to distribute air properly. For our neighbors in Dartmouth, heat pump replacement dartmouth ns often becomes the best choice when the cost of keeping an old, inefficient unit running exceeds the monthly payment on a new, energy-saving model.
One mistake we often see homeowners make is trying to save money by replacing only the outdoor unit while keeping an ancient indoor air handler. This is called a "mismatched system," and it's a recipe for trouble. Modern outdoor units are designed to communicate perfectly with their indoor counterparts.
When you mix old and new tech, you lose out on the efficiency ratings you paid for. It can also lead to premature compressor failure because the two units aren't "speaking the same language." When we provide a heat pump replacements guide kentville ns, we always emphasize the importance of a matched system to ensure your warranty remains valid and your comfort remains consistent.
The technology inside a heat pump has leaped forward recently. The biggest game-changer is inverter technology (variable-speed compressors). Older units were either 100% on or 100% off. Imagine driving a car where you could only go 0 km/h or 100 km/h—it would be a jerky, inefficient ride.
Inverter systems work like a cruise control; they slow down or speed up to maintain the exact temperature you want. This uses significantly less energy and keeps the temperature in your home rock-steady. If you’re exploring a heat pump replacements truro ns guide, you’ll see that these modern units are also much quieter, meaning you won't have to turn up the TV every time the heat kicks on.
In our climate, 10 to 15 years is the standard expectation. Units located right on the coast (like in Prospect or Sambro) may lean toward the 10-year mark due to salt air, while units in more sheltered areas like Middle Sackville might last 15 years or more with excellent maintenance.
The compressor is generally the most expensive part of a heat pump. It is essentially the "heart" of the system. If your compressor fails and your unit is out of warranty and over 10 years old, we almost always recommend replacement over repair.
If your heat pump is part of a "hybrid" or "dual-fuel" system that uses a furnace as a backup, it’s a good idea to evaluate both. If the furnace is also over 15 years old, replacing them together can save you on labor and ensure the entire system is perfectly matched for efficiency. You can read more about this in our guide on whether to repair or replace your furnace.
At Presidential Ventilation Systems, we’ve spent over 30 years helping homeowners across Nova Scotia—from Halifax to Indigo Shores—navigate these tough decisions. We know that choosing between a repair and a replacement isn't just about the equipment; it's about your family's comfort and your long-term financial peace of mind.
Our goal is to help you evaluate the total cost of ownership. Sometimes that means a quick, expert repair to get you through the season. Other times, it means helping you select a new, high-efficiency system that will lower your bills and provide reliable comfort for the next decade.
If you’re feeling stressed about your heat pump’s performance, don't wait for it to fail completely. A professional assessment can give you the clarity you need to make the right choice for your home. Explore our full range of heat pump services and let us help you take the guesswork out of your home comfort.
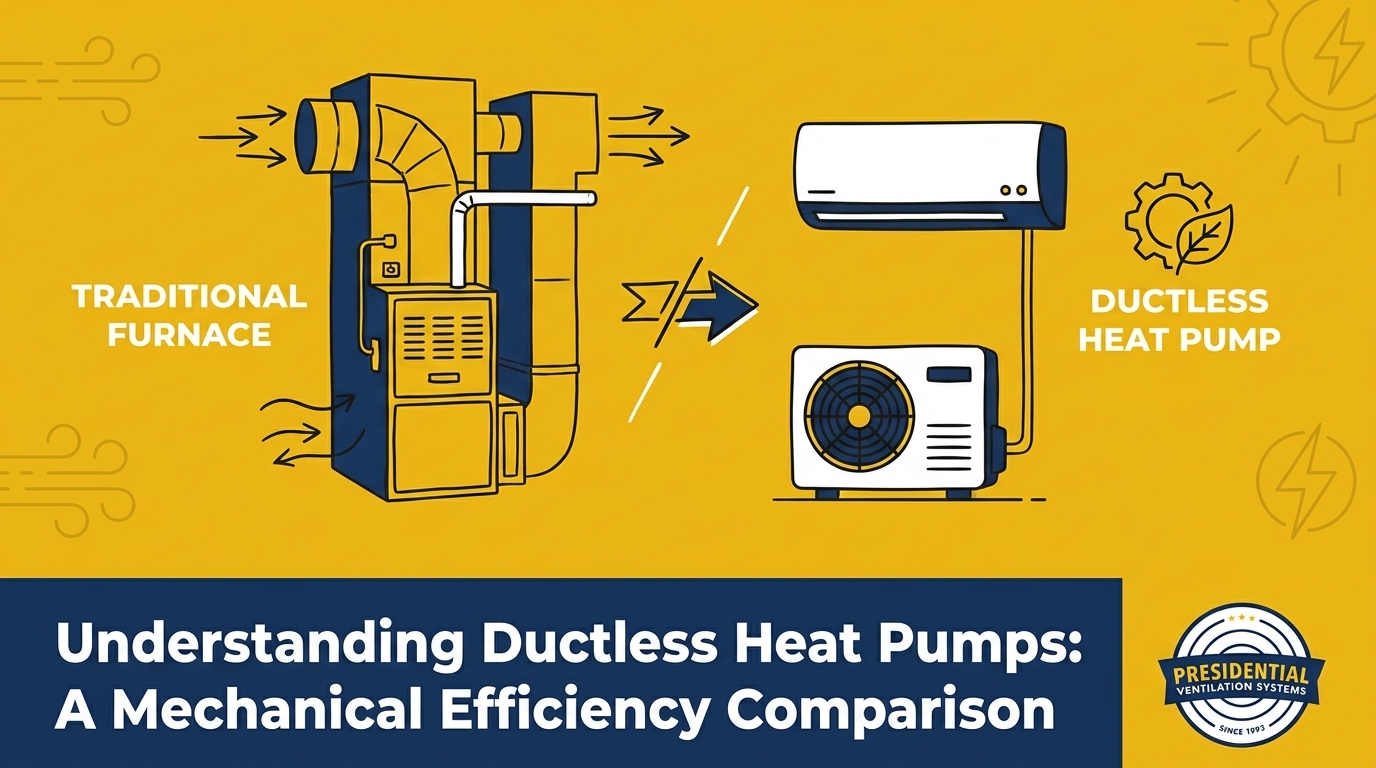
At Presidential Ventilation Systems Ltd., we often see that navigating the various heating system options comparisons for homeowners begins when an aging furnace starts to struggle against the Mount Uniacke cold. You are likely facing a critical mechanical decision: replace your failing equipment with another traditional combustion furnace, or transition to a modern heat transfer system. This choice goes far beyond simply picking a recognizable brand; it hinges on understanding the true mechanical efficiency and the objective operational limits of different heating technologies.
Deciding between a central heat pump and a traditional fossil-fuel setup requires evaluating how consistent winter heating is achieved in a maritime climate. Homeowners must look past generic marketing benefits to see exactly how these systems perform under continuous winter stress. Transitioning away from burning oil or gas changes the fundamental infrastructure of how a house stays warm. The decision point rests on whether the superior mechanical efficiency of heat transfer justifies the initial transition away from a familiar combustion system.
To make sense of these technologies, start by reviewing objective data on ductless heat pumps and how they operate differently from legacy systems. By comparing the underlying mechanics, you can accurately assess which technology aligns with your property's thermal envelope and your long-term comfort requirements.
The problem: Traditional heating systems are fundamentally limited by the laws of thermodynamics related to combustion. A furnace generates heat by burning a consumable fuel—such as oil, natural gas, or propane. Even in the most advanced combustion systems, the mechanical efficiency ceiling is capped because a portion of the thermal energy is always lost through the exhaust flue along with the combustion byproducts.
The cause: Because a furnace must create heat from scratch by consuming a resource, it can never produce more energy than the fuel contains. If a furnace operates at 95% efficiency, it means 95 percent of the fuel consumed becomes usable heat, while the remaining 5 percent escapes outdoors. There is no physical way for a combustion system to exceed 100% efficiency.
The solution: Heat pumps bypass this limitation entirely by utilizing a refrigeration cycle to transfer ambient thermal energy rather than burning fuel to create it. Even during a sub-zero maritime winter, there is still measurable heat energy in the outdoor air. A heat pump uses specialized refrigerant that absorbs this dispersed ambient heat, compresses it to raise its temperature, and transfers it inside the house. Because moving existing heat requires significantly less electrical input than generating new heat, the mechanical efficiency of Lennox ductless systems and similar equipment can easily exceed 100%, often operating at 200% to 300% efficiency under normal conditions.
To accurately compare heating systems, homeowners must understand the specific metrics used to grade different mechanical technologies. You cannot directly compare a heat pump to a furnace using the same number, as they operate on completely different principles. Understanding these ratings ensures that properties in Mount Uniacke and surrounding areas are equipped with systems capable of handling local weather demands.
AFUE (Annual Fuel Utilization Efficiency): This metric applies exclusively to combustion systems like furnaces and boilers. It measures the percentage of fuel that is successfully converted into usable heat over an entire year. A high-efficiency gas furnace might achieve an AFUE rating of 98%, meaning only 2% of the energy is lost as exhaust.
HSPF (Heating Seasonal Performance Factor): This rating applies to heat pumps operating in heating mode. It calculates the total space heating required during the season divided by the total electrical energy consumed by the system. A higher HSPF rating indicates a more efficient unit that requires less electricity to move the same amount of thermal energy.
For a deeper dive into specific equipment ratings and performance metrics, reviewing a comprehensive guide to the best ductless heat pumps provides valuable context on how these numbers translate to real-world operation.
• Standard Gas Furnace — Efficiency Metric: AFUE — Maximum Efficiency Ceiling: Up to 98% — Operational Mechanism: Combustion (Burns fuel to create heat)
• Oil Furnace — Efficiency Metric: AFUE — Maximum Efficiency Ceiling: 80% - 87% — Operational Mechanism: Combustion (Burns fuel to create heat)
• Standard Heat Pump — Efficiency Metric: HSPF — Maximum Efficiency Ceiling: Up to 250% — Operational Mechanism: Heat Transfer (Moves ambient heat)
• Cold-Climate Heat Pump — Efficiency Metric: HSPF — Maximum Efficiency Ceiling: Up to 300%+ — Operational Mechanism: Enhanced Heat Transfer (Inverter-driven)
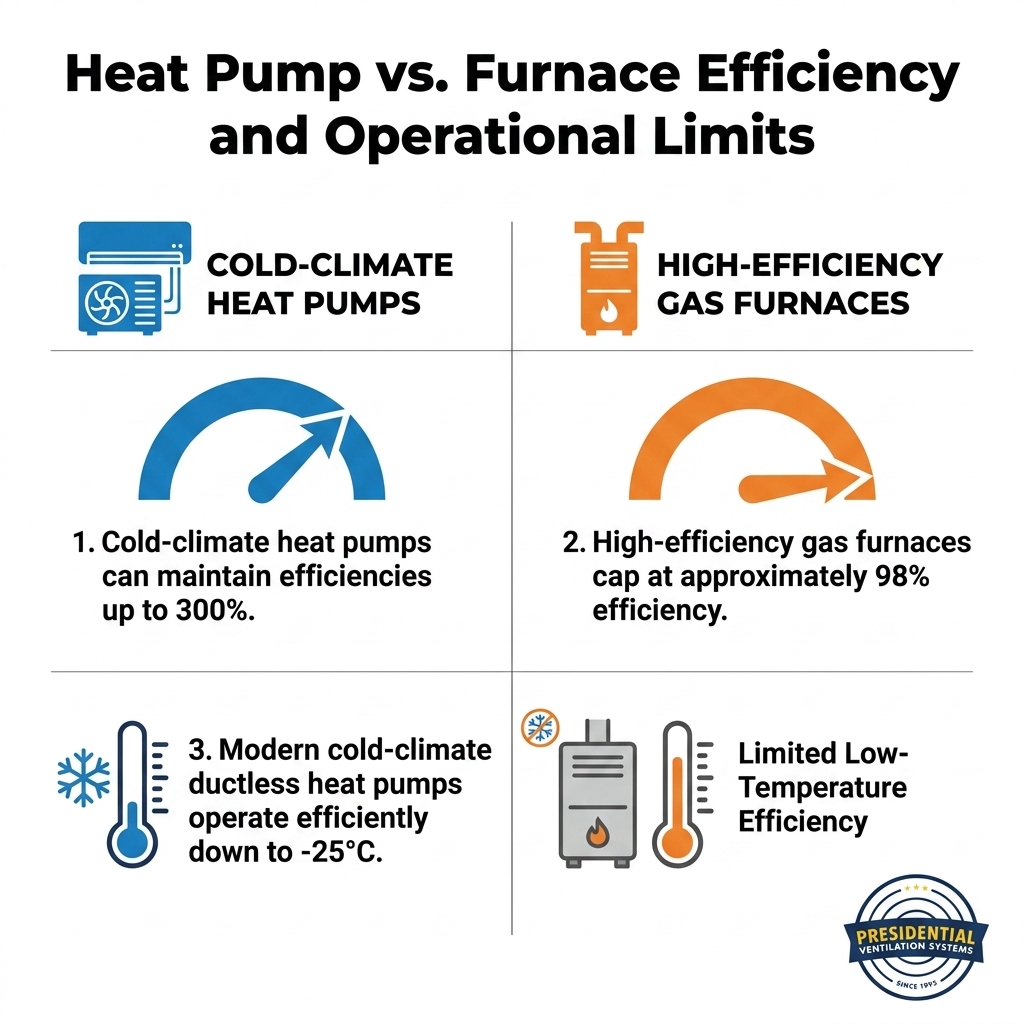
Temperature thresholds: The most critical factor in evaluating a heat pump is its objective operational limit during extreme weather. Standard heat pumps—often designed for milder southern climates—begin losing significant efficiency just below the freezing mark. As the temperature drops, there is less ambient thermal energy available, forcing the compressor to work harder to extract heat. Eventually, a standard unit reaches a balance point where it can no longer extract enough heat to keep the indoor space warm without relying on auxiliary electric resistance heating.
Cold-climate engineering: Modern cold-climate ductless heat pumps are engineered specifically to bypass these traditional limits. Utilizing advanced variable-speed inverter compressors and enhanced refrigerant management, these systems can operate efficiently in temperatures as low as -25 degrees Celsius. They physically accelerate the compressor speed to draw more thermal energy from the frigid air, maintaining indoor comfort through a sub-zero maritime winter.
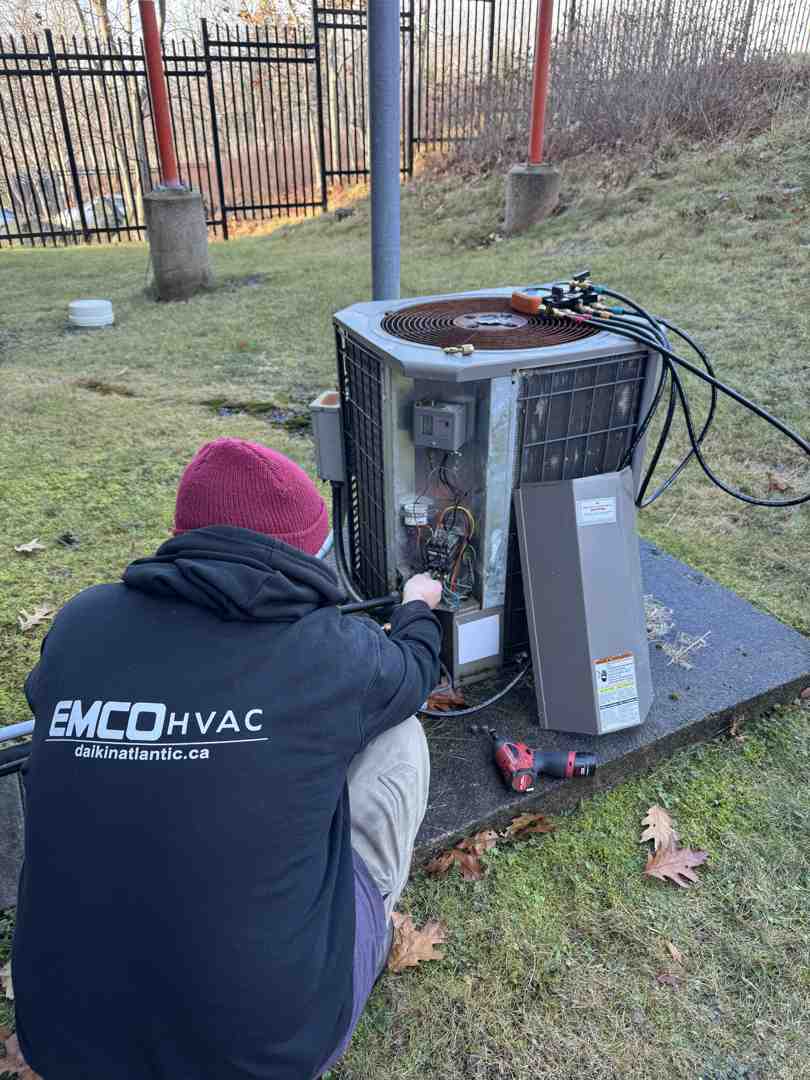
Understanding these mechanical limits helps determine if a hybrid dual-fuel system or a complete transition to heat transfer is the right choice. For example, our technicians at Presidential Ventilation Systems Ltd. recently assessed a Mount Uniacke homeowner's existing, non-company installed heat pump system to evaluate its cold-weather performance. Our team explained the objective pros and cons of the current equipment's mechanical limits and offered helpful alternatives and advice for running the system efficiently despite its specific temperature thresholds.
Transitioning away from a traditional oil burner to a central or ductless heat pump system fundamentally alters a property's electrical load. A furnace primarily uses electricity just to run the blower motor, while a heat pump relies on electricity to power the heavy-duty outdoor compressor. We frequently find that older homes may require electrical panel upgrades—often moving from a 100-amp service to a 200-amp service—to safely support the continuous electrical draw of modern heating systems. Evaluating the existing electrical infrastructure is a mandatory step before committing to a heat transfer upgrade.
Cold temperatures are only one variable in the mechanical performance equation; ambient moisture plays a massive and often overlooked role. In our years of installing systems across Nova Scotia, we've found that the dampness of maritime winters requires specialized defrost capabilities, focusing on the specific challenges of high humidity combined with freezing temperatures. When a heat pump operates in heating mode, the outdoor coil becomes extremely cold—often colder than the ambient air—which causes moisture in the humid air to condense and freeze on the metal fins.
To maintain efficiency, the system must periodically clear this frost accumulation through an automatic defrost cycle. Here is the step-by-step mechanical process of how a system manages high humidity during a sub-zero maritime winter:
1. Frost Accumulation: High ambient humidity in the cold maritime air contacts the freezing outdoor condenser coils, rapidly forming a layer of frost that insulates the fins and restricts airflow.
2. Sensor Activation: Internal thermistors and solid-state control boards detect the drop in airflow and the changing temperature differential across the coil, signaling that the unit is losing efficiency.
3. Reversing the Valve: The system temporarily reverses the flow of refrigerant, shifting from heating mode to cooling mode. This redirects the hot, compressed refrigerant gas back outdoors instead of inside the house.
4. Ice Melt and Drainage: The hot refrigerant rapidly melts the accumulated ice on the outdoor coil. The resulting water must freely drain away from the base pan to prevent solid ice blocks from forming inside the chassis.
5. Resuming Heating: Once the sensors detect the coil is clear of ice, the reversing valve shifts back, and the system resumes extracting heat from the outdoor air to warm the home.
During this brief defrost period, the indoor unit temporarily stops blowing warm air. Systems engineered for damp, cold climates complete this cycle rapidly to minimize any disruption to indoor comfort.
Even the most advanced mechanical equipment will fail to reach its advertised efficiency ratings if the installation parameters are incorrect. Equipment ratings are only accurate if the system is precisely sized and installed correctly for the specific thermal envelope of the home. Certified installation practices, such as maintaining Daikin Comfort Pro status, directly impact a system's ability to maintain efficiency during extreme weather by ensuring strict adherence to manufacturer specifications.
• Precise Load Calculations: Technicians must perform detailed calculations to match the equipment capacity to the home's exact square footage, insulation levels, and window quality. Oversized units will short-cycle, while undersized units will run constantly without satisfying the thermostat.
• Strategic Outdoor Placement: Proper placement of outdoor units is critical in Mount Uniacke and surrounding areas to prevent snow burial. Units must be elevated on stands or wall brackets to allow for adequate defrost drainage and unobstructed airflow during heavy snowfall.
• Refrigerant Line Sizing: The copper lines connecting the indoor and outdoor units must be sized correctly and purged with nitrogen to prevent moisture and non-condensables from degrading the compressor oil.
• Documentation and Compliance: Navigating warranties and available rebates requires meticulous documentation during the installation phase. A recent project of ours demonstrated this full lifecycle: after providing a comprehensive quote, our installation team followed up, completed the installation, submitted the manufacturer warranty, and clearly explained the rebate process to the homeowner.
Executing these technical prerequisites accurately is why professional heat pump installations are vital for long-term mechanical reliability.
The ongoing mechanical care required for heat transfer systems differs significantly from combustion systems. Traditional furnaces require annual checks primarily focused on combustion safety. Our service technicians must inspect heat exchangers for microscopic cracks that could leak carbon monoxide, ensure the exhaust flues are drafting correctly, and clean the burner assemblies to maintain a safe flame.
Ductless systems and central heat pumps do not have combustion hazards, but they move massive volumes of air and are highly sensitive to airflow restrictions. They require frequent filter cleaning by the homeowner and professional deep cleaning of the indoor blower wheels and evaporator coils. If the micro-channel coils become clogged with household dust or pet dander, the system loses its ability to transfer heat efficiently, forcing the outdoor compressor to operate at higher pressures.
During a sub-zero maritime winter, a neglected heat pump will struggle to extract heat, leading to increased electrical consumption and premature component wear. We consistently see that preventative care directly correlates to the longevity of the compressor and the system's overall lifespan. Enrolling in a structured preventative maintenance plan ensures that both the indoor air handlers and the outdoor condenser are professionally calibrated and cleaned before the harsh weather arrives.
Choosing between a traditional combustion furnace and a modern heat transfer system comes down to understanding your home's existing infrastructure and the specific demands of the local climate. Reviewing objective options comparisons for homeowners allows you to look past the marketing language and focus on factual mechanical limits, electrical requirements, and efficiency ratings.
By evaluating how different systems handle defrost cycles, deep freezes, and ongoing maintenance, you can confidently plan your next HVAC upgrade. A clear, technically sound understanding of these operational differences ensures that the equipment you choose will provide consistent, efficient warmth. Consulting with our certified professionals at Presidential Ventilation Systems Ltd. guarantees that your chosen system is sized, placed, and installed to meet your year-round comfort expectations.
At what temperature do heat pumps lose efficiency?
Standard heat pumps typically begin to lose efficiency as temperatures drop below freezing (0°C). However, modern cold-climate heat pumps are engineered with advanced compressors that maintain high efficiency and heat output in temperatures as low as -25°C. The exact drop-off point depends heavily on the specific make and model of the equipment.
How does a maritime climate affect heat pump performance?
A damp maritime climate accelerates frost buildup on the outdoor condenser coils due to high ambient humidity. This requires the heat pump to initiate automatic defrost cycles more frequently to melt the accumulated ice. Systems installed in these regions must be specifically designed to handle rapid defrosting without severely interrupting indoor heating.
Can a heat pump replace a furnace completely?
Yes, a properly sized cold-climate heat pump can completely replace a traditional furnace in most homes. The property must have an adequate electrical panel to support the system, and the unit must be rated for the lowest expected winter temperatures in your specific region. In some cases, homeowners opt for a hybrid system that uses both technologies.
Is it better to have a heat pump or a furnace in Canada?
The better option depends on the specific region, the home's insulation, and the local cost of electricity versus fossil fuels. Cold-climate heat pumps offer superior mechanical efficiency and operate without producing carbon monoxide, making them highly effective for many Canadian homes. Furnaces may still be preferred in extreme northern climates where temperatures consistently remain below -30°C for extended periods.
Why does my heat pump's outdoor unit ice up in the winter?
It is completely normal for a thin layer of white frost to accumulate on the outdoor unit during winter operation, as the freezing coils condense moisture from the air. The system is designed to automatically melt this frost using a built-in defrost cycle. If the unit becomes encased in a solid block of thick ice that does not melt, it indicates a mechanical issue that requires professional service.
What are the electrical requirements for switching to a heat pump?
Switching from a fossil-fuel furnace to a heat pump often requires a dedicated 220-volt circuit for the outdoor compressor. Many older homes with 100-amp electrical panels need to be upgraded to 200-amp service to safely handle the increased electrical load. A certified electrician or HVAC technician must evaluate your current panel before installation.
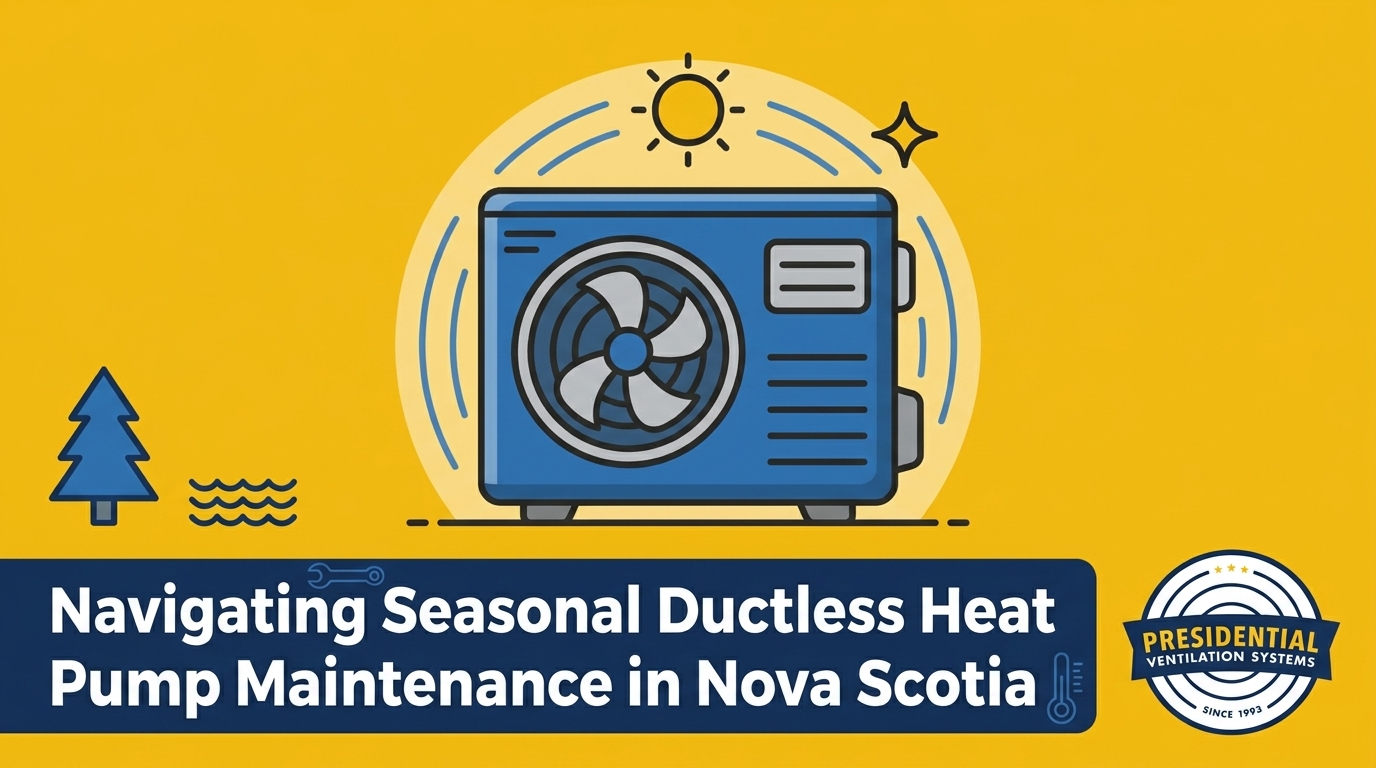
That sudden drop in temperature always seems to happen overnight, leaving you wondering if your heating equipment is truly ready for the cold. Building a reliable seasonal home maintenance checklist is the single best way to prepare your residential ventilation and HVAC systems for these abrupt weather shifts. At Presidential Ventilation Systems Ltd., our team has helped countless homeowners in Mount Uniacke NS realize that preparing for a seasonal transition is about preventing peak-season failures before they ever have a chance to disrupt your comfort. Abrupt temperature changes place immense mechanical stress on compressors, blower motors, and refrigerant lines that have been sitting idle or operating in a different mode for months.
Taking a systematic approach to system preparation is essential before peak heating or cooling seasons begin. However, the most critical decision you will make as a homeowner is determining which maintenance tasks are safe to tackle yourself and which require the specialized diagnostic tools of a certified technician. Crossing that boundary can lead to unintended damage or voided warranties.
Ready to upgrade your home's comfort? Learn more about how ductless heat pumps operate, or explore top-tier Lennox ductless systems for reliable, year-round performance.
The underlying problem: The environment in Nova Scotia is notoriously harsh on mechanical equipment. In our years of servicing residential ventilation systems, we've seen firsthand how damp, freezing winters, heavily humid summers, and pervasive coastal salt air create a perfect storm for accelerated wear and tear on outdoor HVAC components. During a seasonal transition, these environmental factors compound, exposing any underlying weaknesses in your system.
The hidden cause: Outdoor units face constant exposure to elements that actively degrade metal and restrict airflow. Airborne salts, heavy moisture, and rapid temperature fluctuations alter the physical state of the equipment, forcing the system to work harder to achieve the same level of indoor comfort.
The effective solution: Understanding exactly how the Maritime climate attacks your equipment allows you to target your seasonal inspections effectively, addressing minor corrosion or ice buildup before it causes a catastrophic mechanical failure.
In coastal environments, airborne salts settle directly onto the aluminum fins and copper coils of your outdoor heat pump. When combined with the high humidity of Maritime summers or the dampness of winter, this salt acts as a highly conductive electrolyte. This triggers a process known as galvanic corrosion, where the dissimilar metals in the coil begin to degrade rapidly. If left unchecked, this corrosion eats away at the delicate fins, severely reducing the unit's ability to transfer heat. Eventually, it can cause micro-leaks in the pressurized refrigerant lines. Routine, gentle rinsing of the outdoor casing and visual inspections for early signs of pitting or white powdery residue are necessary to combat this constant environmental threat, a preventative measure we strongly recommend to all our coastal clients.
The transition from freezing winters to thawing springs introduces severe mechanical stress. When snow or freezing rain accumulates on the outdoor unit, it eventually melts during warmer afternoon hours. As temperatures plummet overnight, that moisture rapidly refreezes. Because water expands by approximately 9% when it turns to ice, this rapid freeze-thaw cycle can physically crush delicate coil fins or encase the outdoor fan blades in solid ice. While heat pumps are equipped with an automated defrost cycle that temporarily reverses the flow of refrigerant to melt this ice, the sensors and reversing valves controlling this cycle are common failure points. If the defrost board fails, the unit will quickly become a block of ice, entirely choking off airflow and risking severe compressor damage.
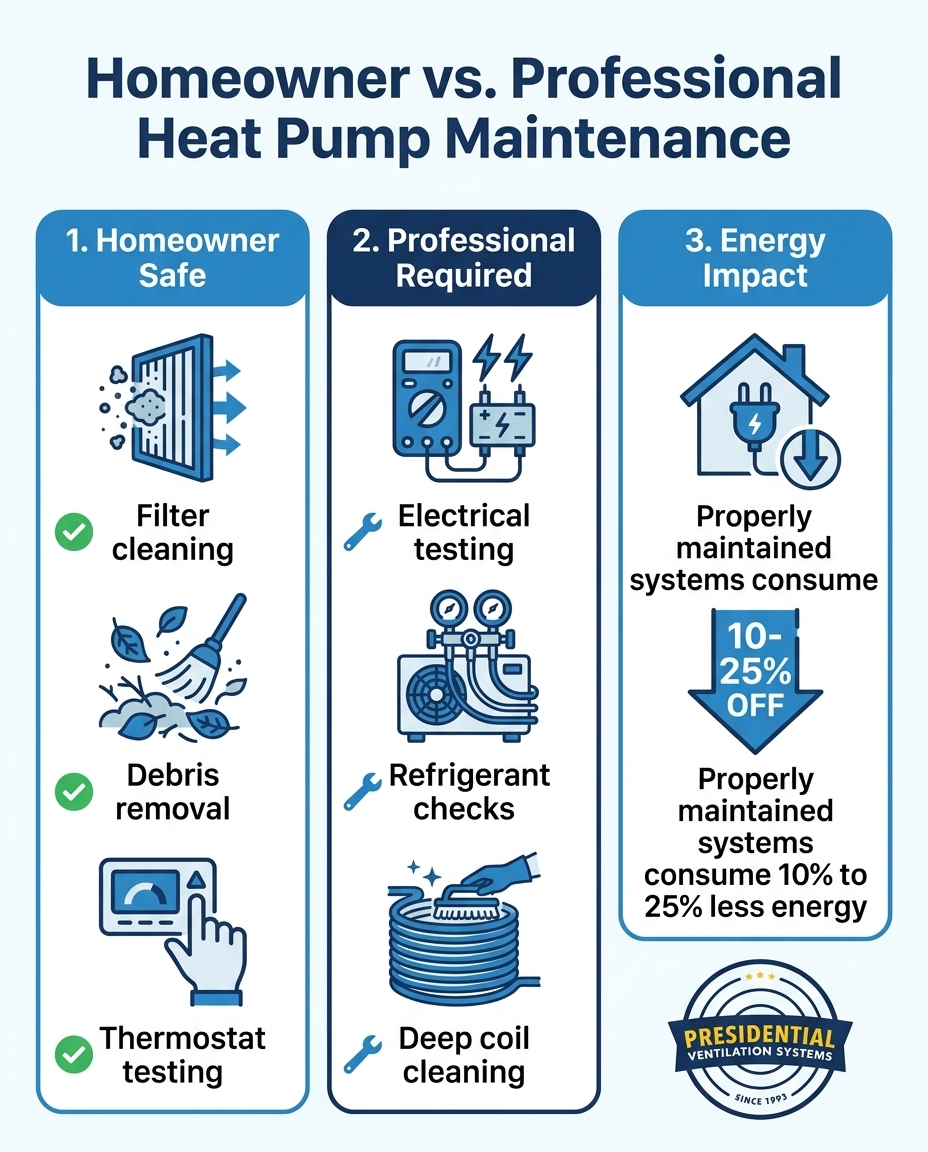
While technical diagnostics require a professional, there are highly effective steps you can take to protect your equipment. For residents in Mount Uniacke NS, adhering to a strict, homeowner-safe maintenance routine is the first line of defense against unexpected breakdowns. The goal is to facilitate optimal airflow and verify basic operation without ever opening the electrical cabinet or tapping into the pressurized refrigerant lines. If you are considering an upgrade, reviewing a best ductless heat pumps guide can also help you understand the specific maintenance requirements of modern systems.
The indoor air handlers of a ductless system rely on washable, reusable mesh filters to capture dust, pet dander, and airborne particles. When these filters clog, the system must run longer and harder to distribute air.
1. Turn off the power: Always use the remote control to power down the indoor head before lifting the front panel.
2. Remove the filters gently: Unlatch the mesh filters and slide them downward. Inspect them for heavy dust accumulation or signs of biological growth.
3. Wash with mild detergent: Rinse the filters under lukewarm water. For stubborn dust, use a very mild dish soap. Never use harsh chemicals or stiff brushes, which can tear the delicate mesh.
4. Dry completely: Shake off excess water and let the filters air dry completely in a shaded area. Reinstalling damp filters introduces moisture directly into the blower wheel, encouraging mold growth.
5. Reinstall and secure: Slide the dry filters back into their tracks and firmly snap the front panel closed.
The outdoor compressor requires unrestricted airflow to dissipate or absorb heat efficiently. Organic debris is the primary enemy of outdoor airflow.
1. Establish a clearance zone: Ensure there is a minimum of 24 inches of clear space on all sides of the outdoor unit. Trim back any encroaching bushes, tall grass, or overgrown branches.
2. Clear autumn leaves: Carefully remove wet leaves that have plastered themselves against the intake vents. Do not use sharp tools that could puncture the coil.
3. Manage snow drifts: During winter months, gently brush snow away from the top and sides of the unit. Ensure the unit is not buried under a snowbank, which will block the exhaust fan.
4. Check the base pan: Verify that the drainage holes at the bottom of the unit are clear of mud and debris so that condensation and defrost runoff can drain away freely.
5. Test the thermostat: Cycle the system through both its heating and cooling modes to verify that the outdoor unit responds promptly to the remote control's commands.
Skipping seasonal maintenance does more than just threaten the mechanical lifespan of your equipment; it directly impacts the air you breathe. As a system operates through a seasonal transition, it processes thousands of cubic feet of air daily. If the internal components are compromised by dirt or biological growth, the resulting drop in indoor air quality (IAQ) can be severe. This is true for both ductless units and comprehensive ducted heat pump systems, where hidden ductwork can amplify the spread of airborne contaminants.
The mechanism of failure: When indoor filters or outdoor coils become blanketed in dust and debris, the static pressure within the system rises dramatically. The blower motor must spin faster and consume more electricity to push the same volume of air through a restricted space. Because the system cannot exchange heat efficiently, the outdoor compressor is forced to run in longer, continuous cycles. This constant strain accelerates wear on the compressor's internal bearings and motor windings. Industry data consistently shows that neglected systems consume between 10% and 25% more energy simply because they are fighting against their own restricted airflow.
The biological threat: During the humid summer months, the indoor air handler acts as a powerful dehumidifier. As warm, moist air passes over the chilled evaporator coil, condensation forms and drips into a shallow drain pan. If the system is not properly cleaned before the season begins, dust mixes with this condensation to form a thick sludge. This sludge can easily clog the primary drain line, causing the pan to overflow. More concerning is that this dark, damp environment becomes an ideal breeding ground for mold and mildew. Every time the blower fan engages, microscopic spores are distributed throughout your living space, triggering allergies and degrading your home's overall air quality.
There is a hard line between basic upkeep and technical diagnostics. Modern HVAC equipment operates using high-voltage electricity and highly pressurized, environmentally regulated chemical refrigerants. Attempting to service these internal components without proper certification is not only dangerous, but it is also illegal in many jurisdictions. For homeowners in Mount Uniacke NS, securing a professional heat pump maintenance plan ensures that these critical internal checks are performed safely and accurately.
During a recent fall seasonal transition, our team was contacted by a homeowner regarding an existing heat pump system that was severely underperforming. A Presidential Ventilation Systems Ltd. technician arrived to perform a thorough diagnostic, providing helpful advice and explaining the pros, cons, and alternatives for running the system efficiently. This level of professional insight is precisely why technical diagnostics cannot be a DIY project.
What professionals check: The electrical components inside your outdoor unit endure extreme stress. Technicians use specialized multimeters to test the microfarad readings of dual-run capacitors, which provide the initial jolt of electricity needed to start the compressor and fan motors. A capacitor that has degraded by even 6% can cause the compressor to stall or overheat. Technicians also inspect contactors for pitted or burnt wiring, tightening all high-voltage connections to prevent electrical arcing, sudden breakdowns, and potential fire hazards.
Why accuracy matters: Heat pumps require an exact volume of refrigerant to operate efficiently. An undercharged system will struggle to heat your home and may cause the indoor coil to freeze solid. An overcharged system places immense pressure on the compressor valves, leading to catastrophic failure. Verifying the refrigerant charge requires specialized digital gauges and a deep understanding of subcooling and superheat calculations. Furthermore, handling refrigerants requires strict adherence to environmental regulations to prevent ozone-depleting atmospheric venting.
• Airflow Management — Specific Action: Washing indoor mesh filters — Required Skill Level: Homeowner Safe — Primary Benefit: Maintains basic airflow and IAQ
• Debris Removal — Specific Action: Clearing leaves from outdoor unit — Required Skill Level: Homeowner Safe — Primary Benefit: Prevents exterior airflow blockages
• Electrical Testing — Specific Action: Measuring capacitor microfarads — Required Skill Level: Certified Professional — Primary Benefit: Prevents sudden motor failure
• Chemical Cleaning — Specific Action: Deep cleaning evaporator coils — Required Skill Level: Certified Professional — Primary Benefit: Restores factory heat transfer rates
• Refrigerant Check — Specific Action: Verifying subcooling/superheat — Required Skill Level: Certified Professional — Primary Benefit: Ensures peak energy efficiency
The financial implications of seasonal maintenance extend far beyond your monthly utility bill. Modern heat pumps represent a significant investment, and manufacturers strictly enforce the terms of their equipment warranties. If a compressor fails and the manufacturer determines the root cause was a lack of documented, professional maintenance, they can—and often do—void the warranty entirely, leaving the homeowner responsible for the full cost of replacement parts and labor.
Furthermore, taking advantage of provincial incentives requires ongoing compliance. As a Daikin Comfort Pro dealer and your local Mount Uniacke experts, the team at Presidential Ventilation Systems Ltd. understands that qualifying for and retaining Efficiency Nova Scotia rebates hinges on the system operating at specific Seasonal Energy Efficiency Ratio (SEER) and Heating Seasonal Performance Factor (HSPF) ratings. A system that is neglected during a seasonal transition will rapidly lose its efficiency, dropping below the required performance thresholds. There is a vast difference between a heat pump that is merely "running" and one that is fully optimized for maximum energy savings. Documented professional tune-ups provide the verifiable proof required to protect both your warranty coverage and your rebate eligibility.
The underlying problem: We often see the consequences of skipped maintenance during the first major temperature drop or spike of the year. When a system is forced to transition from idle to maximum capacity without proper preparation, weakened components inevitably fail. This leaves the home without proper temperature control precisely when it is needed most.
The hidden cause: Early signs of component failure often go unnoticed by the untrained eye. A system that short-cycles (turns on and off rapidly) or produces poor thermal output is struggling mechanically. Often, these issues stem from unqualified repair attempts or a severe lack of preventative care. Last fall, our technicians at Presidential Ventilation Systems Ltd. responded to a homeowner in Mount Uniacke NS who experienced a sudden failure with their mini splits following an improper prior repair attempt. Our certified team was able to diagnose the problem within minutes, plan the correct repair, and confirm that the replacement parts were still under warranty. The issue was resolved promptly, restoring proper function before the cold truly set in.
The effective solution: When a failure occurs, a systematic diagnostic process is required. A certified technician will evaluate the electrical supply, measure the static pressure, and verify the refrigerant circuit to isolate the exact point of failure. If your current equipment is beyond repair, upgrading to highly reliable Lennox ductless systems can provide the durability required to withstand Maritime weather extremes.
Navigating the demands of a seasonal transition requires a proactive approach. Understanding exactly which components to check safely—like washing indoor filters and clearing outdoor debris—empowers you to protect your investment daily. However, recognizing the hard boundary where professional diagnostics must take over is equally important. Proper preparation ensures that your system remains healthy, highly efficient, and capable of delivering consistent comfort regardless of the weather outside.
By committing to a regular schedule of homeowner upkeep and partnering with certified technicians for annual deep cleans and electrical verifications, you secure the long-term longevity of your ventilation equipment. A clear, technically accurate approach to seasonal maintenance guarantees that your system operates safely, efficiently, and reliably for years to come.
What HVAC maintenance can I do myself?
You can safely handle basic airflow and exterior clearance tasks. This includes washing the reusable indoor air filters every few weeks, clearing leaves, snow, and debris from the perimeter of the outdoor unit, and ensuring the thermostat is communicating properly with the system. You should never attempt to open the electrical cabinet or handle the pressurized refrigerant lines.
How often should a ductless heat pump be serviced?
A ductless heat pump requires a comprehensive professional service at least once a year. However, in regions with extreme weather shifts, scheduling a professional inspection twice a year—once in the spring before cooling season and once in the fall before heating season—ensures optimal performance. Homeowner tasks, like filter cleaning, should be done monthly during peak usage.
Why is seasonal HVAC maintenance important?
Seasonal maintenance prepares the mechanical components for the abrupt shift in workload that comes with extreme weather. It prevents minor issues, like a slightly degraded capacitor or a dirty coil, from escalating into a complete system failure during the hottest or coldest days of the year. It also ensures the system operates at peak efficiency, minimizing your monthly energy costs.
How do you prepare a heat pump for winter in Nova Scotia?
Preparing for a Nova Scotia winter involves ensuring the outdoor unit is completely free of debris and elevated above expected snowfall levels. You must verify that the defrost cycle is functioning correctly to prevent the unit from turning into a block of ice during freeze-thaw cycles. Finally, a professional should test the electrical components to ensure they can handle the heavy load of continuous winter heating.
Does skipping professional maintenance void my heat pump warranty?
Yes, in almost all cases, manufacturers require proof of regular, professional maintenance to keep the equipment warranty valid. If a major component like the compressor fails and a technician determines it was caused by severe neglect—such as a completely blocked coil—the manufacturer can deny the warranty claim. Documented service visits protect you from unexpected out-of-pocket replacement costs.
How does coastal salt air affect outdoor heat pump units?
Coastal salt air accelerates galvanic corrosion on the exposed metal surfaces of the outdoor unit. Airborne salts settle on the aluminum fins and copper coils, and when combined with moisture, they rapidly degrade the metal, reducing heat transfer and potentially causing refrigerant leaks. Routine gentle rinsing and professional anti-corrosion treatments are vital for systems installed near the coast.